<!-- section: architecture-overview -->

import { NextLink, Callout } from '../views/docs/prose';

## Architecture Overview

Every Guava call involves two systems running simultaneously: Guava's hosted **Dialog System** and your **Expert** — a small, long-running service that connects to Guava's API and steers the conversation.

<svg viewBox="0 0 760 285" xmlns="http://www.w3.org/2000/svg" className="w-full my-8">
  <defs>
    <marker id="ahd" markerWidth="8" markerHeight="7" refX="7" refY="3.5" orient="auto">
      <polygon points="0 0, 8 3.5, 0 7" fill="rgba(255,255,255,0.25)"/>
    </marker>
  </defs>

  
  <rect x="144" y="47" width="256" height="130" rx="14" fill="#1e1f21" stroke="rgba(255,255,255,0.08)" strokeWidth="1.5"/>
  <text x="272" y="65" textAnchor="middle" fill="#555558" fontSize="9" fontFamily="ui-monospace, monospace" letterSpacing="2">GUAVA CLOUD</text>

  
  <rect x="160" y="72" width="224" height="82" rx="8" fill="#272728" stroke="rgba(26,147,254,0.3)" strokeWidth="1.5"/>
  <text x="272" y="110" textAnchor="middle" fill="#1a93fe" fontSize="14" fontFamily="ui-monospace, monospace" fontWeight="700">Dialog System</text>
  <text x="272" y="132" textAnchor="middle" fill="#555558" fontSize="10" fontFamily="ui-monospace, monospace">audio · STT · LLM · TTS</text>

  
  <circle cx="65" cy="115" r="32" fill="#272728" stroke="rgba(255,255,255,0.1)" strokeWidth="1.5"/>
  
  <path d="M 51,113 C 51,103 58,97 65,97 C 72,97 79,103 79,113" fill="none" stroke="#dadada" strokeWidth="1.8" strokeLinecap="round"/>
  <rect x="47" y="113" width="8" height="12" rx="4" fill="#272728" stroke="#dadada" strokeWidth="1.5"/>
  <rect x="75" y="113" width="8" height="12" rx="4" fill="#272728" stroke="#dadada" strokeWidth="1.5"/>
  <text x="65" y="168" textAnchor="middle" fill="#acacac" fontSize="11" fontFamily="ui-monospace, monospace">Caller</text>

  
  <line x1="104" y1="115" x2="137" y2="115" stroke="#acacac" strokeWidth="1.5"/>
  <polygon points="97,115 104,112 104,118" fill="#acacac"/>
  <polygon points="144,115 137,112 137,118" fill="#acacac"/>
  <text x="120" y="108" textAnchor="middle" fill="#555558" fontSize="9" fontFamily="ui-monospace, monospace">audio</text>

  
  <line x1="407" y1="115" x2="458" y2="115" stroke="#acacac" strokeWidth="1.5"/>
  <polygon points="400,115 407,112 407,118" fill="#acacac"/>
  <polygon points="465,115 458,112 458,118" fill="#acacac"/>
  <text x="432" y="108" textAnchor="middle" fill="#555558" fontSize="9" fontFamily="ui-monospace, monospace">WebSocket</text>

  
  <rect x="465" y="72" width="186" height="82" rx="8" fill="#272728" stroke="rgba(255,255,255,0.12)" strokeWidth="1.5"/>
  <text x="558" y="108" textAnchor="middle" fill="#dadada" fontSize="13" fontFamily="ui-monospace, monospace" fontWeight="700">Your Expert</text>
  <text x="558" y="130" textAnchor="middle" fill="#555558" fontSize="10" fontFamily="ui-monospace, monospace">Python · TypeScript · ...</text>

  
  <line x1="558" y1="154" x2="465" y2="207" stroke="rgba(255,255,255,0.2)" strokeWidth="1.2" strokeDasharray="5 3" markerEnd="url(#ahd)"/>
  <line x1="558" y1="154" x2="650" y2="207" stroke="rgba(255,255,255,0.2)" strokeWidth="1.2" strokeDasharray="5 3" markerEnd="url(#ahd)"/>

  
  <rect x="385" y="210" width="160" height="56" rx="8" fill="#1e1f21" stroke="rgba(255,255,255,0.1)" strokeWidth="1"/>
  <text x="465" y="234" textAnchor="middle" fill="#dadada" fontSize="11" fontFamily="ui-monospace, monospace" fontWeight="600">Your Infrastructure</text>
  <text x="465" y="252" textAnchor="middle" fill="#555558" fontSize="9.5" fontFamily="ui-monospace, monospace">local or self-hosted</text>

  
  <text x="559" y="242" textAnchor="middle" fill="#555558" fontSize="9" fontFamily="ui-monospace, monospace">or</text>

  
  <rect x="573" y="210" width="152" height="56" rx="8" fill="#1e1f21" stroke="rgba(26,147,254,0.35)" strokeWidth="1.5"/>
  <text x="649" y="234" textAnchor="middle" fill="#dadada" fontSize="11" fontFamily="ui-monospace, monospace" fontWeight="600">Guava Hosting</text>
  <text x="649" y="252" textAnchor="middle" fill="#555558" fontSize="9.5" fontFamily="ui-monospace, monospace">managed by Guava</text>
</svg>

### The Dialog System

The Dialog System is Guava's managed service running in the cloud. It handles everything time-sensitive during a call: receiving the caller's audio, running speech-to-text, querying the language model, synthesizing the response, and streaming it back to the caller.

Because the entire pipeline runs as a fully integrated architecture rather than a chain of off-the-shelf APIs, the Dialog System delivers best-in-class latency and naturalness. Callers hear a response that feels like a real conversation, not a chatbot reading from a script.

### Your Expert

Your Expert is the code you write. Using the [Guava SDK](/docs/agent) (Python or TypeScript), it connects to the Dialog System over a persistent WebSocket and steers the agent in real time — setting its persona, sending mid-call instructions, responding to events like [`on_question`](/docs/on-question) or [`on_action`](/docs/on-action-request-execute), and issuing commands like [`transfer`](/docs/transfer) or [`hangup`](/docs/hangup).

Because your Expert is just code, you can do anything: call your CRM, query a database, hit an external API, or chain into another specialized AI sub-agent. For the most common patterns — intent detection, document Q&A, vector search — Guava ships a [helper library](/docs/intent-helpers) so you can get up and running fast without reinventing the wheel.

<Callout>
  Your Expert is not in the latency-critical path. The Dialog System handles all real-time audio processing independently — your Expert can spend time on complex reasoning, external API calls, or chaining multiple AI models without the caller ever noticing a pause.
</Callout>

During development, your Expert runs on your local machine, and Guava routes calls to it directly. You can rapidly iterate by changing the code and restarting the process — no public web server or ngrok required.

### Deployment

When it's time to move to production, you'll want your Expert deployed in a highly-available configuration, running continuously and ready to handle calls at any time. Because Guava Experts only make outbound connections, it's easy to run an Expert behind a NAT or firewall.

We recommend running multiple instances of the same Expert. Guava round-robins new calls across connected Experts, giving you horizontal scaling and redundancy by default. If an Expert instance dies mid-call, Guava will attempt to hand the call off to another active instance — which means you should keep in-memory state to a minimum and design your Expert to be stateless where possible.

You have two options for deploying your Expert:

- **Your Infrastructure** — deploy to your own servers, VM, or serverless compute platform. You control the environment.
- **Guava Hosting** — push your Expert with a single [`guava deploy`](/docs/cli-reference) command and Guava manages the rest.

See the [Deployment guide](/docs/deployment) for a full walkthrough of both options.

### What to read next

The [Quickstart](/docs/quickstart) walks you through a complete working example in minutes. Once you're comfortable with the basics, the [SDK Reference](/docs/runner) covers every callback and call command in detail. If you want to see a real-world use case before diving into reference docs, the [example walkthroughs](/docs/inbound-rag-example) show full Expert implementations for common scenarios.

<NextLink section="quickstart" label="Quickstart" />


---

<!-- section: quickstart -->

import { CodeBlock } from '../views/docs/CodeBlock';
import { NextLink, Callout } from '../views/docs/prose';

## Quickstart

<Callout>
The recommended way to build Guava voice agents is using the Guava CLI, which bootstraps projects and installs the SDK.
If you’d rather not install the CLI, you can skip to the [direct SDK installation guide](./sdk-installation) instead.
</Callout>

### Create an account

Sign up at [app.goguava.ai](https://app.goguava.ai).

### Install the CLI

Pick an install method below.

<CodeBlock code={`# (macOS / Linux) Use the install script. Installs to \`~/.local/bin/guava\` 
curl -fsSL https://storage.googleapis.com/gridspace-guava-cli/cli/install.sh | sh

# (macOS) Install using Homebrew
brew tap goguava-ai/tap
brew install goguava-ai/tap/guava`} language="bash" />

### Authenticate the CLI

<CodeBlock code="guava login" language="bash" />

### Create an Agent

Scaffold a new agent project with starter code (currently Python only).

<CodeBlock code="guava create my-agent" language="bash" />

### Add vibe-coding kit (optional)

Clone the Guava starter repository into your new agent project. It contains plain-text API docs and examples sized for AI coding assistants.

<CodeBlock code={`git clone https://github.com/goguava-ai/guava-starter.git my-agent/guava-starter`} language="bash" />

### Deploy your Agent

<CodeBlock code="guava deploy up ./my-agent" language="bash" />

Track status in [Deployments](https://app.goguava.ai/dashboard/deployments). Every call appears in [Conversations](https://app.goguava.ai/dashboard/conversations).

<NextLink section="inbound-rag-example" label="Inbound Example w/ RAG" />

---

<!-- section: sdk-installation -->

import { CodeBlock } from '../views/docs/CodeBlock';
import { LanguageTabs } from '../views/docs/CodeTabs';
import { Callout, NextLink, Prose } from '../views/docs/prose';

## Quickstart (SDK-Only)

<Callout>
The recommended way to build Guava voice agents is using the [Guava CLI](./quickstart), which bootstraps projects and installs the SDK.
This guide explains how to install the SDK directly if you’d prefer not to use the CLI.
</Callout>

### Create an account

Sign up for an account at [app.goguava.ai](https://app.goguava.ai).

### Install the SDK

Guava provides SDKs for Python and TypeScript. Choose your language and package manager.

<LanguageTabs
  pythonContent={<>
    <CodeBlock code={
`uv add guava-sdk      # Install using uv (Recommended)
pip install guava-sdk # Install using pip
poetry add guava-sdk  # Install using poetry`} language="bash" />
  </>}
  typescriptContent={<>
    <CodeBlock code={
`npm install @guava-ai/guava-sdk # Install using npm
yarn add @guava-ai/guava-sdk    # Install using yarn
pnpm add @guava-ai/guava-sdk    # Install using pnpm`} language="bash" />
  </>}
/>

### Set Environment Variables

The SDK reads credentials from the environment automatically. Set these before running any Guava scripts.

<CodeBlock code={`export GUAVA_API_KEY="gva-..." # Set to your API key.
export GUAVA_AGENT_NUMBER="+15551234567" # Used by SDK examples. Set to your purchased number.`} filename=".env" language="bash" />

Create an API key using the [API Keys](https://app.goguava.ai/dashboard/api-keys) page. Purchase a phone number using the [Phone Numbers](https://app.goguava.ai/dashboard/phone-numbers) page.


### Add the coding agent starter kit

Download the Guava coding agent starter kit into your project. It contains plain-text API docs sized for AI coding assistants.

<CodeBlock code={`curl -o guava-docs.md https://goguava.ai/docs/coding-agent-starter.md`} language="bash" />

### Run an Example

<LanguageTabs
  pythonContent={<>
    <Prose>Examples can be run directly from the Python SDK. You can browse the examples <a href="https://github.com/goguava-ai/python-sdk/tree/main/guava/examples">on GitHub</a>.</Prose>
    <CodeBlock code={
`# Outbound call example. Use your own phone number and name to receive a call.
python -m guava.examples.scheduling_outbound +1... "John Doe"

# Inbound example. Dial your agent's number while the script is running.
python -m guava.examples.restaurant_waitlist`} language="bash" />
  </>}
  typescriptContent={<>
    <Prose>Examples can be run directly from the TypeScript SDK. You can browse the examples <a href="https://github.com/goguava-ai/typescript-sdk/tree/main/examples">on GitHub</a></Prose>
    <CodeBlock code={
`# Outbound call example. Use your own phone number and name to receive a call.
npx @guava-ai/guava-sdk scheduling-outbound +15556667777

# Inbound example. Dial your agent's number while the script is running.
npx @guava-ai/guava-sdk restaurant-waitlist`} language="bash" />
  </>}
/>

<NextLink section="inbound-rag-example" label="Inbound Example w/ RAG" />

---

<!-- section: inbound-rag-example -->

import { CodeTabs } from '../views/docs/CodeTabs';
import { Callout, Prose, NextLink } from '../views/docs/prose';

## Inbound Example w/ RAG

In this example, we'll build an inbound voice agent for a fictional property insurance company.
Callers can ask any question about their policy and receive accurate answers sourced from a policy document.

### Define the Agent

`guava.Agent` is our starting point for building Guava agents. We'll start by creating one with some basic background details.

export const AGENT_PY = `import guava

agent = guava.Agent(
    organization="Harper Valley Property Insurance",
    purpose="Answer questions regarding property insurance policy until there are no more questions",
)`;

export const AGENT_TS = `import * as guava from "@guava-ai/guava-sdk";

const agent = new guava.Agent({
  organization: "Harper Valley Property Insurance",
  purpose: "Answer questions regarding property insurance policy until there are no more questions",
});`;

<CodeTabs
  python={{ code: AGENT_PY, filename: "property_insurance.py" }}
  typescript={{ code: AGENT_TS, filename: "property-insurance.ts" }}
/>

<Callout>
Guava discourages long system prompts that try to cover every scenario. The `purpose` is intentionally short and designed to orient the agent.
</Callout>

### Set up DocumentQA

Next, we initialize a `DocumentQA` instance with the policy document. `DocumentQA` is a built-in RAG that covers a lot of simple use cases. It's a fully pluggable component
and we expect many users will bring their own RAG system.

export const QA_PY = `from guava.helpers.rag import DocumentQA
from guava.examples.example_data import PROPERTY_INSURANCE_POLICY

document_qa = DocumentQA(documents=PROPERTY_INSURANCE_POLICY)`;

export const QA_TS = `import { DocumentQA } from "@guava-ai/guava-sdk/helpers/openai";
import { PROPERTY_INSURANCE_POLICY } from "@guava-ai/guava-sdk/example-data";

const documentQA = new DocumentQA("harper-valley-property-insurance", PROPERTY_INSURANCE_POLICY);`;

<CodeTabs
  python={{ code: QA_PY, filename: "property_insurance.py" }}
  typescript={{ code: QA_TS, filename: "property-insurance.ts" }}
/>


### Handle questions with on_question

Whenever the caller asks something the agent cannot answer from context alone, Guava invokes the `on_question` callback with the question in natural language. We forward it to `DocumentQA` and return the answer.

export const ON_QUESTION_PY = `@agent.on_question
def on_question(call: guava.Call, question: str) -> str:
    return document_qa.ask(question)`;

export const ON_QUESTION_TS = `agent.onQuestion(async (call: guava.Call, question: string) => {
  return await documentQA.ask(question);
});`;

<CodeTabs
  python={{ code: ON_QUESTION_PY, filename: "property_insurance.py" }}
  typescript={{ code: ON_QUESTION_TS, filename: "property-insurance.ts" }}
/>

The agent remains fully responsive during the lookup — it continues listening and engaging with the caller while waiting for your response. You are not latency-constrained in your `on_question` implementation.

<Callout>
  <span className="text-primary font-semibold">Bring your own RAG.</span> The <code>on_question</code> callback receives a plain string and expects a plain string back — you can plug in any knowledge base, vector store, or model you prefer.
</Callout>

### Start the agent

Finally, we attach the agent to a channel so that we can actually talk to it.

export const RUN_PY = `# Run this to attach your agent to a phone number. Call your agent's number to talk to it.
agent.listen_phone(os.environ["GUAVA_AGENT_NUMBER"])

# Run this to receive a WebRTC link where you can talk to your agent in the browser.
agent.listen_webrtc()

# Run this to talk to your agent using your local audio device.
agent.call_local()`;

export const RUN_TS = `// Run this to attach your agent to a phone number. Call your agent's number to talk to it.
agent.listenPhone(process.env.GUAVA_AGENT_NUMBER!);`;

<CodeTabs
  python={{ code: RUN_PY, filename: "property_insurance.py" }}
  typescript={{ code: RUN_TS, filename: "property-insurance.ts" }}
/>

<Callout>
  <span className="text-primary font-semibold">No web servers required.</span> Guava does not require a public web server to receive inbound calls. All Guava agents can be hosted behind firewalls and NATs.
</Callout>

### Complete example

export const FULL_PY = `import logging
import os
import guava
import argparse

from guava.helpers.rag import DocumentQA
from guava import logging_utils, Agent
from guava.examples.example_data import PROPERTY_INSURANCE_POLICY

logger = logging.getLogger("guava.examples.property_insurance")

agent = Agent(
    organization="Harper Valley Property Insurance",
    purpose="Answer questions regarding property insurance policy until there are no more questions",
)

# This is a built-in knowledge base helper that we will use for this example.
# You can use any RAG system you prefer.
document_qa = DocumentQA(documents=PROPERTY_INSURANCE_POLICY)


# When the Agent is asked a question that it cannot answer, it will invoke the on_question callback.
@agent.on_question
def on_question(call: guava.Call, question: str) -> str:
    # Forward the Agent's question to the knowledge base and return the answer.
    # You can plug in any knowledge base system you want here.
    answer = document_qa.ask(question)
    logger.info("RAG answer: %s", answer)
    return answer


if __name__ == "__main__":
    logging_utils.configure_logging()

    # Every Agent can be attached to multiple resources.
    parser = argparse.ArgumentParser()
    group = parser.add_mutually_exclusive_group(required=True)
    group.add_argument("--phone", action="store_true", help="Listen for phone calls.")
    group.add_argument("--webrtc", action="store_true", help="Create on a WebRTC code.")
    group.add_argument("--local", action="store_true", help="Start a local call.")
    args = parser.parse_args()

    # We can attach our agent to receive inbound phone or WebRTC calls.
    if args.phone:
        agent.listen_phone(os.environ["GUAVA_AGENT_NUMBER"])
    elif args.webrtc:
        agent.listen_webrtc()
    else:
        agent.call_local()`;

export const FULL_TS = `import * as guava from "@guava-ai/guava-sdk";
import { DocumentQA } from "@guava-ai/guava-sdk/helpers/openai";
import { PROPERTY_INSURANCE_POLICY } from "@guava-ai/guava-sdk/example-data";

const agent = new guava.Agent({
  organization: "Harper Valley Property Insurance",
  purpose: "Answer questions regarding property insurance policy until there are no more questions",
});

// This is a built-in knowledge base helper that we will use for this example.
// You can use any RAG system you prefer.
const documentQA = new DocumentQA("harper-valley-property-insurance", PROPERTY_INSURANCE_POLICY);

// When the Agent is asked a question that it cannot answer, it will invoke the on_question callback.
agent.onQuestion(async (call: guava.Call, question: string) => {
  // Forward the Agent's question to the knowledge base and return the answer.
  // You can plug in any knowledge base system you want here.
  return await documentQA.ask(question);
});

agent.listenPhone(process.env.GUAVA_AGENT_NUMBER!);`;

<CodeTabs
  python={{ code: FULL_PY, filename: "property_insurance.py" }}
  typescript={{ code: FULL_TS, filename: "property-insurance.ts" }}
/>


---

<!-- section: inbound-form-filling -->

import { CodeTabs } from '../views/docs/CodeTabs';
import { Callout, Prose, NextLink } from '../views/docs/prose';

## Inbound w/ Form Filling

In this example, we'll build an inbound voice agent for a fictional restaurant. Callers can join the waitlist by providing their name, party size, and a callback number — which the agent collects conversationally using a structured task.

### Define the Agent

`guava.Agent` is our starting point for building Guava agents. We'll create one with a name and purpose scoped to the restaurant.

export const AGENT_PY = `import guava

agent = guava.Agent(
    name="Mia",
    organization="Thai Palace",
    purpose="Helping callers join the restaurant waitlist",
)`;

export const AGENT_TS = `import * as guava from "@guava-ai/guava-sdk";

const agent = new guava.Agent({
  name: "Mia",
  organization: "Thai Palace",
  purpose: "Helping callers join the restaurant waitlist",
});`;

<CodeTabs
  python={{ code: AGENT_PY, filename: "restaurant_waitlist.py" }}
  typescript={{ code: AGENT_TS, filename: "restaurant-waitlist.ts" }}
/>

### Accept or reject the call

`on_call_received` fires before the call starts and gives you a chance to accept or reject based on caller info. Here we accept all calls.

export const ACCEPT_PY = `@agent.on_call_received
def on_call_received(call_info: guava.CallInfo) -> guava.IncomingCallAction:
    return guava.AcceptCall()`;

export const ACCEPT_TS = `agent.onCallReceived(async (_callInfo: guava.CallInfo) => {
  return { action: "accept" };
});`;

<CodeTabs
  python={{ code: ACCEPT_PY, filename: "restaurant_waitlist.py" }}
  typescript={{ code: ACCEPT_TS, filename: "restaurant-waitlist.ts" }}
/>

<Callout>
  If you don't register <code>on_call_received</code>, Guava accepts all calls by default. Implement it only when you need to screen callers or look up information based off the incoming phone number.
</Callout>

### Set up the form

`on_call_start` fires at the beginning of every accepted call. We use `set_task` to hand the agent a structured checklist of fields to collect. The agent gathers each piece of information conversationally — it knows when all fields are filled and automatically moves on.

export const TASK_PY = `@agent.on_call_start
def on_call_start(call: guava.Call) -> None:
    call.set_task(
        "waitlist",
        objective="You are a virtual assistant for Thai Palace. Add callers to the waitlist.",
        checklist=[
            guava.Field(key="caller_name", field_type="text", description="Name for the waitlist"),
            guava.Field(key="party_size", field_type="integer", description="Number of people"),
            guava.Field(
                key="phone_number",
                field_type="text",
                description="Phone number to text when the table is ready",
            ),
            "Read the phone number back to the caller to confirm.",
        ],
    )`;

export const TASK_TS = `agent.onCallStart(async (call: guava.Call) => {
  await call.setTask({
    taskId: "waitlist",
    objective: "You are a virtual assistant for Thai Palace. Add callers to the waitlist.",
    checklist: [
      guava.Field({ key: "caller_name", fieldType: "text", description: "Name for the waitlist" }),
      guava.Field({ key: "party_size", fieldType: "integer", description: "Number of people" }),
      guava.Field({
        key: "phone_number",
        fieldType: "text",
        description: "Phone number to text when the table is ready",
      }),
      "Read the phone number back to the caller to confirm.",
    ],
  });
});`;

<CodeTabs
  python={{ code: TASK_PY, filename: "restaurant_waitlist.py" }}
  typescript={{ code: TASK_TS, filename: "restaurant-waitlist.ts" }}
/>

<Callout>
  The checklist can mix <code>Field</code> objects (typed, named values the agent extracts) with plain strings (freeform instructions the agent follows). Fields are retrievable later via <code>get_field()</code>.
</Callout>

### Handle task completion

`on_task_complete` fires once every field in the checklist is collected. This is the right place to save the data to your backend, trigger a notification, or hang up.

export const COMPLETE_PY = `@agent.on_task_complete("waitlist")
def on_waitlist_done(call: guava.Call) -> None:
    logger.info(
        "Added %s, party of %d, to waitlist.",
        call.get_field("caller_name"),
        call.get_field("party_size"),
    )
    call.hangup("Thank the caller and let them know we'll text when their table is ready.")`;

export const COMPLETE_TS = `agent.onTaskComplete("waitlist", async (call: guava.Call) => {
  logger.info(
    "Added %s, party of %d, to waitlist.",
    await call.getField("caller_name"),
    await call.getField("party_size"),
  );
  await call.hangup("Thank the caller and let them know we'll text when their table is ready.");
});`;

<CodeTabs
  python={{ code: COMPLETE_PY, filename: "restaurant_waitlist.py" }}
  typescript={{ code: COMPLETE_TS, filename: "restaurant-waitlist.ts" }}
/>

### Start the agent

Attach the agent to a phone number to start receiving inbound calls.

export const RUN_PY = `# Run this to attach your agent to a phone number. Call your agent's number to talk to it.
agent.listen_phone(os.environ["GUAVA_AGENT_NUMBER"])

# Run this to receive a WebRTC link where you can talk to your agent in the browser.
agent.listen_webrtc()

# Run this to talk to your agent using your local audio device.
agent.call_local()`;

export const RUN_TS = `// Run this to attach your agent to a phone number. Call your agent's number to talk to it.
agent.listenPhone(process.env.GUAVA_AGENT_NUMBER!);`;

<CodeTabs
  python={{ code: RUN_PY, filename: "restaurant_waitlist.py" }}
  typescript={{ code: RUN_TS, filename: "restaurant-waitlist.ts" }}
/>

### Complete example

export const FULL_PY = `import os
import guava
import logging
import argparse
from guava import logging_utils

logger = logging.getLogger("thai_palace")

agent = guava.Agent(
    name="Mia",
    organization="Thai Palace",
    purpose="Helping callers join the restaurant waitlist",
)


@agent.on_call_received
def on_call_received(call_info: guava.CallInfo) -> guava.IncomingCallAction:
    return guava.AcceptCall()


@agent.on_call_start
def on_call_start(call: guava.Call) -> None:
    call.set_task(
        "waitlist",
        objective="You are a virtual assistant for Thai Palace. Add callers to the waitlist.",
        checklist=[
            guava.Field(key="caller_name", field_type="text", description="Name for the waitlist"),
            guava.Field(key="party_size", field_type="integer", description="Number of people"),
            guava.Field(
                key="phone_number",
                field_type="text",
                description="Phone number to text when the table is ready",
            ),
            "Read the phone number back to the caller to confirm.",
        ],
    )


@agent.on_task_complete("waitlist")
def on_waitlist_done(call: guava.Call) -> None:
    logger.info(
        "Added %s, party of %d, to waitlist.",
        call.get_field("caller_name"),
        call.get_field("party_size"),
    )
    call.hangup("Thank the caller and let them know we'll text when their table is ready.")


if __name__ == "__main__":
    logging_utils.configure_logging()

    parser = argparse.ArgumentParser()
    group = parser.add_mutually_exclusive_group(required=True)
    group.add_argument("--phone", action="store_true", help="Listen for phone calls.")
    group.add_argument("--webrtc", action="store_true", help="Create on a WebRTC code.")
    group.add_argument("--local", action="store_true", help="Start a local call.")
    args = parser.parse_args()

    if args.phone:
        agent.listen_phone(os.environ["GUAVA_AGENT_NUMBER"])
    elif args.webrtc:
        agent.listen_webrtc()
    else:
        agent.call_local()`;

export const FULL_TS = `import * as guava from "@guava-ai/guava-sdk";
import { getDefaultLogger } from "@guava-ai/guava-sdk";

const logger = getDefaultLogger();

const agent = new guava.Agent({
  name: "Mia",
  organization: "Thai Palace",
  purpose: "Helping callers join the restaurant waitlist",
});

agent.onCallReceived(async (_callInfo: guava.CallInfo) => {
  return { action: "accept" };
});

agent.onCallStart(async (call: guava.Call) => {
  await call.setTask({
    taskId: "waitlist",
    objective: "You are a virtual assistant for Thai Palace. Add callers to the waitlist.",
    checklist: [
      guava.Field({ key: "caller_name", fieldType: "text", description: "Name for the waitlist" }),
      guava.Field({ key: "party_size", fieldType: "integer", description: "Number of people" }),
      guava.Field({
        key: "phone_number",
        fieldType: "text",
        description: "Phone number to text when the table is ready",
      }),
      "Read the phone number back to the caller to confirm.",
    ],
  });
});

agent.onTaskComplete("waitlist", async (call: guava.Call) => {
  logger.info(
    "Added %s, party of %d, to waitlist.",
    await call.getField("caller_name"),
    await call.getField("party_size"),
  );
  await call.hangup("Thank the caller and let them know we'll text when their table is ready.");
});

agent.listenPhone(process.env.GUAVA_AGENT_NUMBER!);`;

<CodeTabs
  python={{ code: FULL_PY, filename: "restaurant_waitlist.py" }}
  typescript={{ code: FULL_TS, filename: "restaurant-waitlist.ts" }}
/>


---

<!-- section: outbound-scheduling -->

import { CodeTabs } from '../views/docs/CodeTabs';
import { Callout, Prose, NextLink } from '../views/docs/prose';

## Outbound w/ Scheduling

In this example, we'll build an outbound voice agent for a dental office. The agent calls patients to help them schedule appointments.

### Define the Agent

`guava.Agent` is our starting point for building Guava agents. We'll create one for this example.

export const AGENT_PY = `import guava

agent = guava.Agent(
    organization="Bright Smile Dental",
    purpose="Call patients to help them schedule a dental appointment.",
)`;

export const AGENT_TS = `import * as guava from "@guava-ai/guava-sdk";

const agent = new guava.Agent({
  organization: "Bright Smile Dental",
  purpose: "You are calling patients to help them schedule a dental appointment",
});`;

<CodeTabs
  python={{ code: AGENT_PY, filename: "scheduling_outbound.py" }}
  typescript={{ code: AGENT_TS, filename: "scheduling-outbound.ts" }}
/>

### Set up DatetimeFilter

`DatetimeFilter` is a built-in helper that accepts a natural-language availability query (e.g. "Tuesdays work best") and returns a short list of matching slots from your source data. In a production system you would swap this for a call to your own scheduling backend.

export const FILTER_PY = `from guava.helpers.openai import DatetimeFilter
from guava.examples.example_data import MOCK_APPOINTMENTS

datetime_filter = DatetimeFilter(source_list=MOCK_APPOINTMENTS)`;

export const FILTER_TS = `import { DatetimeFilter } from "@guava-ai/guava-sdk/helpers/openai";
import { mockAppointmentsForFuture } from "@guava-ai/guava-sdk/example-data";

const datetimeFilter = new DatetimeFilter({
  sourceList: mockAppointmentsForFuture(),
});`;

<CodeTabs
  python={{ code: FILTER_PY, filename: "scheduling_outbound.py" }}
  typescript={{ code: FILTER_TS, filename: "scheduling-outbound.ts" }}
/>

### Reach the right person

`on_call_start` fires at the beginning of every outbound call. We read the patient's name from the call variables and invoke `reach_person`, which instructs the agent to confirm it is speaking with the intended recipient before proceeding. Later in this example, we'll see how to set the `patient_name` variable.

export const START_PY = `@agent.on_call_start
def on_call_start(call: guava.Call):
    call.reach_person(
        contact_full_name=call.get_variable("patient_name"),
    )`;

export const START_TS = `agent.onCallStart(async (call: guava.Call) => {
  await call.reachPerson(await call.getVariable("patientName"));
});`;

<CodeTabs
  python={{ code: START_PY, filename: "scheduling_outbound.py" }}
  typescript={{ code: START_TS, filename: "scheduling-outbound.ts" }}
/>

<Callout>
  Under the hood `reach_person()` is just a call to `set_task()`. You can replace `reach_person()` with your own [Task](./tasks) if you need custom behavior here.
</Callout>

### Handle the reach-person outcome

`on_reach_person` fires once the agent has determined whether the intended person is available. If they are, we set a task to collect an appointment time. If not, we hang up gracefully.

export const REACH_PY = `@agent.on_reach_person
def on_reach_person(call: guava.Call, outcome: str) -> None:
    if outcome == "unavailable":
        call.hangup("Apologize for your mistake and hang up the call.")
    elif outcome == "available":
        call.set_task(
            "schedule_appointment",
            checklist=[
                "Tell them that it's been a while since their regular cleaning with Dr. Teeth.",
                guava.Field(
                    key="appointment_time",
                    field_type="calendar_slot",
                    description="Find a time that works for the caller",
                    searchable=True,
                ),
                "Tell them their appointment has been confirmed and answer any questions before ending the call.",
            ],
        )`;

export const REACH_TS = `agent.onReachPerson(async (call: guava.Call, outcome: string) => {
  if (outcome === "available") {
    await call.setTask({
      taskId: "schedule_appointment",
      checklist: [
        "Tell them that it's been a while since their regular cleaning with Dr. Teeth.",
        guava.Field({
          key: "appointment_time",
          fieldType: "calendar_slot",
          description: "Find a time that works for the caller",
          searchable: true,
        }),
        "Tell them their appointment has been confirmed and answer any questions before ending the call.",
      ],
    });
  } else {
    await call.hangup("Apologize for your mistake and hang up the call.");
  }
});`;

<CodeTabs
  python={{ code: REACH_PY, filename: "scheduling_outbound.py" }}
  typescript={{ code: REACH_TS, filename: "scheduling-outbound.ts" }}
/>

### Register an `on_search_query` handler

The `appointment_time` field has a special attribute `searchable=True` set. This turns the field into a "Search Field". Instead of providing a fixed list of choices, we will register an `on_search_query` handler.

The agent will invoke this handler to generate possible candidates for filling the field - at each invocation the agent provides a natural-language search query for us to match against.

In this example, we can simply forward that query to DatetimeFilter and return the result.

export const SEARCH_PY = `@agent.on_search_query("appointment_time")
def search_appointments(call: guava.Call, query: str):
    return datetime_filter.filter(query, max_results=3)`;

export const SEARCH_TS = `agent.onSearchQuery("appointment_time", async (_call, query) => {
  return datetimeFilter.filter(query, { maxResults: 3 });
});`;

<CodeTabs
  python={{ code: SEARCH_PY, filename: "scheduling_outbound.py" }}
  typescript={{ code: SEARCH_TS, filename: "scheduling-outbound.ts" }}
/>

The agent may call this handler multiple times if the patient rejects the initial options or refines their availability.

### Handle task completion

`on_task_complete` fires once every item in the checklist is resolved. This is where you'd write the confirmed slot back to your database, trigger a confirmation SMS, or perform any other post-booking actions.

export const COMPLETE_PY = `@agent.on_task_complete("schedule_appointment")
def on_appointment_scheduled(call: guava.Call):
    call.hangup("Thank them for their time and hang up the call.")`;

export const COMPLETE_TS = `agent.onTaskComplete("schedule_appointment", async (call) => {
  await call.hangup("Thank them for their time and hang up the call.");
});`;

<CodeTabs
  python={{ code: COMPLETE_PY, filename: "scheduling_outbound.py" }}
  typescript={{ code: COMPLETE_TS, filename: "scheduling-outbound.ts" }}
/>

### Place the outbound call

Use `call_phone` to initiate the call. Here is where you set initial values for variables - they'll be available inside your handlers via `get_variable()`.

export const RUN_PY = `agent.call_phone(
    from_number=os.environ["GUAVA_AGENT_NUMBER"],
    to_number=args.phone,
    variables={"patient_name": args.name},
)`;

export const RUN_TS = `agent.callPhone(process.env.GUAVA_AGENT_NUMBER, toNumber, {
  patientName: patientName,
});`;

<CodeTabs
  python={{ code: RUN_PY, filename: "scheduling_outbound.py" }}
  typescript={{ code: RUN_TS, filename: "scheduling-outbound.ts" }}
/>

<Callout>
If you intend to dial multiple participants, use [Campaigns](./campaign) instead of individual outbound calls. Campaigns offer settings for automatic retries, call windows, multiple origin phone numbers, and concurrency control.
</Callout>

### Complete example

export const FULL_PY = `import logging
import os
import argparse
import guava

from guava import logging_utils, Agent
from guava.examples.example_data import MOCK_APPOINTMENTS
from guava.helpers.openai import DatetimeFilter

logger = logging.getLogger("guava.examples.scheduling_outbound")

agent = Agent(
    organization="Bright Smile Dental",
    purpose="Call patients to help them schedule a dental appointment.",
)
datetime_filter = DatetimeFilter(source_list=MOCK_APPOINTMENTS)


@agent.on_call_start
def on_call_start(call: guava.Call):
    call.reach_person(
        contact_full_name=call.get_variable("patient_name"),
    )


@agent.on_reach_person
def on_reach_person(call: guava.Call, outcome: str) -> None:
    if outcome == "unavailable":
        call.hangup("Apologize for your mistake and hang up the call.")
    elif outcome == "available":
        call.set_task(
            "schedule_appointment",
            checklist=[
                "Tell them that it's been a while since their regular cleaning with Dr. Teeth.",
                guava.Field(
                    key="appointment_time",
                    field_type="calendar_slot",
                    description="Find a time that works for the caller",
                    searchable=True,
                ),
                "Tell them their appointment has been confirmed and answer any questions before ending the call.",
            ],
        )


@agent.on_search_query("appointment_time")
def search_appointments(call: guava.Call, query: str):
    return datetime_filter.filter(query, max_results=3)


@agent.on_task_complete("schedule_appointment")
def on_appointment_scheduled(call: guava.Call):
    call.hangup("Thank them for their time and hang up the call.")


if __name__ == "__main__":
    logging_utils.configure_logging()

    parser = argparse.ArgumentParser()
    parser.add_argument("phone", type=str, help="Phone number to call.")
    parser.add_argument("name", nargs="?", help="Name of the patient", default="Benjamin Buttons")
    args = parser.parse_args()

    agent.call_phone(
        from_number=os.environ["GUAVA_AGENT_NUMBER"],
        to_number=args.phone,
        variables={"patient_name": args.name},
    )`;

export const FULL_TS = `import * as guava from "@guava-ai/guava-sdk";
import { DatetimeFilter } from "@guava-ai/guava-sdk/helpers/openai";
import { mockAppointmentsForFuture } from "@guava-ai/guava-sdk/example-data";

const agent = new guava.Agent({
  organization: "Bright Smile Dental",
  purpose: "You are calling patients to help them schedule a dental appointment",
});

const datetimeFilter = new DatetimeFilter({
  sourceList: mockAppointmentsForFuture(),
});

agent.onCallStart(async (call: guava.Call) => {
  await call.reachPerson(await call.getVariable("patientName"));
});

agent.onSearchQuery("appointment_time", async (_call, query) => {
  return datetimeFilter.filter(query, { maxResults: 3 });
});

agent.onReachPerson(async (call: guava.Call, outcome: string) => {
  if (outcome === "available") {
    await call.setTask({
      taskId: "schedule_appointment",
      checklist: [
        "Tell them that it's been a while since their regular cleaning with Dr. Teeth.",
        guava.Field({
          key: "appointment_time",
          fieldType: "calendar_slot",
          description: "Find a time that works for the caller",
          searchable: true,
        }),
        "Tell them their appointment has been confirmed and answer any questions before ending the call.",
      ],
    });
  } else {
    await call.hangup("Apologize for your mistake and hang up the call.");
  }
});

agent.onTaskComplete("schedule_appointment", async (call) => {
  await call.hangup("Thank them for their time and hang up the call.");
});

export async function run(args: string[]) {
  const [toNumber, patientName = "Benjamin Buttons"] = args;

  if (!toNumber) {
    console.error("Usage: guava-example scheduling-outbound <phone> [name]");
    process.exit(1);
  }

  agent.callPhone(process.env.GUAVA_AGENT_NUMBER, toNumber, {
    patientName: patientName,
  });
}

if (import.meta.main) {
  run(process.argv.slice(2));
}`;

<CodeTabs
  python={{ code: FULL_PY, filename: "scheduling_outbound.py" }}
  typescript={{ code: FULL_TS, filename: "scheduling-outbound.ts" }}
/>


---

<!-- section: agent -->

import { CodeTabs } from '../views/docs/CodeTabs';
import { Callout, NextLink } from '../views/docs/prose';

export const AGENT_EX_PY = `import os
import guava

# Define our agent
agent = guava.Agent(
    name="Nova",
    organization="Acme Corp",
    purpose="Help customers with their orders.",
)

# Register handlers
@agent.on_call_start
def on_call_start(call: guava.Call):
    ...

# Attach to a channel
agent.listen_phone(os.environ["GUAVA_AGENT_NUMBER"])`;

export const AGENT_EX_TS = `import * as guava from "@guava-ai/guava-sdk";

// Define our agent
const agent = new guava.Agent({
  name: "Nova",
  organization: "Acme Corp",
  purpose: "Help customers with their orders.",
});

// Register handlers
agent.onCallStart(async (call) => {
  ...
});

// Attach to a channel
agent.listenPhone(process.env.GUAVA_AGENT_NUMBER!);`;

## Agent

`guava.Agent` is the entrypoint for creating Guava voice agents. Create an `Agent` instance, attach handlers, then attach to a channel.

<CodeTabs
  python={{ code: AGENT_EX_PY, filename: "agent.py" }}
  typescript={{ code: AGENT_EX_TS, filename: "agent.ts" }}
/>

export const AGENT_SIG_PY = `guava.Agent(
    # The name the agent uses to identify itself to callers.
    name: str | None = None,

    # The organization the agent represents.
    organization: str | None = None,

    # High-level description of the agent's role.
    purpose: str | None = None,
)`;

export const AGENT_SIG_TS = `new guava.Agent({
  // The name the agent uses to identify itself to callers.
  name?: string,

  // The organization the agent represents.
  organization?: string,

  // High-level description of the agent's role.
  purpose?: string,
})`;

### Constructor

Use the constructor parameters to configure your Agent's persona and goal.

<CodeTabs
  python={{ code: AGENT_SIG_PY }}
  typescript={{ code: AGENT_SIG_TS }}
/>

### Handlers

Register handlers to control and react to the call in real-time.

| Handler | Description |
|---------|-------------|
| `on_call_received` | This handler is invoked on incoming calls. You can chose whether to reject or accept the call. The default behavior if not provided is to accept every call. |
| `on_call_start` | Called when a call begins. Unlike `on_call_received`, this handler is invoked for both incoming and outgoing calls. Use this handler to set initial tasks and context for the Agent. |
| [`on_caller_speech`](./on-caller-speech) | Called each time the caller speaks. |
| [`on_agent_speech`](./on-agent-speech) | Called each time the agent speaks. |
| [`on_question`](./on-question) | Called when the caller asks the agent a question it cannot answer from context alone. The provided answer is relayed back to the caller. |
| `on_task_complete` | Called when the Agent completes a [Task](./tasks) previously set using `call.set_task`. |
| `on_search_query` | Provide dynamic search results for a searchable [Field](./field). |
| [`on_action_request` / `on_action`](./on-action-request-execute) | Called when the caller asks for a specific action, e.g. "can I reset my password?" |
| `on_session_end` | Called when the session ends. |
| [`on_reach_person`](./reach-person) | Called when a `reach_person` task completes. |
| `on_outbound_failed` | Called when an outbound call fails to dial. |
| `on_escalate` | Called when an escalation is triggered. |

### Entrypoints / Channels

Attach the agent to a channel to start receiving calls.

| Entrypoint | Description |
|------------|-------------|
| `listen_phone("+1...")` | Listen for inbound phone calls on the given phone number. |
| `listen_webrtc("grtc-..." \| None)` | Listen for inbound WebRTC connections to the given agent code. If not provided, a temporarly agent code is automatically created. |
| `listen_sip("guavasip-...")` | Listen for inbound SIP connections to the given SIP code. |
| `call_phone(from_number, to_number, variables?)` | Place a single outbound phone call. |
| `call_local()` | Call the agent using your local audio device (for testing). |
| `attach_campaign(campaign)` | Attach an agent to an outbound [Campaign](./campaign). |

<Callout>
  To attach an agent to multiple channels, or run multiple agents in the same process, use <a href="./runner">guava.Runner</a>.
</Callout>

<NextLink section="tasks" label="Tasks" />


---

<!-- section: tasks -->

import { CodeTabs } from '../views/docs/CodeTabs';
import { Callout, NextLink } from '../views/docs/prose';

export const SET_TASK_SIG_PY = `call.set_task(
    # Unique identifier for this task, used to bind on_task_complete handlers.
    task_id: str,

    # High-level goal for the agent. Provides context when no checklist is given,
    # or alongside a checklist to frame the overall objective.
    objective: str = "",

    # Ordered list of items for the agent to complete during the call.
    checklist: list[Field | Say | str] | None = None,

    # Optional extra guidance on when to consider this task done. Useful for
    # open-ended tasks where the checklist alone doesn't define completion.
    completion_criteria: str = "",
)`;

export const SET_TASK_SIG_TS = `await call.setTask({
  // Unique identifier for this task, used to bind onTaskComplete handlers.
  taskId: string,

  // High-level goal for the agent. Provides context when no checklist is given,
  // or alongside a checklist to frame the overall objective.
  objective?: string,

  // Ordered list of items for the agent to complete during the call.
  checklist?: (FieldItem | SayItem | string)[],
})`;

## Task

A task is the unit of work your agent completes on a call. Call `call.set_task()` to direct the agent toward a new goal. You can invoke `call.set_task()` on one of your handler callbacks, or at any time (even on another thread).

<CodeTabs
  python={{ code: SET_TASK_SIG_PY, filename: "signature" }}
  typescript={{ code: SET_TASK_SIG_TS, filename: "signature" }}
/>

### Checklist items

The checklist drives the agent forward. Each item is one of three types:

| Type | Purpose |
|------|---------|
| `guava.Field` | Collect structured data from the caller |
| `guava.Say` | Speak a verbatim statement |
| `str` | Natural language instruction for the agent |

<Callout>
  <span className="text-primary font-semibold">guava.Say</span> A <code>guava.Say</code> step is spoken verbatim — use it sparingly when exact wording matters.
</Callout>

### Example

export const SET_TASK_EX_PY = `@agent.on_call_start
def on_call_start(call: guava.Call):
    call.set_task(
        "waitlist",
        objective="You are a virtual assistant for Thai Palace. Add callers to the waitlist.",
        checklist=[
            guava.Field(key="caller_name", field_type="text", description="Name for the waitlist"),
            guava.Field(key="party_size", field_type="integer", description="Number of people"),
            guava.Field(
                key="phone_number",
                field_type="text",
                description="Phone number to text when the table is ready",
            ),
            "Read the phone number back to the caller to confirm.",
        ],
    )

@agent.on_task_complete("waitlist")
def on_waitlist_done(call: guava.Call):
    logger.info("Added %s, party of %d, to waitlist.",
        call.get_field("caller_name"), call.get_field("party_size"))
    call.hangup("Thank the caller and let them know we'll text when their table is ready.")`;

export const SET_TASK_EX_TS = `agent.onCallStart(async (call) => {
  await call.setTask({
    taskId: "waitlist",
    objective: "You are a virtual assistant for Thai Palace. Add callers to the waitlist.",
    checklist: [
      guava.Field({ key: "caller_name", fieldType: "text", description: "Name for the waitlist" }),
      guava.Field({ key: "party_size", fieldType: "integer", description: "Number of people" }),
      guava.Field({
        key: "phone_number",
        fieldType: "text",
        description: "Phone number to text when the table is ready",
      }),
      "Read the phone number back to the caller to confirm.",
    ],
  });
});

agent.onTaskComplete("waitlist", async (call) => {
  logger.info("Added %s, party of %d, to waitlist.",
    await call.getField("caller_name"), await call.getField("party_size"));
  await call.hangup("Thank the caller and let them know we'll text when their table is ready.");
});`;

<CodeTabs
  python={{ code: SET_TASK_EX_PY, filename: "example.py" }}
  typescript={{ code: SET_TASK_EX_TS, filename: "example.ts" }}
/>

<NextLink section="field" label="Fields" />


---

<!-- section: field -->

import { CodeTabs } from '../views/docs/CodeTabs';
import { Callout, NextLink, PropTable } from '../views/docs/prose';


export const FIELD_SIG_PY = `guava.Field(
    # Identifier used to retrieve the value via get_field() after collection.
    key: str,

    # Natural-language instruction to the LLM about how to collect this value.
    # Use when you do not particularly care how the agent phrases its question.
    description: str = '',

    # Encourages the agent to ask for the field in a particular way. Use instead
    # of description when you want more control over the phrasing.
    question: str = '',

    # Controls parsing and validation. "calendar_slot" and "multiple_choice"
    # require either choices or searchable=True.
    field_type: Literal[
        'text', 'date', 'datetime', 'integer', 'multiple_choice', 'calendar_slot'
    ] = 'text',

    # If False, the agent can skip this field if the caller is unwilling to provide it.
    required: bool = True,

    # Static list of valid options for "calendar_slot" and "multiple_choice" fields.
    # Use when the list is small. Large lists should use searchable=True.
    choices: list[str] = [],

    # When True, enables dynamic search for "multiple_choice" and "calendar_slot"
    # fields. The agent searches for options matching the caller's query at runtime.
    searchable: bool = False,
)`;

export const FIELD_SIG_TS = `guava.Field({
  // Identifier used to retrieve the value via get_field() after collection.
  key: string,

  // Natural-language instruction to the LLM about how to collect this value.
  // Use when you do not particularly care how the agent phrases its question.
  description: string,

  // Controls parsing and validation. "calendar_slot" and "multiple_choice"
  // require either choices or choiceGenerator.
  fieldType: 'text' | 'date' | 'datetime' | 'integer' | 'multiple_choice' | 'calendar_slot',

  // If false, the agent can skip this field if the caller is unwilling to provide it.
  required?: boolean, // default: true

  // Static list of valid options for "calendar_slot" and "multiple_choice" fields.
  // Use when the list is small. Large lists should use choiceGenerator.
  choices?: string[], // default: []

  // Takes a query string and returns (matching, fallback) lists. Use for large
  // or dynamic option sets with "calendar_slot" and "multiple_choice".
  choiceGenerator?: ChoiceGenerator,

  // When true, enables dynamic search for "multiple_choice" and "calendar_slot"
  // fields. The agent searches for options matching the caller's query at runtime.
  searchable?: boolean, // default: false
})`;

## Field

A `Field` is a [Task](./tasks) checklist item instructing the Guava agent to collect structured data from the caller. The agent elicits the value through natural conversation, validates it against the specified type, and marks the checklist item complete when satisfied.


<CodeTabs
  python={{ code: FIELD_SIG_PY, filename: "signature" }}
  typescript={{ code: FIELD_SIG_TS, filename: "signature" }}
/>


### Basic Examples

export const FIELD_EX1_PY = `# Basic text field
field = guava.Field(
    key="caller_name",
    description="Get the caller's name",
)

# Integer field with question
field = guava.Field(
    key="caller_age",
    question="How old are you?",
    field_type="integer",
)

# Multiple choice with static choices
field = guava.Field(
    key="caller_preference",
    description="Get the caller's preferred fruit",
    field_type="multiple_choice",
    # Use searchable=True instead when there's a large number of choices
    choices=["apple", "banana", "orange"],
    required=False,
)`;

export const FIELD_EX1_TS = `// Basic text field
const field = guava.Field({
  key: "caller_name",
  description: "Get the caller's name",
});

// Integer field with question
const field = guava.Field({
  key: "caller_age",
  description: "How old are you?",
  fieldType: "integer",
});

// Multiple choice with static choices
const field = guava.Field({
  key: "caller_preference",
  description: "Get the caller's preferred fruit",
  fieldType: "multiple_choice",
  // Use searchable: true instead when there's a large number of choices
  choices: ["apple", "banana", "orange"],
  required: false,
});`;

<CodeTabs
  python={{ code: FIELD_EX1_PY, filename: "examples.py" }}
  typescript={{ code: FIELD_EX1_TS, filename: "examples.ts" }}
/>

### Search Fields

Some fields can have a very large set of valid options.
For example, a `destination_airport` field may include thousands of airports worldwide.
In other cases, options must be generated dynamically, such as an `appointment_time` field populated from a booking system.

This is where search fields come in handy. Set `searchable=True` on the field, then register an `@agent.on_search_query` handler.
When the agent needs options, it calls your handler with a natural-language query string.
Return two lists: a primary list of matches, and a fallback list shown only when no primary matches are found.

export const FIELD_EX4_PY = `field = guava.Field(
    key="airport",
    description="Find a suitable airport for the caller",
    field_type="multiple_choice",
    searchable=True,
)

@agent.on_search_query("airport")
def search_airports(call: guava.Call, query: str):
    matching_airports: list[str] = []
    other_airports: list[str] = []

    ...
    # Do some work to generate a few matching airport
    # options based on the caller's query.
    # 'query' will be human natural language
    # (e.g. "I need to fly out of an airport in
    # southern california")
    ...

    # The second list only becomes relevant if there
    # are no matches to the caller's query. It is used
    # to at least present something to the caller in
    # case there are no perfect matches.
    return matching_airports, other_airports`;

export const FIELD_EX4_TS = `const field = guava.Field({
  key: "airport",
  description: "Find a suitable airport for the caller",
  fieldType: "multiple_choice",
  searchable: true,
});

agent.onSearchQuery("airport", async (call, query) => {
  const matchingAirports: string[] = [];
  const otherAirports: string[] = [];

  // ...
  // Do some work to generate a few matching airport
  // options based on the caller's query.
  // 'query' will be human natural language
  // (e.g. "I need to fly out of an airport in
  // southern california")
  // ...

  // The second list only becomes relevant if there
  // are no matches to the caller's query. It is used
  // to at least present something to the caller in
  // case there are no perfect matches.
  return [matchingAirports, otherAirports];
})`;

<CodeTabs
  python={{ code: FIELD_EX4_PY, filename: "search_field.py" }}
  typescript={{ code: FIELD_EX4_TS, filename: "search_field.ts" }}
/>

### Field Types Reference

| Type | Example collected value | Return type from `get_field()` |
|------|------------------------|-------------------------------|
| `text` | `"I want to cancel my appointment"` | `str` |
| `date` | `{"year": 2024, "month": 3, "day": 15}` | `dict` with keys `year`, `month`, `day` (all `int`) |
| `integer` | `42` | `int` |
| `multiple_choice` | `"apple"` | `str` (guaranteed to be one of `choices` or returned by `choice_generator`) |
| `calendar_slot` | `"2022-12-31T17:30"` | ISO-8601 datetime `str` |

<Callout>
  <span className="text-primary font-semibold">Note:</span> The `choices` list for `calendar_slot` fields must be ISO-8601 datetimes (e.g. `"2022-12-31T17:30"`).
</Callout>

<NextLink section="say" label="Say" />


---

<!-- section: campaign -->

import { CodeBlock } from '../views/docs/CodeBlock';
import { Callout, NextLink, Prose, PropTable } from '../views/docs/prose';
import { GUAVADIALER_EX, VOICEMAIL_DETECTION_EX } from './guides-constants';

## Campaign

Guavadialer is the SDK for creating and running high-volume outbound calling campaigns programmatically. Define campaigns, upload contacts, write per-call logic via `Agent` callbacks, and serve campaigns — all from Python.
Note that you need outbound permission approval to use outbound dialing; please contact support@goguava.ai.

### Campaign lifecycle

A campaign is created with `create_or_update_campaign()`, which upserts by name and returns an `Campaign` object. From there you upload contacts, serve the campaign, and monitor status.

### Campaign configuration

<PropTable rows={[
  { name: "campaign_name", type: "str", desc: "Unique campaign name per organization." },
  { name: "origin_phone_numbers", type: "list[str]", desc: "E.164 numbers owned by you. Calls are round-robin distributed across them." },
  { name: "calling_windows", type: "list[dict]", desc: 'Each dict: day (0–6 or name like "monday"), start_time ("HH:MM"), end_time ("HH:MM"). Times are in campaign timezone.' },
  { name: "start_date", type: "str", desc: '"YYYY-MM-DD" — when the campaign begins.' },
  { name: "end_date", type: "str | None", default: "None", desc: '"YYYY-MM-DD" — optional end date.' },
  { name: "max_concurrency", type: "int", default: "1", desc: "Maximum simultaneous active calls." },
  { name: "max_attempts", type: "int", default: "1", desc: "Maximum call attempts per contact before marking failed." },
  { name: "timezone", type: "str", default: '"America/Los_Angeles"', desc: "IANA timezone for calling windows." },
  { name: "description", type: "str", default: '""', desc: "Campaign description. Required when using Agentic Tenacity." },
]} />

### SDK methods

<PropTable rows={[
  { name: "create_or_update_campaign()", type: "function", desc: "Upserts a campaign by name. Returns an Campaign object. If the campaign already existed, updates with any provided fields" },
  { name: "list_campaigns()", type: "function", desc: "Returns all campaigns for the authenticated user." },
  { name: "campaign.upload_contacts()", type: "method", desc: 'Uploads contacts. Each contact is a Contact(phone_number="+1...", data={...}) object. accepted_terms_of_service must be True. Pass outreach_modalities to enable multi-channel outreach (see Agentic Tenacity). allow_duplicates is also available.' },
  { name: "campaign.get_status()", type: "method", desc: "Returns contact status histogram (trying, completed, partially_completed, failed)." },
  { name: "campaign.update()", type: "method", desc: "Updates mutable campaign fields (concurrency, calling windows, etc.)." },
  { name: "campaign.delete()", type: "method", desc: "Soft-deletes the campaign." },
]} />

### Contact statuses

<div className="my-4 overflow-x-auto rounded-lg border border-border">
  <table className="w-full text-sm font-mono">
    <thead>
      <tr className="border-b border-border bg-card/50">
        <th className="text-left px-4 py-3 text-muted-foreground font-semibold">Status</th>
        <th className="text-left px-4 py-3 text-muted-foreground font-semibold">Meaning</th>
      </tr>
    </thead>
    <tbody>
      <tr className="bg-transparent">
        <td className="px-4 py-3 text-primary">trying</td>
        <td className="px-4 py-3 text-muted-foreground">Eligible for dispatch</td>
      </tr>
      <tr className="bg-card/20">
        <td className="px-4 py-3 text-primary">completed</td>
        <td className="px-4 py-3 text-muted-foreground">Call finished successfully</td>
      </tr>
      <tr className="bg-transparent">
        <td className="px-4 py-3 text-primary">partially_completed</td>
        <td className="px-4 py-3 text-muted-foreground">Call connected but not all tasks done</td>
      </tr>
      <tr className="bg-card/20">
        <td className="px-4 py-3 text-primary">failed</td>
        <td className="px-4 py-3 text-muted-foreground">Permanent error or max attempts exhausted</td>
      </tr>
      <tr className="bg-transparent">
        <td className="px-4 py-3 text-primary">do_not_call</td>
        <td className="px-4 py-3 text-muted-foreground">Contact has asked not to be called</td>
      </tr>
    </tbody>
  </table>
</div>

### Agent callbacks

Define an `Agent` and attach callbacks using decorators. Per-call data from the contact's `data` dict is available via `call.get_variable()`. Use `on_call_start` to initiate contact, `on_reach_person` to branch on availability, and `on_task_complete` to wrap up.

### Serving a campaign

Use `agent.attach_campaign(campaign=campaign)` to start processing calls. This blocks and handles calls as they are dispatched by the autodialer. Multiple processes can run in parallel for horizontal scaling.

The autodialer dispatches calls every 2 minutes within configured calling windows. Calls that fail with retryable SIP errors are automatically rescheduled up to `max_attempts`.

`attach_campaign` polls `v1/campaigns/{id}/has-callable-contacts` every 5 seconds. When no callable contacts remain and no active calls exist, the socket closes cleanly and `attach_campaign` returns with a log: `INFO: Campaign '<name>' has no more callable contacts and no active calls. Closing.` (Added in v0.21; previously `attach_campaign` blocked indefinitely until the process was killed.)

### Complete example

<CodeBlock code={GUAVADIALER_EX} filename="campaign.py" language="python" />

<Callout><span className="text-primary font-semibold">Auth:</span> All SDK calls require the `GUAVA_API_KEY` env var set to a valid API key. The base URL defaults to production; override with `GUAVA_BASE_URL`.</Callout>

### Voicemail detection and handling

Not every outbound call reaches a live person, and that's fine. Rather than using `reach_person()` (which simply succeeds or fails), you can build custom routing logic to handle voicemail, wrong numbers, and do-not-contact requests, turning every call outcome into a useful action.

The pattern: use a `Field` with `field_type="multiple_choice"` to classify who answered — the target contact, someone else, voicemail, or a wrong number. Then route to the appropriate handler based on the result.

<Prose><span className="text-foreground">read_script()</span> — delivers a scripted message verbatim (no LLM improvisation). Ideal for voicemail messages where you need precise, compliant wording.</Prose>

<Prose><span className="text-foreground">Multi-phase tasks.</span> Call `set_task()` again from `on_complete` to chain tasks. The first task identifies who answered; the second task handles the actual conversation or voicemail.</Prose>

<Prose><span className="text-foreground">Graceful exits.</span> Handle every outcome — confirmed identity, unavailable, wrong number, do-not-contact — so no call ends awkwardly or without logging.</Prose>

<CodeBlock code={VOICEMAIL_DETECTION_EX} filename="voicemail_detection.py" language="python" />

<NextLink section="agentic-tenacity" label="Agentic Tenacity" />


---

<!-- section: runner -->

import { CodeBlock } from '../views/docs/CodeBlock';
import { PropTable, NextLink } from '../views/docs/prose';

export const RUNNER_EX = `import os
from guava import Agent, Runner

agent_a = Agent(name="Grace", purpose="You are a helpful voice agent.")
agent_b = Agent(name="Jordan", purpose="You are a helpful voice agent.")

runner = Runner()
runner.listen_phone(agent_a, os.environ["GUAVA_AGENT_NUMBER"])
runner.listen_webrtc(agent_b)
runner.run()`;

## Runner

`guava.Runner` lets you serve multiple agents in a single process. Each agent can be attached to any number of channels — phone, WebRTC, SIP, or outbound campaigns. Call `run()` to start everything and block until all channels exit.

<CodeBlock code={RUNNER_EX} filename="run.py" language="python" />

### Methods

<PropTable rows={[
  { name: "listen_phone(agent, agent_number)", type: "Runner", desc: "Register an agent to receive inbound calls on the given phone number. Returns self for chaining." },
  { name: "listen_webrtc(agent, webrtc_code=None)", type: "Runner", desc: "Register an agent to accept WebRTC connections. A new code is generated if webrtc_code is omitted. Returns self for chaining." },
  { name: "listen_sip(agent, sip_code)", type: "Runner", desc: "Register an agent to receive inbound SIP calls on the given SIP code. Returns self for chaining." },
  { name: "attach_campaign(agent, campaign)", type: "Runner", desc: "Attach an outbound campaign to an agent. Returns self for chaining." },
  { name: "run()", type: "None", desc: "Start all registered channels in daemon threads and block until they all exit." },
]} />

<NextLink section="on-action-request-execute" label="on_action_request() / on_action()" />


---

<!-- section: client -->

import { CodeTabs } from '../views/docs/CodeTabs';
import { PropTable, NextLink } from '../views/docs/prose';

export const CLIENT_EX_PY = `import guava, os

client = guava.Client(
    api_key=os.environ["GUAVA_API_KEY"],   # or omit — reads env automatically
)`;

export const CLIENT_EX_TS = `import * as guava from "@guava-ai/guava-sdk";

const client = new guava.Client(
  process.env.GUAVA_API_KEY,  // or omit — reads env automatically
);`;

## Client

`guava.Client` complements [`guava.Agent`](./agent) by providing functions for managing account-level resources. It also provides any functions that don't fit onto [`guava.Agent`](./agent).

<CodeTabs
  python={{ code: CLIENT_EX_PY, filename: "run.py" }}
  typescript={{ code: CLIENT_EX_TS, filename: "run.ts" }}
/>

### API

<PropTable rows={[
  { name: "api_key", type: "str | None", default: "env GUAVA_API_KEY", desc: "Your Guava API key." },
  { name: "base_url", type: "str | None", default: "production", desc: "Override the API endpoint (for testing)." },
]} />

### Methods

<PropTable rows={[
  { name: "create_sip_agent()", type: "method", desc: "Generate a SIP code linked to your account for inbound SIP call handling." },
  { name: "create_webrtc_agent(ttl)", type: "method", desc: "Generate a WebRTC code for browser-based voice interaction, with optional TTL." },
  { name: "send_sms()", type: "method", desc: "Send an SMS message." },
]} />

<NextLink section="tasks" label="Tasks" />


---

<!-- section: on-question -->

import { CodeTabs } from '../views/docs/CodeTabs';
import { NextLink } from '../views/docs/prose';

export const ON_QUESTION_SIG_PY = `@agent.on_question
def on_question(call: guava.Call, question: str) -> str:
    # question: natural-language question from the caller
    # return: answer to relay to caller
    ...`;

export const ON_QUESTION_SIG_TS = `agent.onQuestion(async (call: guava.Call, question: string) => string);`;

export const ON_QUESTION_EX_PY = `import guava
from guava import Agent
from guava.helpers.rag import DocumentQA
from guava.examples.example_data import PROPERTY_INSURANCE_POLICY

agent = Agent(
    organization="Harper Valley Property Insurance",
    purpose="Answer questions regarding property insurance policy",
)

document_qa = DocumentQA(documents=PROPERTY_INSURANCE_POLICY)

@agent.on_question
def on_question(call: guava.Call, question: str) -> str:
    return document_qa.ask(question)`;

export const ON_QUESTION_EX_TS = `import * as guava from "@guava-ai/guava-sdk";
import { DocumentQA } from "@guava-ai/guava-sdk/helpers/openai";
import { PROPERTY_INSURANCE_POLICY } from "@guava-ai/guava-sdk/example-data";

const agent = new guava.Agent({
  organization: "Harper Valley Property Insurance",
  purpose: "Answer questions regarding property insurance policy",
});

const documentQA = new DocumentQA(
  "harper-valley-property-insurance",
  PROPERTY_INSURANCE_POLICY,
);

agent.onQuestion(async (call: guava.Call, question: string) => {
  return await documentQA.ask(question);
});`;

## on\_question()

When a Guava agent is asked a question that it cannot answer from its context alone, it will invoke the `on_question` callback. Your **Expert** then has the chance to answer that question, typically using a RAG system. Our examples use the provided `DocumentQA` class, but you can use any RAG system you prefer.

See our [Q&A example](./inbound-rag-example) for a step-by-step walkthrough.

<CodeTabs
  python={{ code: ON_QUESTION_SIG_PY, filename: "signature" }}
  typescript={{ code: ON_QUESTION_SIG_TS, filename: "signature" }}
/>

> If you want the agent to answer questions immediately, use `add_info` to pre-emptively add information to the context.

- `on_question`, like all Guava callbacks, is invoked asynchronously and does not block dialog. The Guava voice agent continues to engage the caller until the question answer comes back.
- `on_question` may be invoked multiple times, for example, if a caller asks a question and then refines it. `on_question` may be invoked speculatively before a caller is done talking.
- `on_question` may be invoked simultaneously with [`on_action_request`](./on-action-request-execute), as some requests can be both an "action" and a "question". For example, *"Do you have a lost and found?"* In this case, the agent will synthesize both responses: *"Yes, we have a lost and found. Would you like me to transfer you there?"*


### Example

<CodeTabs
  python={{ code: ON_QUESTION_EX_PY, filename: "support_controller.py" }}
  typescript={{ code: ON_QUESTION_EX_TS, filename: "support_controller.ts" }}
/>

<NextLink section="on-agent-speech" label="on_agent_speech()" />


---

<!-- section: on-action-request-execute -->

import { CodeTabs } from '../views/docs/CodeTabs';
import { Callout, NextLink, PropTable } from '../views/docs/prose';

export const ON_ACTION_REQUEST_SIG_PY = `@agent.on_action_request
def on_action_request(call: guava.Call, request: str) -> SuggestedAction | None:
    # request: natural-language summary of what the caller wants
    # return: SuggestedAction(key=...) or None

@agent.on_action("action_key")
def handler(call: guava.Call) -> None:
    # Runs when Guava executes the action with the matching key
    ...`;

export const ON_ACTION_REQUEST_SIG_TS = `agent.onActionRequest(
  async (call: guava.Call, request: string) => { key: string } | null
);

agent.onAction("action_key", async (call: guava.Call) => {
  // Runs when Guava executes the action with the matching key
});`;

export const ON_ACTION_REQUEST_EX_PY = `from guava import Agent, SuggestedAction
from guava.helpers.openai import IntentRecognizer

agent = Agent(name="Nova", organization="Thai Palace", purpose="...")

ACTIONS = {
    "reservation": "for handling reservations",
    "waitlist": "additions to the waitlist",
    "delivery": "for takeout orders",
    "hiring": "for people looking for jobs",
    "order_for_pickup": "",
}

intent_recognizer = IntentRecognizer(ACTIONS)


@agent.on_action_request
def on_action_request(call: guava.Call, request: str) -> SuggestedAction | None:
    key = intent_recognizer.classify(request)
    return SuggestedAction(key=key) if key else None


@agent.on_action("reservation")
def reservation(call: guava.Call):
    call.set_task(...)


@agent.on_action("waitlist")
def waitlist(call: guava.Call):
    call.set_task(...)`;

export const ON_ACTION_REQUEST_EX_TS = `import * as guava from "@guava-ai/guava-sdk";
import { IntentRecognizer } from "@guava-ai/guava-sdk/helpers/openai";

const agent = new guava.Agent({
  name: "Nova",
  organization: "Thai Palace",
  purpose: "...",
});

const ACTIONS = {
  reservation: "for handling reservations",
  waitlist: "additions to the waitlist",
  delivery: "for takeout orders",
  hiring: "for people looking for jobs",
  order_for_pickup: "",
};

const intentRecognizer = new IntentRecognizer(Object.keys(ACTIONS));

agent.onActionRequest(async (_call: guava.Call, request: string) => {
  const key = await intentRecognizer.classify(request);
  return key ? { key } : null;
});

agent.onAction("reservation", async (call: guava.Call) => {
  call.setTask({ objective: "Handle reservation" });
});

agent.onAction("waitlist", async (call: guava.Call) => {
  call.setTask({ objective: "Handle waitlist addition" });
});`;


## on\_action\_request() / on\_action()

These handlers are used when the caller expresses an intent or action (e.g. "I'd like to pay my bill"). The flow is as follows.

1. **The caller makes a request** — e.g. "I'd like to check the status of my order."
2. **Guava invokes `on_action_request` with a summary of the request** — e.g. "the customer would like to check the status of their order."
3. **You classify the request and return a `SuggestedAction`** — e.g. `SuggestedAction(key="order_status")`. You can use our built-in `IntentRecognizer` helper, or build your own intent classifier. Return `None` if no action matches the request.
4. **Guava decides whether to execute the action** — it may proceed immediately or ask the caller to confirm.
5. **Guava executes the action** — The `on_action` handler registered under the matching suggested action key is called.

<Callout>
  <span className="text-primary font-semibold">Design note:</span> The two-step pattern (request → execute) gives the agent a chance to confirm intent with the caller before committing to an action.
</Callout>

<CodeTabs
  python={{ code: ON_ACTION_REQUEST_SIG_PY, filename: "signature" }}
  typescript={{ code: ON_ACTION_REQUEST_SIG_TS, filename: "signature" }}
/>

### Interaction with on\_question

A caller utterance can be both a question and an action (e.g. *"Could you help me pay my bill?"*). In this case Guava will invoke both callbacks in parallel and synthesize an appropriate response based on the results.

For example, if `on_question` returns *"Yes, we handle bill payment"* and `on_action_request` returns `SuggestedAction(key="bill_pay")`,
Guava may immediately chain into executing the action, or it may respond *"Yes — would you like to get started?"* to confirm the action with the caller.

### Example

<CodeTabs
  python={{ code: ON_ACTION_REQUEST_EX_PY, filename: "restaurant_controller.py" }}
  typescript={{ code: ON_ACTION_REQUEST_EX_TS, filename: "restaurant_controller.ts" }}
/>

<NextLink section="on-question" label="on_question()" />


---

<!-- section: on-agent-speech -->

import { CodeTabs } from '../views/docs/CodeTabs';
import { Callout, NextLink, PropTable } from '../views/docs/prose';
import {
  ON_AGENT_SPEECH_SIG_PY, ON_AGENT_SPEECH_SIG_TS,
  ON_AGENT_SPEECH_EX_PY, ON_AGENT_SPEECH_EX_TS,
} from './sdk-reference-constants';

## on\_agent\_speech()

Register a handler to receive a callback whenever the agent speaks. The event contains what the agent said and whether it was interrupted by the caller.

The `AgentSpeechEvent` is a pydantic model imported from `guava.events`:

```python
from guava.events import AgentSpeechEvent

class AgentSpeechEvent(BaseEvent):
    event_type: Literal["agent-speech"] = "agent-speech"
    utterance: str
    interrupted: bool = False
```

### Signature

<CodeTabs
  python={{ code: ON_AGENT_SPEECH_SIG_PY, filename: "signature" }}
  typescript={{ code: ON_AGENT_SPEECH_SIG_TS, filename: "signature" }}
/>

<PropTable rows={[
  {
    name: "call",
    type: "Call",
    desc: "The active call object.",
  },
  {
    name: "event",
    type: "AgentSpeechEvent",
    desc: "Contains `utterance` (string) and `interrupted` (boolean) fields.",
  },
]} />

**Return value:** `None`

### Example

<CodeTabs
  python={{ code: ON_AGENT_SPEECH_EX_PY, filename: "controller.py" }}
  typescript={{ code: ON_AGENT_SPEECH_EX_TS, filename: "controller.ts" }}
/>

<NextLink section="on-caller-speech" label="on_caller_speech()" />


---

<!-- section: on-caller-speech -->

import { CodeTabs } from '../views/docs/CodeTabs';
import { Callout, NextLink, PropTable } from '../views/docs/prose';
import {
  ON_CALLER_SPEECH_SIG_PY, ON_CALLER_SPEECH_SIG_TS,
  ON_CALLER_SPEECH_EX_PY, ON_CALLER_SPEECH_EX_TS,
} from './sdk-reference-constants';

## on\_caller\_speech()

Register a handler to receive a callback whenever caller speech is detected. The event contains what the caller said and an `utterance_id` that distinguishes new utterances from updates to existing ones.

As transcription progresses, you may receive multiple events with the same `utterance_id`. Usually these updates append new words, but there can be slight corrections to previously transcribed words. For example:

- `"Hi."` — `utterance_id='0'`
- `"I am going to the store"` — `utterance_id='1'`
- `"I'm going to the store and"` — `utterance_id='1'` (update to the same utterance)

The `CallerSpeechEvent` is a pydantic model imported from `guava.events`:

```python
from guava.events import CallerSpeechEvent

class CallerSpeechEvent(BaseEvent):
    event_type: Literal["caller-speech"] = "caller-speech"
    utterance: str
    utterance_id: Optional[str] = None
```

### Signature

<CodeTabs
  python={{ code: ON_CALLER_SPEECH_SIG_PY, filename: "signature" }}
  typescript={{ code: ON_CALLER_SPEECH_SIG_TS, filename: "signature" }}
/>

<PropTable rows={[
  {
    name: "call",
    type: "Call",
    desc: "The active call object.",
  },
  {
    name: "event",
    type: "CallerSpeechEvent",
    desc: "Contains `utterance` (string) and `utterance_id` (optional string) fields.",
  },
]} />

**Return value:** `None`

### Example

<CodeTabs
  python={{ code: ON_CALLER_SPEECH_EX_PY, filename: "controller.py" }}
  typescript={{ code: ON_CALLER_SPEECH_EX_TS, filename: "controller.ts" }}
/>

<NextLink section="accept-reject" label="accept_call() / reject_call()" />


---

<!-- section: set-task -->

import { CodeTabs } from '../views/docs/CodeTabs';
import { Callout, NextLink } from '../views/docs/prose';

## set_task()

`call.set_task()` directs the agent toward a new goal mid-call. It accepts an objective, an ordered checklist of steps, and a task ID for binding completion handlers.

export const SET_TASK_SIG_PY = `call.set_task(
    task_id: str,
    objective: str = "",
    checklist: list[Field | Say | str] | None = None,
    completion_criteria: str = "",
)`;

export const SET_TASK_SIG_TS = `await call.setTask({
  taskId: string,
  objective?: string,
  checklist?: (FieldItem | SayItem | string)[],
})`;

<CodeTabs
  python={{ code: SET_TASK_SIG_PY, filename: "signature" }}
  typescript={{ code: SET_TASK_SIG_TS, filename: "signature" }}
/>

<Callout>
  <span className="text-primary font-semibold">Full reference:</span> See the <a href="/docs/tasks" className="text-primary hover:underline">Task</a> page for parameter details, checklist item types, and a complete example.
</Callout>

<NextLink section="set-persona" label="set_persona()" />


---

<!-- section: set-persona -->

import { CodeTabs } from '../views/docs/CodeTabs';
import { Callout, NextLink, PropTable } from '../views/docs/prose';
import {
  SET_PERSONA_SIG_PY, SET_PERSONA_SIG_TS,
  SET_PERSONA_EX_PY, SET_PERSONA_EX_TS,
} from './sdk-reference-constants';

## set\_persona()

`call.set_persona()` is deliberately minimal. Give it the organization name and let the agent figure out the tone. You don't need to specify a voice style, a greeting template, or a list of prohibited phrases — Guava's defaults are professional and natural.

<CodeTabs
  python={{ code: SET_PERSONA_SIG_PY, filename: "signature" }}
  typescript={{ code: SET_PERSONA_SIG_TS, filename: "signature" }}
/>

<PropTable rows={[
  {
    name: "organization_name",
    type: "str | None",
    desc: "The organization the agent represents. Used in introductions.",
  },
  {
    name: "agent_name",
    type: "str | None",
    desc: "The agent's first name. Defaults to a generic 'assistant' style.",
  },
  {
    name: "agent_purpose",
    type: "str | None",
    desc: "A sentence describing why the agent is calling. Sets the LLM's operating context.",
  },
  {
    name: "voice",
    type: "str | None",
    default: '"grace"',
    desc: 'The TTS voice to use. Options: "grace" (southern female) or "jack" (British male). For languages outside of English, only the "grace" voice is supported.',
  },
]} />

### Example

<CodeTabs
  python={{ code: SET_PERSONA_EX_PY, filename: "example.py" }}
  typescript={{ code: SET_PERSONA_EX_TS, filename: "example.ts" }}
/>

<Callout>
  <span className="text-primary font-semibold">Tip:</span> Include the contact's name in `agent_purpose` to help the agent personalize the conversation naturally.
</Callout>

<NextLink section="field" label="Field" />


---

<!-- section: send-instruction -->

import { CodeTabs } from '../views/docs/CodeTabs';
import { Callout, NextLink, PropTable } from '../views/docs/prose';
import {
  SEND_INSTRUCTION_SIG_PY, SEND_INSTRUCTION_SIG_TS,
  SEND_INSTRUCTION_EX_PY, SEND_INSTRUCTION_EX_TS,
} from './sdk-reference-constants';

## send\_instruction()

`call.send_instruction(instruction)` sends a real-time instruction to the agent without changing the current task. Use it for context injection and behavioral nudges.

### Signature

<CodeTabs
  python={{ code: SEND_INSTRUCTION_SIG_PY, filename: "signature" }}
  typescript={{ code: SEND_INSTRUCTION_SIG_TS, filename: "signature" }}
/>

<PropTable rows={[
  {
    name: "instruction",
    type: "str",
    desc: "A real-time instruction to pass to the agent. Does not change the current task.",
  },
]} />

**Return value:** `None` / `Promise<void>`

### Example

<CodeTabs
  python={{ code: SEND_INSTRUCTION_EX_PY, filename: "example.py" }}
  typescript={{ code: SEND_INSTRUCTION_EX_TS, filename: "example.ts" }}
/>

<Callout>
  <span className="text-primary font-semibold">Tip:</span> Unlike `call.set_task()`, `call.send_instruction()` doesn't replace the agent's current objective. Use it to inject context or steer behavior mid-conversation — for example, after a database lookup reveals something the agent should know.
</Callout>

<NextLink section="field" label="Field" />


---

<!-- section: get-set-variable -->

import { CodeTabs } from '../views/docs/CodeTabs';
import { Callout, NextLink } from '../views/docs/prose';

export const SIG_PY = `call.set_variable(key: str, value: Any) -> None
call.get_variable(key: str) -> Any`;

export const SIG_TS = `await call.setVariable(key: string, value: any): Promise<void>
await call.getVariable(key: string): Promise<any>`;

export const SET_GET_VARIABLE_EX_PY = `@agent.on_call_start
def on_call_start(call: guava.Call):
    # Variables seeded via call_phone(variables={...}) are readable immediately
    patient_name = call.get_variable("patient_name")
    call.reach_person(contact_full_name=patient_name)


@agent.on_reach_person
def on_reach_person(call: guava.Call, outcome: str):
    if outcome == "available":
        call.set_task(
            objective="Confirm the appointment and answer any questions.",
            on_complete=on_confirmed,
        )


@agent.on_task_complete("confirmed")
def on_confirmed(call: guava.Call):
    call.hangup()`;

export const SET_GET_VARIABLE_EX_TS = `agent.onCallStart(async (call: guava.Call) => {
  // Variables seeded via callPhone({ variables: {...} }) are readable immediately
  const patientName = await call.getVariable("patientName");
  await call.reachPerson(patientName);
});

agent.onReachPerson(async (call: guava.Call, outcome: string) => {
  if (outcome === "available") {
    await call.setTask({
      objective: "Confirm the appointment and answer any questions.",
    });
  }
});

agent.onTaskComplete("confirmed", async (call: guava.Call) => {
  await call.hangup();
});`;

## set\_variable() / get\_variable()

Call variables are provided as a convenient way to pass per-call data (patient name, account ID, etc.) between agent handlers.
Variables can be seeded when the call starts and read or updated at any point during the call.

<CodeTabs
  python={{ code: SIG_PY, filename: "signature" }}
  typescript={{ code: SIG_TS, filename: "signature" }}
/>

### Valid variable values

Variable values must be JSON-serializable: strings, numbers, booleans, `None`, and dicts/lists composed of those types.

### Seeding variables at call start

For the following types of calls, variables can be seeded at the start.

- **Outbound calls** — pass a `variables` dict to `call_phone()` / `callPhone()`
- **Campaigns** — each contact's `data` dict becomes that contact's variables

### Other ways to store call state

As an alternative to call variables, you can keep per-call state in an in-process dictionary keyed by `call.id`.

That said, we only recommend this for simple use cases. If your process restarts, any in-memory state will be lost.
For durable per-call state, use Redis or another session store keyed by `call.id`.

```python
r = redis.Redis()
call_state: dict[str, dict] = {}

@agent.on_call_start
def on_call_start(call: guava.Call):
    # In-memory — lost on process restart
    call_state[call.id] = {"stage": "intro"}

    # Redis — survives restarts
    r.set(f"call_state:{call.id}", json.dumps({"stage": "intro"}), ex=3600)
```


### Example

<CodeTabs
  python={{ code: SET_GET_VARIABLE_EX_PY, filename: "example.py" }}
  typescript={{ code: SET_GET_VARIABLE_EX_TS, filename: "example.ts" }}
/>


<NextLink section="add-info" label="add_info()" />


---

<!-- section: set-language-mode -->

import { CodeTabs } from '../views/docs/CodeTabs';
import { Callout, NextLink, PropTable } from '../views/docs/prose';
import {
  SET_LANGUAGE_MODE_SIG_PY, SET_LANGUAGE_MODE_SIG_TS,
  SET_LANGUAGE_MODE_EX1_PY, SET_LANGUAGE_MODE_EX1_TS,
  SET_LANGUAGE_MODE_EX2_PY, SET_LANGUAGE_MODE_EX2_TS,
} from './sdk-reference-constants';

## set\_language\_mode()

Configures the voice agent to understand and respond in additional languages beyond English. The agent starts in the primary language and switches to a secondary language when the caller requests it or speaks in that language.

<CodeTabs
  python={{ code: SET_LANGUAGE_MODE_SIG_PY, filename: "signature" }}
  typescript={{ code: SET_LANGUAGE_MODE_SIG_TS, filename: "signature" }}
/>

<PropTable rows={[
  {
    name: "primary",
    type: "Language",
    default: '"english"',
    desc: "The language the agent starts the conversation in.",
  },
  {
    name: "secondary",
    type: "list[Language] | None",
    default: "None",
    desc: "Additional languages the agent can switch to when the caller requests them.",
  },
]} />

The `Language` type is defined as:

```
Literal["english", "spanish", "french", "german", "italian"]
```

**Return value:** `None` / `Promise<void>`

### Example: single secondary language

<CodeTabs
  python={{ code: SET_LANGUAGE_MODE_EX1_PY, filename: "example.py" }}
  typescript={{ code: SET_LANGUAGE_MODE_EX1_TS, filename: "example.ts" }}
/>

### Example: multiple secondary languages

<CodeTabs
  python={{ code: SET_LANGUAGE_MODE_EX2_PY, filename: "example.py" }}
  typescript={{ code: SET_LANGUAGE_MODE_EX2_TS, filename: "example.ts" }}
/>

### Transcript behavior

- There is no auto-translation on the transcript. Each turn appears in the language it was spoken in — if the caller speaks Spanish, that turn is in Spanish; if they speak English, that turn is in English.
- There is currently no per-turn language marker in the transcript.

### Edge cases

- If `secondary` is `None` or empty, the agent operates in `primary` only (the current default behavior).
- When a non-English language is detected during a call, the system automatically switches to a language-specific TTS voice.
- The `grace` voice has clones for Spanish, French, German, and Italian. If no dedicated clone exists for a voice + language combination, the base voice is used.

<Callout>
  <span className="text-primary font-semibold">Compliance:</span> Non-English languages are not currently supported for HITRUST / PCI-compliant deployments. Support is planned.
</Callout>

<NextLink section="field" label="Field" />


---

<!-- section: transfer -->

import { CodeTabs } from '../views/docs/CodeTabs';
import { Callout, NextLink, PropTable } from '../views/docs/prose';
import {
  TRANSFER_SIG_PY, TRANSFER_SIG_TS,
  TRANSFER_EX_PY, TRANSFER_EX_TS,
} from './sdk-reference-constants';

## transfer()

`call.transfer()` hands the active call off to another phone number or SIP address. It is a soft transfer — the agent notifies the caller before bridging, so there's no abrupt silence or dead air.

<CodeTabs
  python={{ code: TRANSFER_SIG_PY, filename: "signature" }}
  typescript={{ code: TRANSFER_SIG_TS, filename: "signature" }}
/>

<PropTable rows={[
  {
    name: "destination",
    type: "str",
    desc: "The phone number or SIP address to transfer the call to.",
  },
  {
    name: "instructions",
    type: "str | None",
    desc: 'What the agent should say before bridging. Defaults to a generic "I\'ll transfer you now" message.',
  },
]} />

### Example

<CodeTabs
  python={{ code: TRANSFER_EX_PY, filename: "example.py" }}
  typescript={{ code: TRANSFER_EX_TS, filename: "example.ts" }}
/>

<NextLink section="hangup" label="hangup()" />


---

<!-- section: hangup -->

import { CodeTabs } from '../views/docs/CodeTabs';
import { Callout, NextLink, PropTable } from '../views/docs/prose';
import {
  HANGUP_SIG_PY, HANGUP_SIG_TS,
  HANGUP_EX_PY, HANGUP_EX_TS,
} from './sdk-reference-constants';

## hangup()

`call.hangup()` is a soft hangup. Rather than cutting the call immediately, it hands the agent a final instruction and lets it close the conversation naturally before ending the call. Callers hear a proper goodbye.

<CodeTabs
  python={{ code: HANGUP_SIG_PY, filename: "signature" }}
  typescript={{ code: HANGUP_SIG_TS, filename: "signature" }}
/>

<PropTable rows={[
  {
    name: "final_instructions",
    type: "str",
    desc: "What the agent should do before hanging up. If omitted, the agent ends the conversation naturally with no special instructions.",
  },
]} />

### Example

<CodeTabs
  python={{ code: HANGUP_EX_PY, filename: "example.py" }}
  typescript={{ code: HANGUP_EX_TS, filename: "example.ts" }}
/>

<Callout>
  <span className="text-primary font-semibold">Tip:</span> Be specific in your final instructions. The agent will try to fulfill them naturally — including mentioning a confirmation number, scheduling next steps, or expressing appropriate warmth.
</Callout>

<NextLink section="reach-person" label="reach_person()" />


---

<!-- section: reach-person -->

import { CodeTabs } from '../views/docs/CodeTabs';
import { Callout, NextLink, PropTable } from '../views/docs/prose';
import {
  REACH_PERSON_SIG_PY, REACH_PERSON_SIG_TS,
  REACH_PERSON_EX_PY, REACH_PERSON_EX_TS,
} from './sdk-reference-constants';

## reach\_person()

For outbound calls, `reach_person()` handles the critical first step: confirming you have the right person on the line before proceeding. It automatically handles answering machines, gatekeepers, wrong numbers, and refusals.

<CodeTabs
  python={{ code: REACH_PERSON_SIG_PY, filename: "signature" }}
  typescript={{ code: REACH_PERSON_SIG_TS, filename: "signature" }}
/>

<PropTable rows={[
  {
    name: "contact_full_name",
    type: "str",
    desc: "The full name of the person you're trying to reach.",
  },
  {
    name: "greeting",
    type: "str | None",
    default: "None",
    desc: "Custom greeting message. Overrides the default introduction.",
  },
  {
    name: "outcomes",
    type: "list[ReachPersonOutcome] | None",
    default: "None",
    desc: "Custom outcome routing. Defaults to a binary available/unavailable split. Use this to define additional outcomes (e.g. callback requested, wrong number, DNC).",
  },
]} />

<CodeTabs
  python={{ code: REACH_PERSON_EX_PY, filename: "example.py" }}
  typescript={{ code: REACH_PERSON_EX_TS, filename: "example.ts" }}
/>


### What happens on the call

When `reach_person()` is invoked, the agent automatically:

1. **Greets** whoever answers and introduces itself (organization + purpose).
2. **Asks for the contact** by name. If someone else answered, asks to speak with or be transferred to the contact.
3. **Determines availability** and records the contact's availability in a `contact_availability` field.
4. **Fires `agent.on_reach_person`** with the outcome key (`"available"`, `"unavailable"`, or a custom outcome if you provided `outcomes`).

### Common mistake: redundant introductions

<Callout>
  <span className="text-primary font-semibold">Warning:</span> By the time `on_reach_person` fires, the agent has already introduced itself and stated the purpose of the call. Do **not** re-introduce in the first task after `reach_person`.
</Callout>

```python
# WRONG — redundant introduction
@agent.on_reach_person
def on_reach_person(call: guava.Call, outcome: str):
    if outcome == "available":
        call.set_task("survey", checklist=[
            guava.Say("Hi, this is Grace from Acme Corp, I'm calling about..."),  # Already said this
            ...
        ])

# RIGHT — go straight to content
@agent.on_reach_person
def on_reach_person(call: guava.Call, outcome: str):
    if outcome == "available":
        call.set_task("survey", checklist=[
            guava.Say("I just have a few quick questions for you today."),
            ...
        ])
```

<NextLink section="read-script" label="read_script()" />


---

<!-- section: read-script -->

import { CodeTabs } from '../views/docs/CodeTabs';
import { Callout, NextLink } from '../views/docs/prose';
import {
  READ_SCRIPT_SIG_PY, READ_SCRIPT_SIG_TS,
  READ_SCRIPT_EX_PY, READ_SCRIPT_EX_TS,
} from './sdk-reference-constants';

## read\_script()

`read_script()` speaks a verbatim opening statement at the very start of a call, before any LLM involvement. Use it for compliance disclosures, scripted greetings, or anything that must be delivered word-for-word.

<CodeTabs
  python={{ code: READ_SCRIPT_SIG_PY, filename: "signature" }}
  typescript={{ code: READ_SCRIPT_SIG_TS, filename: "signature" }}
/>

<CodeTabs
  python={{ code: READ_SCRIPT_EX_PY, filename: "example.py" }}
  typescript={{ code: READ_SCRIPT_EX_TS, filename: "example.ts" }}
/>

<Callout>
  <span className="text-primary font-semibold">Note:</span> Unlike `Say` in a checklist, `read_script()` fires before any LLM turn and before any task is set. It's the agent's very first words.
</Callout>

<NextLink section="get-field" label="get_field()" />


---

<!-- section: add-info -->

import { CodeTabs } from '../views/docs/CodeTabs';
import { NextLink, PropTable } from '../views/docs/prose';

export const ADD_INFO_SIG_PY = `def add_info(label: str, info: Any) -> None`;

export const ADD_INFO_SIG_TS = `addInfo(label: string, info: any): Promise<void>`;

export const ADD_INFO_EX_PY = `AMENITIES_INFO = {
    "amenities": [
        "Rooftop pool",
        "Full-service spa",
        "Fitness center",
        "Business center",
        "Complimentary airport shuttle",
    ]
}

agent = guava.Agent(
    name="Riley",
    organization="Oceanfront Hotel",
    purpose="You are the head concierge tasked with assisting guests with questions and reservations.",
)

@agent.on_call_start
def on_call_start(call: guava.Call):
    call.add_info("amenities_details", AMENITIES_INFO)`;

export const ADD_INFO_EX_TS = `const AMENITIES_INFO = {
  amenities: [
    "Rooftop pool",
    "Full-service spa",
    "Fitness center",
    "Business center",
    "Complimentary airport shuttle",
  ],
};

const agent = new guava.Agent({
  name: "Riley",
  organization: "Oceanfront Hotel",
  purpose: "You are the head concierge tasked with assisting guests with questions and reservations.",
});

agent.onCallStart(async (call: guava.Call) => {
  await call.addInfo("amenities_details", AMENITIES_INFO);
})`;

## add\_info()

`add_info()` can be used to provide Guava agents with additional context. Once called, the information persists for the duration of the call and
surfaces naturally when relevant. It can be called at the start of a call as well as any time during a call.

<CodeTabs
  python={{ code: ADD_INFO_SIG_PY, filename: "signature" }}
  typescript={{ code: ADD_INFO_SIG_TS, filename: "signature" }}
/>

### Example

<CodeTabs
  python={{ code: ADD_INFO_EX_PY, filename: "example.py" }}
  typescript={{ code: ADD_INFO_EX_TS, filename: "example.ts" }}
/>

<NextLink section="get-field" label="get_field()" />


---

<!-- section: get-field -->

import { CodeTabs } from '../views/docs/CodeTabs';
import { Callout, NextLink } from '../views/docs/prose';
import {
  GET_FIELD_SIG_PY, GET_FIELD_SIG_TS,
  GET_FIELD_EX_PY, GET_FIELD_EX_TS,
} from './sdk-reference-constants';

## get_field()

After the checklist completes and `agent.on_task_complete` fires, use `call.get_field()` to retrieve collected values by their key. This is where you write results to your CRM, database, or EHR.

<CodeTabs
  python={{ code: GET_FIELD_SIG_PY, filename: "signature" }}
  typescript={{ code: GET_FIELD_SIG_TS, filename: "signature" }}
/>

<CodeTabs
  python={{ code: GET_FIELD_EX_PY, filename: "example.py" }}
  typescript={{ code: GET_FIELD_EX_TS, filename: "example.ts" }}
/>

### Return types by field type

The type of the value returned by `get_field()` depends on the field's `field_type`:

| `field_type` | Returned value |
|---|---|
| `text` | `str` |
| `date` | `dict` with keys `year`, `month`, `day` (all `int`) |
| `integer` | `int` |
| `multiple_choice` | `str` (guaranteed to be one of the values in `choices` or returned by `choice_generator`) |
| `calendar_slot` | ISO-8601 datetime string (e.g. `"2022-12-25T16:30"`) |

<Callout>
  <span className="text-primary font-semibold">Tip:</span> You can call `get_field()` at any point after the field has been collected — not just in `on_task_complete`. Use it in mid-call callbacks to personalize subsequent steps.
</Callout>

<NextLink section="intent-recognizer" label="IntentRecognizer" />


---

<!-- section: intent-helpers -->

import { CodeTabs } from '../views/docs/CodeTabs';
import { Callout, NextLink } from '../views/docs/prose';
import {
  INTENT_RECOGNIZER_SIG_PY, INTENT_RECOGNIZER_SIG_TS,
  INTENT_RECOGNIZER_EX_PY, INTENT_RECOGNIZER_EX_TS,
  INTENT_CLARIFIER_SIG_PY, INTENT_CLARIFIER_SIG_TS,
  INTENT_CLARIFIER_EX_PY, INTENT_CLARIFIER_EX_TS,
} from './helpers-constants';

## Intent Helpers

Guava provides two intent classification helpers for routing caller requests: `IntentRecognizer` for single-best-match classification, and `IntentClarifier` for surfacing multiple plausible matches when the caller's intent is ambiguous.

Both classes are imported from `guava.helpers.openai`.

### IntentRecognizer

`IntentRecognizer` classifies a free-text caller utterance into one of your predefined intent labels. Use it inside `on_action_request()` to map vague caller language to clean routing decisions.

<CodeTabs
  python={{ code: INTENT_RECOGNIZER_SIG_PY, filename: "signature" }}
  typescript={{ code: INTENT_RECOGNIZER_SIG_TS, filename: "signature" }}
/>

| Parameter | Type | Required | Description |
|-----------|------|----------|-------------|
| `intent_choices` | `list[str] \| dict[str, str]` | Yes | The set of intents to classify into. Pass a list of choice strings, or a dict mapping choice strings to plain-English descriptions (descriptions improve accuracy on similar-sounding choices). |
| `client` | `openai.OpenAI` | No | An OpenAI client to use. If omitted, a client is created automatically. |

**`classify(intent: str) -> str | None`** — Returns the single choice string from `intent_choices` that best matches `intent`, or `None` if the model cannot match any choice. When `intent_choices` is a `dict`, the keys are the valid return values; values are used only as descriptions to guide the model.

<CodeTabs
  python={{ code: INTENT_RECOGNIZER_EX_PY, filename: "support_agent.py" }}
  typescript={{ code: INTENT_RECOGNIZER_EX_TS, filename: "support_agent.ts" }}
/>

### IntentClarifier

`IntentClarifier` analyzes a caller's intent and returns the subset of choices that could plausibly match, ordered by likelihood. Use this when an intent may be ambiguous and you need to surface options for the caller to confirm.

<CodeTabs
  python={{ code: INTENT_CLARIFIER_SIG_PY, filename: "signature" }}
  typescript={{ code: INTENT_CLARIFIER_SIG_TS, filename: "signature" }}
/>

| Parameter | Type | Required | Description |
|-----------|------|----------|-------------|
| `intent_choices` | `list[str] \| dict[str, str]` | Yes | The set of intents to match against. Same format as `IntentRecognizer`. |
| `client` | `openai.OpenAI` | No | An OpenAI client to use. If omitted, a client is created automatically. |

**`propose_choices(intent: str) -> list[str]`** — Returns a list of choices that could match `intent`, ordered by likelihood:
- One element if the intent clearly maps to a single choice.
- Multiple elements if the intent is ambiguous.
- Empty list if the intent matches none of the provided choices.

An empty list means the caller's intent is out-of-scope — not that an error occurred. When `intent_choices` is a `dict`, only the keys appear in the returned list.

<CodeTabs
  python={{ code: INTENT_CLARIFIER_EX_PY, filename: "scheduler_agent.py" }}
  typescript={{ code: INTENT_CLARIFIER_EX_TS, filename: "scheduler_agent.ts" }}
/>

<Callout>
  <span className="text-primary font-semibold">Model details:</span> Both `IntentRecognizer` and `IntentClarifier` use `gpt-5-mini` with a hardcoded `reasoning.effort` of `"low"`. These settings are not configurable.
</Callout>

<NextLink section="document-qa" label="DocumentQA" />


---

<!-- section: document-qa -->

import { CodeTabs } from '../views/docs/CodeTabs';
import { CodeBlock } from '../views/docs/CodeBlock';
import { Callout, NextLink } from '../views/docs/prose';
import {
  DOCUMENT_QA_SIG_PY, DOCUMENT_QA_SIG_TS,
  DOCUMENT_QA_EX_PY, DOCUMENT_QA_EX_TS,
  DOCUMENT_QA_MGMT_EX_PY,
} from './helpers-constants';

## DocumentQA

`DocumentQA` answers caller questions against documents using retrieval-augmented generation (RAG). It operates in one of two modes:

- **Server mode (default):** Documents are uploaded to the Guava server and questions are answered server-side. Intended for simple use cases with few documents.
- **Local mode:** Bring your own vector store and generation model for full control over the RAG pipeline. Guava provides ready-made backends for ChromaDB, LanceDB, pgvector, and Pinecone.

### Constructor

<CodeTabs
  python={{ code: DOCUMENT_QA_SIG_PY, filename: "signature" }}
  typescript={{ code: DOCUMENT_QA_SIG_TS, filename: "signature" }}
/>

| Parameter | Type | Required | Default | Description |
|-----------|------|----------|---------|-------------|
| `store` | `VectorStore \| None` | No | `None` | Vector store for local mode. When omitted, server mode is used automatically. |
| `documents` | `list[str] \| str \| None` | No | `None` | Documents to index at construction time. Accepts a single string or a list. |
| `ids` | `list[str] \| None` | No | `None` | Caller-provided IDs for each document, enabling later `upsert_document` / `delete_document`. Length must match `documents` if provided. |
| `chunk_size` | `int` | No | `5000` | Maximum characters per chunk (local mode only). |
| `chunk_overlap` | `int` | No | `200` | Overlap between consecutive chunks in characters (local mode only). |
| `instructions` | `str \| None` | No | `None` | System instruction for the generation model. Overrides the built-in default. |
| `generation_model` | `GenerationModel \| None` | Local mode | `None` | Generation model for producing answers. Required when `store` is provided. |
| `namespace` | `str \| None` | Server mode | `None` | Stable string to scope this instance's documents on the server. |

<Callout>
  <span className="text-primary font-semibold">namespace requirement:</span> In server mode, `namespace` is required when running multiple `DocumentQA` instances concurrently — even across different files. Without a namespace, concurrent instances may interfere with each other's document stores.
</Callout>

### Methods

**`ask(question: str, k: int = 5) -> str`** — Retrieve relevant chunks and generate an answer. In server mode, `k` is ignored (the server uses full document context).

**`upsert_document(key: str, text: str) -> None`** — Add or replace a document by key. Stale chunks from a previously longer document are deleted automatically.

**`add_document(text: str) -> None`** — Add a document without specifying a key. In server mode, uses a content-derived key (SHA-256 hash).

**`delete_document(key: str) -> None`** — Delete a previously upserted document by key.

**`clear() -> None`** — Remove all documents from the store.

### Available VectorStore Backends (Local Mode)

| Class | Import | Install | Default Embedding |
|-------|--------|---------|-------------------|
| `ChromaVectorStore` | `guava.helpers.chromadb` | `pip install 'gridspace-guava[chromadb]'` | Built-in `all-MiniLM-L6-v2` (no API needed) |
| `LanceDBStore` | `guava.helpers.lancedb` | `pip install 'gridspace-guava[lancedb]'` | Required — pass an `EmbeddingModel` |
| `PgVectorStore` | `guava.helpers.pgvector` | `pip install 'gridspace-guava[pgvector]'` | Required — pass an `EmbeddingModel` |
| `PineconeVectorStore` | `guava.helpers.pinecone` | `pip install 'gridspace-guava[pinecone]'` | `multilingual-e5-large` via Pinecone Inference |

See the <a href="/docs/vector-stores">Vector Stores</a> reference for full constructor details and backend-specific options.

### Examples

<CodeTabs
  python={{ code: DOCUMENT_QA_EX_PY, filename: "document_qa_examples.py" }}
  typescript={{ code: DOCUMENT_QA_EX_TS, filename: "document_qa_examples.ts" }}
/>

### Incremental Document Management

Use `ids` to assign stable keys to documents at construction time, then use `upsert_document`, `delete_document`, and `clear` to manage documents without re-creating the `DocumentQA` instance.

<CodeBlock code={DOCUMENT_QA_MGMT_EX_PY} filename="document_management.py" language="python" />

<NextLink section="datetime-filter" label="DatetimeFilter" />


---

<!-- section: datetime-filter -->

import { CodeTabs } from '../views/docs/CodeTabs';
import { Callout, NextLink } from '../views/docs/prose';
import {
  DATETIME_FILTER_SIG_PY, DATETIME_FILTER_SIG_TS,
  DATETIME_FILTER_EX_PY, DATETIME_FILTER_EX_TS,
  DATETIME_FILTER_FIELD_EX_PY, DATETIME_FILTER_FIELD_EX_TS,
} from './helpers-constants';

## DatetimeFilter

`DatetimeFilter` filters a list of ISO 8601 datetime strings to find entries matching a natural-language query (e.g. "tomorrow afternoon"). Returns both matching datetimes and fallback suggestions when no exact match exists.

### Constructor

<CodeTabs
  python={{ code: DATETIME_FILTER_SIG_PY, filename: "signature" }}
  typescript={{ code: DATETIME_FILTER_SIG_TS, filename: "signature" }}
/>

| Parameter | Type | Required | Description |
|-----------|------|----------|-------------|
| `source_list` | `list[str]` | Yes | The pool of available appointment datetimes in ISO 8601 format (e.g. `"2026-03-02T09:00:00"`). The model will only return values present in this list. |
| `client` | `openai.OpenAI` | No | An OpenAI client to use. If omitted, a client is created automatically. |

### Methods

**`filter(query: str, max_results: int = 5) -> tuple[list[str], list[str]]`**

Returns a 2-tuple `(matching_appointments, other_appointments)`:
- `matching_appointments`: datetimes from `source_list` that match `query`, capped at `max_results`.
- `other_appointments`: alternative datetimes to suggest when `matching_appointments` is empty, also capped at `max_results`.

### Edge Cases

- Raises `AssertionError` if `max_results` is not an `int`.
- Both output lists are guaranteed to contain only values drawn from `source_list` — the model is explicitly instructed never to hallucinate datetimes.
- Today's date is injected into the prompt automatically, so relative queries like "tomorrow" and "next week" resolve correctly without any date math on the caller's side.
- `other_appointments` may be non-empty even when `matching_appointments` is empty — use it to offer the caller nearby alternatives.

<Callout>
  <span className="text-primary font-semibold">Model details:</span> `DatetimeFilter` uses `gpt-5-mini` with `reasoning.effort = "medium"`. These settings are not configurable.
</Callout>

### Basic Usage

<CodeTabs
  python={{ code: DATETIME_FILTER_EX_PY, filename: "datetime_filter.py" }}
  typescript={{ code: DATETIME_FILTER_EX_TS, filename: "datetime_filter.ts" }}
/>

### Using with `Field` and `on_search_query`

A common pattern is to pair `DatetimeFilter` with a `Field` of type `"calendar_slot"` with `searchable=True`, and wire the filter into the `on_search_query` callback:

<CodeTabs
  python={{ code: DATETIME_FILTER_FIELD_EX_PY, filename: "scheduling_agent.py" }}
  typescript={{ code: DATETIME_FILTER_FIELD_EX_TS, filename: "scheduling_agent.ts" }}
/>

<NextLink section="vector-stores" label="Vector Stores" />


---

<!-- section: vector-stores -->

import { CodeBlock } from '../views/docs/CodeBlock';
import { Callout, NextLink } from '../views/docs/prose';
import { VECTOR_STORES_EX_PY } from './helpers-constants';

## Vector Stores

Guava provides four ready-made `VectorStore` implementations that can be passed directly to `DocumentQA` as the `store` argument. Each wraps a popular vector database and handles embedding, indexing, and similarity search.

<Callout>
  <span className="text-primary font-semibold">Python only:</span> Vector store backends are currently available in Python only. TypeScript equivalents are not yet available.
</Callout>

### Installation

Install only the backend(s) you need:

- `pip install 'gridspace-guava[chromadb]'`
- `pip install 'gridspace-guava[lancedb]'`
- `pip install 'gridspace-guava[pgvector]'`
- `pip install 'gridspace-guava[pinecone]'`

Importing a backend class without the corresponding extra installed raises `ImportError` with an install hint.

### ChromaVectorStore

`from guava.helpers.chromadb import ChromaVectorStore`

| Parameter | Type | Required | Default | Description |
|-----------|------|----------|---------|-------------|
| `path` | `str \| None` | No | `"./chroma_data"` | Directory for persistent storage. Pass `None` for an in-memory ephemeral store. |
| `collection_name` | `str` | No | `"chunks"` | ChromaDB collection name. |
| `embedding_model` | `EmbeddingModel \| None` | No | `None` | External embedding model. When omitted, ChromaDB's built-in `all-MiniLM-L6-v2` model is used — no external API needed. |

### LanceDBStore

`from guava.helpers.lancedb import LanceDBStore`

| Parameter | Type | Required | Default | Description |
|-----------|------|----------|---------|-------------|
| `path` | `str` | No | `"./lancedb_data"` | Local path or GCS URI (e.g. `"gs://bucket/lancedb"`) for storage. |
| `table_name` | `str` | No | `"chunks"` | LanceDB table name. |
| `embedding_model` | `EmbeddingModel` | **Yes** | — | Embedding model to use. Pass a configured instance such as `VertexAIEmbedding`. |

<Callout>
  <span className="text-primary font-semibold">Note:</span> LanceDB silently drops tables that predate the current schema version. This triggers a full re-index the next time `DocumentQA` ingests documents.
</Callout>

### PgVectorStore

`from guava.helpers.pgvector import PgVectorStore`

| Parameter | Type | Required | Default | Description |
|-----------|------|----------|---------|-------------|
| `db_url` | `str` | **Yes** | — | PostgreSQL connection string (e.g. `"postgresql://user:pass@host/db"`). |
| `table_name` | `str` | No | `"guava_chunks"` | Table name for stored chunks. |
| `embedding_model` | `EmbeddingModel` | **Yes** | — | Embedding model to use. Pass a configured instance such as `VertexAIEmbedding`. |

`PgVectorStore` creates the `vector` extension, chunks table, and HNSW cosine index automatically on first connect. If the connecting user lacks `CREATE EXTENSION` privileges, initialization will fail.

<Callout>
  <span className="text-primary font-semibold">Managed Postgres:</span> Managed services (Cloud SQL, AlloyDB, RDS) are untested but expected to work since the implementation uses standard `psycopg`.
</Callout>

### PineconeVectorStore

`from guava.helpers.pinecone import PineconeVectorStore`

| Parameter | Type | Required | Default | Description |
|-----------|------|----------|---------|-------------|
| `api_key` | `str \| None` | No | env `PINECONE_API_KEY` | Pinecone API key. If omitted, reads from the environment. |
| `index_name` | `str` | No | `"guava-chunks"` | Pinecone index name. Created automatically if it does not exist. |
| `cloud` | `str` | No | `"aws"` | Serverless cloud provider for index creation. Ignored if the index already exists. |
| `region` | `str` | No | `"us-east-1"` | Serverless region for index creation. Ignored if the index already exists. |
| `embedding_model` | `EmbeddingModel \| None` | No | `PineconeInferenceEmbedding` | Defaults to `multilingual-e5-large` (1024-dim) via Pinecone's hosted Inference API. |

<Callout>
  <span className="text-primary font-semibold">Cold start:</span> Pinecone index creation can take 30–60 seconds on first use. Subsequent instantiations with the same `index_name` skip creation and connect immediately.
</Callout>

### PineconeInferenceEmbedding

`from guava.helpers.pinecone import PineconeInferenceEmbedding`

| Parameter | Type | Required | Default | Description |
|-----------|------|----------|---------|-------------|
| `pc` | `Pinecone` | **Yes** | — | A configured `Pinecone` client instance. |
| `model` | `str` | No | `"multilingual-e5-large"` | Pinecone inference model name. |
| `dimensionality` | `int` | No | `1024` | Output vector size. |

### GenerationModel

Any implementation of the `guava.helpers.rag.GenerationModel` interface works with `DocumentQA` in local mode. The examples on this page use `VertexAIGeneration`, but other LLM providers can be used as well.

### Examples

<CodeBlock code={VECTOR_STORES_EX_PY} filename="vector_store_examples.py" language="python" />

<NextLink section="inbound-calls" label="Inbound Calls" />


---

<!-- section: api-overview -->

import { CodeBlock } from '../views/docs/CodeBlock';
import { Callout } from '../views/docs/prose';

## API Reference

The Guava REST API lets you manage calls, agents, and account resources directly over HTTP — no SDK required.

### Base URL

All requests are made to:

```
https://api.goguava.ai/v1
```

### Authentication

Include your API key in the `Authorization` header on every request:

```
Authorization: Bearer YOUR_GUAVA_API_KEY
```

### POST /v1/check-sdk-deprecation

Check the deprecation status of a specific SDK version.

#### Request parameters

| Name | Type | Required | Description |
|------|------|----------|-------------|
| sdk_name | string | Yes | `"python-sdk"` or `"typescript-sdk"` |
| sdk_version | string | Yes | The version to check (e.g. `"0.5.0"`) |

#### Response fields

| Name | Type | Description |
|------|------|-------------|
| deprecation_status | string | `"supported"` or `"deprecated"` |

#### Example

<CodeBlock
  filename="terminal"
  language="bash"
  code={`curl -X POST https://api.goguava.ai/v1/check-sdk-deprecation \\
  -H "Authorization: Bearer $GUAVA_API_KEY" \\
  -H "Content-Type: application/json" \\
  -d '{"sdk_name": "python-sdk", "sdk_version": "0.5.0"}'`}
/>

Sample response:

<CodeBlock
  filename="response.json"
  language="json"
  code={`{
  "deprecation_status": "supported"
}`}
/>

<Callout>
  This endpoint is REST-only — there is no SDK or CLI method for it yet.
</Callout>


---

<!-- section: conversations-api -->

import { Callout } from '../views/docs/prose';

## Conversations

These endpoints let you retrieve, inspect, and delete conversation data for completed calls.

<Callout>
  All requests require an `Authorization: Bearer YOUR_GUAVA_API_KEY` header. See the <a href="/docs/api-overview">API Overview</a> for details.
</Callout>

### Get conversation details

```
GET /v1/conversations/{call_id}
```

Retrieve metadata about a single conversation.

#### Parameters

| Name | Type | Required | Description |
|------|------|----------|-------------|
| `call_id` | string | Yes | ID of the call |

#### Response

A JSON object with the following fields:

| Field | Type | Description |
|-------|------|-------------|
| `call_id` | string | ID of the call |
| `ts` | string | Date of the call in ISO 8601 format |
| `direction` | string | `"inbound"` or `"outbound"` (from the perspective of your agent) |
| `from_number` | string | Phone number that initiated the call |
| `to_number` | string | Phone number that received the call |
| `duration_sec` | integer | How long the call lasted in seconds |
| `campaign_id` | string (nullable) | Outbound campaign that initiated this call, if applicable |

#### Errors

| Status | Description |
|--------|-------------|
| 401 | Invalid authentication |
| 404 | The call with this ID does not exist |

#### Example

```bash
curl -H 'Authorization: Bearer YOUR_GUAVA_API_KEY' \
  https://api.goguava.ai/v1/conversations/6064ab9663dc4eb0
```

---

### Get conversation transcript

```
GET /v1/conversations/{call_id}/transcript
```

Download the transcript for a conversation as a list of turns.

#### Parameters

| Name | Type | Required | Description |
|------|------|----------|-------------|
| `call_id` | string | Yes | ID of the call |

#### Response

A JSON array of turn objects. Each turn has:

| Field | Type | Description |
|-------|------|-------------|
| `speaker` | string | `"HUMAN"` or `"AGENT"` |
| `text` | string | What was said by the speaker |
| `offset_ms` | integer | Milliseconds into the call when this turn began |

#### Errors

| Status | Description |
|--------|-------------|
| 401 | Invalid authentication |
| 404 | The call with this ID does not exist |

#### Example

```bash
curl -H 'Authorization: Bearer YOUR_GUAVA_API_KEY' \
  https://api.goguava.ai/v1/conversations/6064ab9663dc4eb0/transcript
```

---

### Get conversation recording

```
GET /v1/conversations/{call_id}/recording
```

Download the audio recording for a conversation in WAV format.

#### Parameters

| Name | Type | Required | Description |
|------|------|----------|-------------|
| `call_id` | string | Yes | ID of the call |

#### Response

WAV audio file.

#### Errors

| Status | Description |
|--------|-------------|
| 401 | Invalid authentication |
| 404 | The call with this ID does not exist |

#### Example

```bash
curl -H 'Authorization: Bearer YOUR_GUAVA_API_KEY' \
  -o recording.wav \
  https://api.goguava.ai/v1/conversations/6064ab9663dc4eb0/recording
```

---

### Delete a conversation

```
DELETE /v1/conversations/{call_id}
```

Permanently delete a conversation and its associated data.

#### Parameters

| Name | Type | Required | Description |
|------|------|----------|-------------|
| `call_id` | string | Yes | ID of the call |

#### Response

None (empty body).

#### Errors

| Status | Description |
|--------|-------------|
| 401 | Invalid authentication |
| 404 | The call with this ID does not exist |

#### Example

```bash
curl -X DELETE -H 'Authorization: Bearer YOUR_GUAVA_API_KEY' \
  https://api.goguava.ai/v1/conversations/6064ab9663dc4eb0
```


---

<!-- section: webrtc-widgets -->

import { CodeBlock } from '../views/docs/CodeBlock';
import { CodeTabs } from '../views/docs/CodeTabs';
import { Callout, Prose, PropTable, GetStartedCTA } from '../views/docs/prose';

## WebRTC Widget

Embed a Guava voice agent on your website so visitors can start a voice conversation directly from the browser. The WebRTC audio widget is a drop-in `<script>` tag that handles all WebRTC signaling, UI, and state management — no additional CSS, JS, or dependencies required.

### Integration

Add a single `<script>` tag to your page. The only required attribute is `data-webrtc-code`, which is the agent code (starts with `grtc-`) obtained from the Guava dashboard.

<CodeBlock
  filename="index.html"
  language="html"
  code={`<script
  src="https://app.goguava.ai/static/build/webrtc-widgets/guava-widget-audio-orb.js"
  data-webrtc-code="grtc-YOUR_AGENT_CODE_HERE"
></script>`}
/>

### Complete standalone page

If you don't have a page yet, here's a full HTML file you can use as a starting point:

<CodeBlock
  filename="index.html"
  code={`<!DOCTYPE html>
<html lang="en">
  <head>
    <meta charset="UTF-8" />
    <meta name="viewport" content="width=device-width, initial-scale=1" />
    <title>My Voice Agent</title>
  </head>
  <body>
    <script
      src="https://app.goguava.ai/static/build/webrtc-widgets/guava-widget-audio-orb.js"
      data-webrtc-code="grtc-YOUR_AGENT_CODE_HERE"
    ></script>
  </body>
</html>`}
/>

### Script tag attributes

<PropTable rows={[
  { name: "src", type: "URL", desc: "URL to the hosted widget JS file." },
  { name: "data-webrtc-code", type: "string", desc: "The WebRTC agent code (e.g. grtc-nB9oE4...). Obtained from the Guava dashboard." },
]} />

### Widget states

<div className="my-4 overflow-x-auto rounded-lg border border-border">
  <table className="w-full text-sm font-mono">
    <thead>
      <tr className="border-b border-border bg-card/50">
        <th className="text-left px-4 py-3 text-muted-foreground font-semibold">State</th>
        <th className="text-left px-4 py-3 text-muted-foreground font-semibold">Behavior</th>
        <th className="text-left px-4 py-3 text-muted-foreground font-semibold">User action</th>
      </tr>
    </thead>
    <tbody>
      <tr className="bg-transparent">
        <td className="px-4 py-3 text-primary">idle</td>
        <td className="px-4 py-3 text-muted-foreground">Ready to call — green indicator</td>
        <td className="px-4 py-3 text-muted-foreground">Click to call</td>
      </tr>
      <tr className="bg-card/20">
        <td className="px-4 py-3 text-primary">connecting</td>
        <td className="px-4 py-3 text-muted-foreground">Pulsing animation, clicks disabled</td>
        <td className="px-4 py-3 text-muted-foreground">Wait</td>
      </tr>
      <tr className="bg-transparent">
        <td className="px-4 py-3 text-primary">active</td>
        <td className="px-4 py-3 text-muted-foreground">Call in progress — audio-reactive visuals</td>
        <td className="px-4 py-3 text-muted-foreground">Click to hang up</td>
      </tr>
      <tr className="bg-card/20">
        <td className="px-4 py-3 text-primary">error</td>
        <td className="px-4 py-3 text-muted-foreground">Red indicator — connection failed</td>
        <td className="px-4 py-3 text-muted-foreground">Click to retry</td>
      </tr>
    </tbody>
  </table>
</div>

<Callout>
  <span className="text-primary font-semibold">No configuration needed.</span> The widget is entirely self-contained — it injects its own HTML and CSS (scoped under `[data-guava-widget]` so it won't conflict with your page styles), wrapped in an IIFE with no global variables. Works on any page with a modern browser.
</Callout>

### Generating a WebRTC code via SDK

Instead of obtaining a WebRTC code from the Guava dashboard, you can generate one programmatically with `client.create_webrtc_agent()`. This is useful when you need to create codes on-the-fly or control their TTL.

<CodeTabs
  python={{ code: `from guava import Client\nfrom datetime import timedelta\n\nclient = Client(api_key="your-api-key")\n\n# Create a WebRTC code valid for 1 hour\nwebrtc_code = client.create_webrtc_agent(ttl=timedelta(hours=1))\nprint(f"WebRTC code: {webrtc_code}")\n\n# Use the code to listen for inbound calls\nclient.listen_inbound(webrtc_code=webrtc_code, controller_class=MyCallController)`, filename: "generate_code.py" }}
  typescript={{ code: `import * as guava from "@guava-ai/guava-sdk";\n\nconst client = new guava.Client({ apiKey: "your-api-key" });\n\n// Create a WebRTC code valid for 1 hour (3600 seconds)\nconst webrtcCode = await client.createWebrtcAgent({ ttlSec: 3600 });\nconsole.log(\`WebRTC code: \${webrtcCode}\`);\n\n// Use the code to listen for inbound calls\nclient.listenInbound(\n  { webrtc_code: webrtcCode },\n  (logger) => new MyCallController(logger),\n);`, filename: "generate_code.ts" }}
/>

| Parameter | Type | Required | Description |
|-----------|------|----------|-------------|
| `ttl` | `datetime.timedelta \| None` | No | How long the WebRTC code should remain valid. If omitted, the server default TTL applies. |

**Returns:** `str` — a WebRTC code (e.g. `grtc-...`) that can be passed to `listen_inbound(webrtc_code=...)` or used as a `?webrtc_code=<value>` query parameter in the browser widget.

Raises an HTTP error (via `check_response`) if the API request fails.

<GetStartedCTA />


---

<!-- section: agentic-tenacity -->

import { CodeBlock } from '../views/docs/CodeBlock';
import { Callout, Prose, NextLink } from '../views/docs/prose';
import { AGENTIC_TENACITY_EX } from './guides-constants';

## Agentic Tenacity

Agentic Tenacity is an extension to Guavadialer that intelligently reaches out to contacts across multiple channels before calling them. Rather than placing blind cold calls, the system warms contacts with pre-call alerts and responds to inbound messages to reschedule, answer questions, or mark contacts as do-not-call.

<Callout>
  <span className="text-primary font-semibold">Current status:</span> SMS is the only supported outreach modality. Email, WhatsApp, and RCS/iMessage support is planned. Only pre-call messages are supported — post-call follow-ups are not yet implemented.
</Callout>

### How it works

When you upload contacts with outreach modalities enabled, Guava sends a pre-call message before each call attempt. For example: "Hi! This is a message from Harper Valley. We are doing a political opinion survey, and you should receive a call from us in the next 10–30 minutes. If that is not a good time, please reply with a time that works better for you."

The system automatically handles inbound replies — rescheduling calls, answering general questions about the campaign, or marking contacts as DNC.

### Setup

<Prose><span className="text-foreground">1. Apply for SMS permissions</span> — contact the Guava team to enable SMS for your account. This is currently a manual process via a Google Form.</Prose>

<Prose><span className="text-foreground">2. Provide a campaign description</span> — the `description` parameter in `get_or_create_campaign()` is required when using Agentic Tenacity. The agent uses it to respond to messages about who is calling and what the campaign is about.</Prose>

### Setting outreach modalities

Modalities can be set in two places. Per-contact settings take priority over global settings.

<Prose><span className="text-foreground">Per contact:</span> Add an `outreach_modalities` field to individual contact objects. This controls which modalities are used for that specific contact.</Prose>

<Prose><span className="text-foreground">Global shortcut:</span> Pass `outreach_modalities` to `campaign.upload_contacts()` to apply the same modalities to all contacts in that batch (unless a contact has its own setting).</Prose>

If neither is set, no pre-call messages are sent and the campaign behaves as a standard Guavadialer campaign.

### Example

<CodeBlock code={AGENTIC_TENACITY_EX} filename="agentic_campaign.py" language="python" />

<NextLink section="deployment" label="Deployment" />


---

<!-- section: deployment -->

import { CodeBlock } from '../views/docs/CodeBlock';
import { Callout, Prose, NextLink } from '../views/docs/prose';

## Deployment

Guava Deploy is a managed cloud platform that lets you deploy Guava voice-agent projects without provisioning or managing your own infrastructure. When you run `guava deploy up`, the CLI packages your project, builds it in the cloud, and launches it for you. No servers to set up, no infrastructure to manage.

### Security

Your deployments are secure by default:

<Callout>
  <ul className="space-y-2 list-none pl-0 mb-0">
    <li><span className="text-primary font-semibold">Isolated environments</span> — Each deployment runs in its own private sandbox, completely separated from other users' workloads.</li>
    <li><span className="text-primary font-semibold">Network protection</span> — Your sandbox can make outbound requests to the internet (e.g. calling APIs), but no one can connect into your sandbox from the outside.</li>
    <li><span className="text-primary font-semibold">Secure credentials</span> — Your API key and phone number are injected securely at runtime and never appear in logs.</li>
    <li><span className="text-primary font-semibold">Dedicated resources</span> — CPU and memory are reserved for your deployment, so performance is consistent.</li>
  </ul>
</Callout>

### Step-by-step guide

#### Prerequisites

<Prose>- A Guava account</Prose>
<Prose>- A terminal (macOS, Linux, or WSL on Windows)</Prose>

#### Step 1 — Install the CLI

Follow the [Quickstart guide](/docs/quickstart) to install the Guava CLI.

#### Step 2 — Log in

<CodeBlock code="guava login" filename="terminal" language="bash" />

This opens your browser for authentication. Once you log in, the CLI is authenticated and all subsequent commands will use your account.

#### Step 3 — Create a project

<CodeBlock code="guava create my-agent" filename="terminal" language="bash" />

The CLI walks you through interactive configuration:

<Prose>1. **Base image** — Python version (3.10, 3.11, 3.12, 3.13, or 3.14)</Prose>
<Prose>2. **Instance tier** — choose based on your workload:</Prose>

| Tier | CPU | Memory | Use case |
|------|-----|--------|----------|
| `guava-seed` | 1 core | 1Gi | Development / testing |
| `guava-fruit` | 2 cores | 2Gi | Standard production |
| `guava-tree` | 4 cores | 4Gi | High-performance workloads |

<Prose>3. **Phone number** — optionally buy a number now (or later with `guava numbers buy`)</Prose>

This generates the following project structure:

<CodeBlock
  filename="terminal"
  language="bash"
  code={`my-agent/
  .guava          # Project config (project ID, tier, base image, etc.)
  main.py         # Required entry point — your agent code goes here
  pyproject.toml  # Python dependencies
  PRD.md          # Product requirements template
  README.md       # Project readme`}
/>

<Callout>
  <span className="text-primary font-semibold">Important:</span> If you use git, the `.guava` file must be committed and kept up to date. The CLI reads it to identify your project and track deployment state.
</Callout>

#### Deploying an existing project

If you already have a Python project with a `main.py`, you don't need to run `guava create`. Just navigate to your project directory and run:

<CodeBlock code="guava deploy up" filename="terminal" language="bash" />

The CLI will detect that there's no `.guava` config and ask if you'd like to initialize one. It will then prompt you for a base image and instance tier, generate a `.guava` file, and proceed with the deploy.

#### Step 4 — Write your agent code

Edit `main.py` with your voice-agent logic.

For dependencies, Guava supports several common Python workflows. The build system automatically detects which one you're using based on the files in your project:

| Files present | What happens |
|---------------|--------------|
| `uv.lock` + `pyproject.toml` | Installs with `uv sync --frozen` (locked, reproducible) |
| `poetry.lock` + `pyproject.toml` | Installs with `uv sync` |
| `pyproject.toml` (alone) | Installs with `uv sync` |
| `requirements.txt` | Installs with `uv pip install -r requirements.txt` |
| `requirements.in` | Installs with `uv pip install -r requirements.in` |

#### Step 5 — Deploy

<CodeBlock code="guava deploy up" filename="terminal" language="bash" />

The CLI will:

<Prose>1. **Check for changes** — if your code hasn't changed since the last deploy, the build step is skipped automatically.</Prose>
<Prose>2. **Upload your code** to cloud storage.</Prose>
<Prose>3. **Build a container image** with your chosen Python version and dependencies. The CLI shows build progress in the terminal.</Prose>
<Prose>4. **Launch your sandbox** and wait until it's running. The CLI shows the deployment status as it starts up.</Prose>

To force a full rebuild even if your code hasn't changed:

<CodeBlock code="guava deploy up --rebuild" filename="terminal" language="bash" />

If a deployment is already running, the CLI will ask whether to reuse or replace it.

#### Step 6 — Check deployment status

<CodeBlock code="guava deploy status" filename="terminal" language="bash" />

Shows whether your deployment is starting up, running, or has encountered an error.

#### Step 7 — View logs

<CodeBlock
  filename="terminal"
  language="bash"
  code={`# Runtime logs (default: last 200 lines, max 1000)
guava deploy logs
guava deploy logs -n 500

# Build logs (returns a temporary URL to view full build output)
guava deploy build-logs`}
/>

#### Step 8 — List all deployments

<CodeBlock code="guava deploy ls" filename="terminal" language="bash" />

Prints a table with columns: NAME, NUMBER, ACTIVE, ID.

#### Step 9 — Update project configuration

<CodeBlock code="guava deploy update" filename="terminal" language="bash" />

Re-prompts for configuration fields (name, base image, tier) with current values shown as defaults.

#### Step 10 — Check for code changes

<CodeBlock code="guava deploy changed" filename="terminal" language="bash" />

Tells you whether your code has changed since the last deploy.

#### Step 11 — Tear down

<CodeBlock code="guava deploy down" filename="terminal" language="bash" />

Stops the running sandbox. You can also target a specific task:

<CodeBlock code={`guava deploy down --id <task-id>`} filename="terminal" language="bash" />

### Phone number management

Buy a phone number for your project at any time:

<CodeBlock code="guava numbers buy" filename="terminal" language="bash" />

The CLI fetches available numbers, shows you a match, and stores the purchased number in `.guava`. On the next deploy, the number is passed to your sandbox as the `GUAVA_AGENT_NUMBER` environment variable.

### File caching

<Callout>
  If you need to cache a file at runtime, write it to <code>/tmp</code>. Note that <code>/tmp</code> is ephemeral: contents are lost when the sandbox restarts.
</Callout>

### Quick reference

For a full list of commands and options, see the [CLI Reference](/docs/cli-reference).

<NextLink section="cli-reference" label="CLI Reference" />


---

<!-- section: cli-reference -->

import { CodeBlock } from '../views/docs/CodeBlock';
import { Callout, Prose, NextLink } from '../views/docs/prose';

## CLI Reference

`guava` is the primary interface for working with Guava. It handles project scaffolding, deployment, phone number provisioning, and deployment lifecycle management (logs, status, teardown). The Guava SDK is installed automatically as part of the project template.

### Quick reference

| Command | Description |
|---------|-------------|
| `guava login` | Authenticate via OAuth |
| `guava create <name>` | Scaffold a new project |
| `guava deploy up` | Build and deploy (add `--rebuild` to force) |
| `guava deploy down` | Stop a deployment |
| `guava deploy status` | Check deployment state |
| `guava deploy logs [-n N]` | View runtime logs |
| `guava deploy build-logs` | Get build log URL |
| `guava deploy ls` | List all deployments |
| `guava deploy update` | Reconfigure project settings |
| `guava deploy changed` | Check if code changed since last deploy |
| `guava numbers buy` | Provision a phone number |

### Command reference

#### `guava login`

No parameters. Opens a browser to log in. Credentials are stored locally in `~/.config/guava/config.json` and refreshed automatically on subsequent CLI calls.

#### `guava create`

| Name | Type | Required | Description |
|------|------|----------|-------------|
| name | string | No | Optional project name. If omitted, prompted interactively. Used as the directory name and the generated `CallController` class name. |

#### `guava deploy up`

| Name | Type | Required | Description |
|------|------|----------|-------------|
| dir | string | No | Optional path to the project directory. Defaults to the current directory. |
| --rebuild | flag | No | Force a fresh build even if code has not changed. |

#### `guava deploy down`

| Name | Type | Required | Description |
|------|------|----------|-------------|
| target | string | No | Optional project name or directory path. Defaults to the current directory. |
| --id | string | No | Optional task ID to stop directly. |

#### `guava deploy ls`

No parameters. Lists all deployments for the authenticated user as a table (NAME, NUMBER, ACTIVE, ID).

#### `guava deploy status`

| Name | Type | Required | Description |
|------|------|----------|-------------|
| target | string | No | Optional project name or directory path. If omitted, behaves like `deploy ls`. |

#### `guava deploy logs`

| Name | Type | Required | Description |
|------|------|----------|-------------|
| target | string | No | Optional project name or directory path. Defaults to the current directory. |
| -n, --tail | integer | No | Number of log lines to retrieve (default 200, max 1000). |

#### `guava deploy build-logs`

| Name | Type | Required | Description |
|------|------|----------|-------------|
| target | string | No | Optional project name or directory path. Defaults to the current directory. |
| --id | string | No | Optional Cloud Build ID to look up directly. |

#### `guava deploy update`

| Name | Type | Required | Description |
|------|------|----------|-------------|
| target | string | No | Optional project name or directory path. Defaults to the current directory. |

Re-prompts for all configuration fields (name, base image, tier) with current values shown as defaults.

#### `guava deploy changed`

| Name | Type | Required | Description |
|------|------|----------|-------------|
| target | string | No | Optional project name or directory path. Defaults to the current directory. |

Checks whether project files have changed since the last deploy.

#### `guava numbers buy`

| Name | Type | Required | Description |
|------|------|----------|-------------|
| dir | string | No | Optional path to the project directory. Defaults to the current directory. |

Purchases a phone number and stores it in `.guava`. On the next deploy, the number is available to your code via the `GUAVA_AGENT_NUMBER` environment variable.

### The `.guava` file

Every Guava project has a `.guava` file in its root directory, created by `guava create` or `guava deploy up`. This file stores your project's configuration and deployment state. The CLI reads it to identify your project and track deployments.

<Callout>
  <span className="text-primary font-semibold">Do not edit this file manually.</span> Use `guava deploy update` to change settings. Manually editing `.guava` can put your project into an inconsistent state and cause deploy failures.
</Callout>

<Callout>
  <span className="text-primary font-semibold">Commit this file to git.</span> If you delete it or leave it out of version control, the CLI won't be able to find your project or resume previous deployments.
</Callout>

<CodeBlock
  filename=".guava"
  language="json"
  code={`{
  "project_id": "auto-generated unique ID for your project",
  "name": "your project name",
  "base_image": "base container image, e.g. python-sandbox:3.14",
  "tier": "instance tier: guava-seed, guava-fruit, or guava-tree",
  "phone_number": "assigned phone number (set by guava numbers buy)",
  "task_id": "current deployment ID (managed by the CLI)",
  "build_id": "current build artifact ID (managed by the CLI)",
  "cloud_build_id": "current cloud build job ID (managed by the CLI)",
  "bundle_hash": "hash of your code from the last deploy (managed by the CLI)"
}`}
/>

### Instance tiers

| Tier | CPU | Memory | Use case |
|------|-----|--------|----------|
| `guava-seed` | 1 | 1Gi | Development / testing |
| `guava-fruit` | 2 | 2Gi | Standard production |
| `guava-tree` | 4 | 4Gi | High-performance workloads |

### Base images & dependencies

When you create a project, you choose a base image. During deployment, your code and dependencies are built on top of this image to produce the final container that runs in the cloud. You can change the base image later with `guava deploy update`.

Available base images:

- `python-sandbox:3.14`
- `python-sandbox:3.13`
- `python-sandbox:3.12`
- `python-sandbox:3.11`
- `python-sandbox:3.10`

Dependencies are installed from `pyproject.toml`, `requirements.txt`, `uv.lock`, or `poetry.lock`.

### Troubleshooting

- **"Please run `guava login`"** — Your session has expired or you haven't logged in yet. Run `guava login` to re-authenticate.
- **"No main.py found"** — `deploy up` requires a `main.py` in your project directory. Make sure you're running the command from the right folder.
- **Deploy didn't pick up my changes** — If nothing changed since the last deploy, the build step is skipped automatically. Use `guava deploy up --rebuild` to force a full rebuild.
- **Build failed** — Run `guava deploy build-logs` to see the full build output and diagnose the issue.
- **Missing files in deployment** — `deploy up` excludes `.guava`, hidden files/dirs, `__pycache__`, and `node_modules` from the upload. Make sure your files aren't in an excluded path.
- **Dependencies not installing** — The build system auto-detects dependencies from `pyproject.toml`, `requirements.txt`, `uv.lock`, or `poetry.lock`. Make sure one of these is present in your project root.

### Example

<CodeBlock
  filename="terminal"
  language="bash"
  code={`# Log in (opens browser)
guava login

# Create a new project
guava create my-agent

# Deploy the project
cd my-agent
guava deploy up

# Check status
guava deploy status

# View runtime logs
guava deploy logs -n 50

# List all deployments
guava deploy ls

# Buy a phone number for the project
guava numbers buy

# Tear down
guava deploy down`}
/>

<NextLink section="webrtc-widgets" label="WebRTC Widgets" />


---

<!-- section: deploy-heroku -->

import { CodeBlock } from '../views/docs/CodeBlock';
import { Callout, Prose, NextLink } from '../views/docs/prose';

export const AGENT_CODE = `import os
import guava

from typing_extensions import override
from guava import logging_utils

agent = guava.Agent(
    purpose="You are a helpful voice agent.",
    name="Hannah",
)

@agent.on_call_start()
def on_call_start(call: guava.Call):
    # Set your first task here using call.set_task(...)
    pass

if __name__ == "__main__":
    logging_utils.configure_logging()
    agent.listen_phone("+1...") # Replace with your agent's phone number.
`;

## Deploying to Heroku

Guava agents can be deployed to Heroku. They should be run as a background worker, rather than as part of a web server.

1. Add `guava-sdk` to your Heroku app.
2. Create an API Key on the Guava Dashboard.
3. Use the Heroku dashboard or CLI to add the key to your environment.
4. Add the following to your Procfile: `guava-worker: python agent.py` (or whichever file is your agent’s entrypoint).
5. Push your code and scale the new worker type.

What follows is a detailed guide.

### Add `guava-sdk` as a dependency

Add the Python package `guava-sdk` as a dependency using the package manager of your choice.

```shell
echo "guava-sdk==0.24.0" >> requirements.txt # If using pip + requirements.txt
uv add guava-sdk # If using uv
poetry add guava-sdk # If using poetry
```

### Add a Guava API Key to the Heroku Environment

Open the [API Keys page in the Guava dashboard](https://app.goguava.ai/dashboard/api-keys) and click **Create API Key**. The key should be of the form `gva-...`.

Next, add this key to your Heroku environment, either using the CLI or the Heroku dashboard.

```shell
heroku config:set GUAVA_API_KEY="gva-..."
```

### Define your agent

Define your agent. In this example we'll create it in a file `agent.py`, but you can use anything. Note the entrypoint `agent.listen_phone(...)` at the bottom - this method attaches your agent to the phone number and does not exit.

<CodeBlock filename="agent.py" language="python" code={AGENT_CODE} />

### Add the worker to your Procfile

Add the following section to your Procfile. This will create a new dyno type called "guava-worker".

```make
# Run the Guava agent in a background process.
guava-worker: python agent.py
```

### Push to Heroku

Commit and push your code to Heroku to trigger a deploy.

```shell
git add .
git commit -m "Added Guava agent."
git push heroku main # or master, depending on your setup
```

### Scale the Guava worker up

Scale the newly added worker dyno.

```shell
heroku ps:scale guava-worker=1
```

### Call your agent

Now, you should be able to call your agent. You can use `heroku logs` to check logs for your dynos.

<NextLink section="sip-integrations" label="SIP Integration" />


---

<!-- section: sip-integrations -->

import { CodeBlock } from '../views/docs/CodeBlock';
import { CodeTabs } from '../views/docs/CodeTabs';
import { Callout, NextLink, Prose, PropTable } from '../views/docs/prose';


## SIP Integrations

Guava agents can receive inbound calls over the SIP protocol. You can use this feature to directly dial Guava agents from an SBC, PBX, or softphone without going out to the PSTN.

<Callout>
<strong>Using Twilio?</strong> See the [Twilio Programmable Voice guide](/docs/twilio-programmable-voice) or the [Twilio Elastic SIP guide](/docs/twilio-elastic-sip) for step-by-step walkthroughs.
</Callout>

### Contact us for peer whitelisting

Currently, we are whitelisting SIP peers at our firewall level. Contact us at [hi@goguava.ai](mailto:hi@goguava.ai) to get your source IPs whitelisted.

### Check connectivity

Once whitelisted, try to make an `OPTIONS` ping to our SIP trunk at `sip.goguava.ai`. If the check fails, see our guide below on firewall configuration.

### Create a SIP code

Every SIP integration requires a `guavasip` code, which you can create in the Guava dashboard. `guavasip` codes work just like registered phone numbers — agents can listen to them and peers can dial them.

1. Open the [SIP page in the dashboard](https://app.goguava.ai/dashboard/sip).
2. Click **Create SIP Code**.
3. Take note of both the SIP code and the termination URI.

<CodeBlock
  language="bash"
  code={`# You will see a SIP code like this.
guavasip-xxx

# Your termination URI will look like this.
sip:guavasip-xxx@sip.goguava.ai`}
/>

### Attach your agent to the SIP code

Next, start an agent using `agent.listen_sip("guavasip-xxx")`. This is the SIP equivalent of `agent.listen_phone(...)` — Guava forwards every call addressed to that code to your agent.

<CodeBlock
  filename="main.py"
  language="python"
  code={`import os
import guava

agent = guava.Agent(
    name="Nova",
    organization="Acme Corp",
    purpose="Handle inbound calls from the corporate PBX.",
)

# Register handlers — on_call_received, on_call_start, etc.

# Replace with your SIP code from the dashboard.
agent.listen_sip("guavasip-xxx")`}
/>

<Callout>To connect an agent to both a phone number and a SIP code simultaneously, see the documentation for [guava.Runner](./runner).</Callout>

### Dial your agent

The last step is to dial your agent using the termination URI (e.g. `sip:guavasip-xxx@sip.goguava.ai`). If you're having trouble connecting to your agent, please contact us at [hi@goguava.ai](mailto:hi@goguava.ai).

### Firewall configuration

To dial our SIP trunk from your network, you may need to whitelist us in your firewall.

|     |  |
| -------- | ------- |
| **FQDN**  | The FQDN for the Guava SIP trunk is `sip.goguava.ai`.    |
| **Trunk IP** | The IP address for the Guava SIP trunk is `136.118.29.109`. This IP is used for both media and signaling.     |
| **TCP Ports**    | `5060`, `5061` (TLS)   |
| **UDP Ports** | `5060`, `10000-65535` (Media) |
| **ICMP** | Whitelist ICMP to allow connectivity checks (e.g. `ping`). |
| **Supported Codecs** | `PCMU` (G.711 μ-law), `PCMA` (G.711 a-law) |

---

<!-- section: twilio-programmable-voice -->

import { CodeBlock } from '../views/docs/CodeBlock';
import { Callout, NextLink, Prose, PropTable } from '../views/docs/prose';

## Twilio Programmable Voice (TwiML)

<Callout><strong>Looking for Twilio Elastic SIP?</strong> Check out our [guide here](./twilio-elastic-sip).</Callout>

If you already use Twilio Programmable Voice / TwiML, you can transfer to a Guava agent at any time during your call.

1. Create a Guava SIP code "guavasip-xxx" [on the Guava dashboard](https://app.goguava.ai/dashboard/sip).
2. Attach an agent to the SIP code.
3. Use the following TwiML template to transfer to your agent.

<CodeBlock
  language="xml"
  code={`<Response>
    <Dial>
      <Sip>sip:guavasip-xxx@sip.goguava.ai</Sip>
    </Dial>
</Response>`}
/>

Below is a more detailed guide.

### Create a Guava SIP code

Every SIP integration in Guava requires a `guavasip` code. `guavasip` codes are used to route inbound calls to agents — agents can listen to codes and peers dial them.

Open the [SIP page in the Guava dashboard](https://app.goguava.ai/dashboard/sip) and click **Create SIP Code**.

<p style={{display: "flex", justifyContent: "center", margin: "1.5rem 0"}}>
    <img style={{maxWidth: "700px", width: "100%", borderRadius: "6px"}} src="/docs/sip-dashboard.png" alt="Guava SIP dashboard" />
</p>

Take note of the SIP code and the termination URI.


### Start an agent

Next, start an agent using `agent.listen_sip("guavasip-xxx")` — Guava forwards every call addressed to that code to your agent.

<CodeBlock
  filename="main.py"
  language="python"
  code={`import os
import guava

agent = guava.Agent(
    name="Nova",
    organization="Acme Corp",
)

# Register handlers — on_call_received, on_call_start, etc.

# Replace with your SIP code from the dashboard.
agent.listen_sip("guavasip-xxx")`}
/>


### Twilio Example: Outbound Call

Initiate an outbound call through Twilio, then use a `Dial` command to transfer the call to your Guava agent using the termination URI.

<CodeBlock
  filename="twilio_outbound.py"
  language="python"
  code={`import os
from twilio.rest import Client

client = Client(
    os.environ["TWILIO_ACCOUNT_SID"],
    os.environ["TWILIO_AUTH_TOKEN"]
)

client.calls.create(
    to="+1...", # The recipient of the call.
    from_="+1...", # Your owned Twilio number.
    twiml="<Response><Dial><Sip>sip:guavasip-xxx@sip.goguava.ai</Sip></Dial></Response>",
)`}
/>


---

<!-- section: twilio-elastic-sip -->

import { CodeBlock } from '../views/docs/CodeBlock';
import { CodeTabs } from '../views/docs/CodeTabs';
import { Callout, NextLink, Prose, PropTable } from '../views/docs/prose';


## Twilio Elastic SIP Integration

<Callout><strong>Looking for TwiML examples?</strong> Check out our [Twilio Programmable Voice / TwiML guide](./twilio-programmable-voice).</Callout>

If you already own a phone number in Twilio and want to connect it to a Guava agent, you can do so using Twilio Elastic SIP Trunking.

### Create a Guava SIP code

Every SIP integration in Guava requires a `guavasip` code. `guavasip` codes are used to route inbound calls to agents — agents can listen to them and peers can dial them.

Open the [SIP page in the Guava dashboard](https://app.goguava.ai/dashboard/sip) and click **Create SIP Code**.

<p style={{display: "flex", justifyContent: "center", margin: "1.5rem 0"}}>
    <img style={{maxWidth: "700px", width: "100%", borderRadius: "6px"}} src="/docs/sip-dashboard.png" alt="Guava SIP dashboard" />
</p>

Take note of the SIP code and the termination URI.

### Create a Twilio Elastic SIP trunk

Navigate to the "Elastic SIP Trunks" page on your Twilio Console. You can find it using the search bar in the top right.

<p style={{display: "flex", justifyContent: "center", margin: "1.5rem 0"}}>
    <img style={{maxWidth: "400px", width: "100%", borderRadius: "6px"}} src="/docs/twilio-elastic-sip-search.png" alt="Elastic SIP Trunks in the Twilio console" />
</p>

Click **Create new SIP Trunk** and provide the trunk with a name.

<p style={{display: "flex", justifyContent: "center", margin: "1.5rem 0"}}>
    <img style={{maxWidth: "700px", width: "100%", borderRadius: "6px"}} src="/docs/twilio-elastic-sip-trunks.png" alt="Twilio Elastic SIP Trunks page" />
</p>

### Set the Origination URI

On the trunk's settings page, click **Origination** on the left hand side. Then click **Add new Origination URI** and enter your Guava termination URI (e.g. `sip:guavasip-xxx@sip.goguava.ai`). Then click **Add**.

<p style={{display: "flex", justifyContent: "center", margin: "1.5rem 0"}}>
    <img style={{maxWidth: "700px", width: "100%", borderRadius: "6px"}} src="/docs/twilio-elastic-sip-origination.png" alt="Adding an origination URI in Twilio" />
</p>

### Assign a number to the Trunk

Assuming you already have a number in your Twilio account, under the **Develop** tab, go to **Phone Numbers** > **Manage** > **Active Numbers** and select that number. Select **Configure with** and change that setting to **SIP Trunk**. Then select the **SIP Trunk** dropdown and select the SIP trunk you created earlier.

<p style={{display: "flex", justifyContent: "center", margin: "1.5rem 0"}}>
    <img style={{maxWidth: "700px", width: "100%", borderRadius: "6px"}} src="/docs/twilio-elastic-sip-number-config.png" alt="Assigning a phone number to a SIP trunk in Twilio" />
</p>

Finally, scroll down and click **Save Configuration**.

### Start an agent

Next, start an agent using `agent.listen_sip("guavasip-xxx")`. This is the SIP equivalent of `agent.listen_phone(...)` — Guava forwards every call addressed to that code to your agent.

<CodeBlock
  filename="main.py"
  language="python"
  code={`import os
import guava

agent = guava.Agent(
    name="Nova",
    organization="Acme Corp",
    purpose="Handle inbound calls from the corporate PBX.",
)

# Register handlers — on_call_received, on_call_start, etc.

# Replace with your SIP code from the dashboard.
agent.listen_sip("guavasip-xxx")`}
/>

### Call your number

Call your number and you should be able to reach your agent.

---

<!-- section: amazon-connect-ai-customer-service -->

import { Callout } from '../views/docs/prose';
import MermaidDiagram from '../components/MermaidDiagram';

## AI Customer Service

This example shows how to route calls from an Amazon Connect contact flow to a Guava AI agent. Amazon Connect handles your inbound phone number and initial routing; the Guava agent (**Riley**) handles the customer conversation — answering questions from a knowledge base, collecting details, and escalating when needed.

Riley can:
- Answer product questions, return policies, shipping info, and warranty questions in real time using a knowledge base
- Collect customer details and create an Amazon Connect task for cases that need specialist follow-up
- Transfer the caller back to a live Connect agent queue for sensitive escalations (complaints, legal, "I want to speak to a human")

### How It Works

<MermaidDiagram chart={`flowchart TD
    A([Customer calls Amazon Connect]) --> B["Amazon Connect contact flow\n(greeting, optional IVR routing)"]
    B -->|Transfer to GUAVA_AGENT_NUMBER| C["Riley — Guava AI<br/>
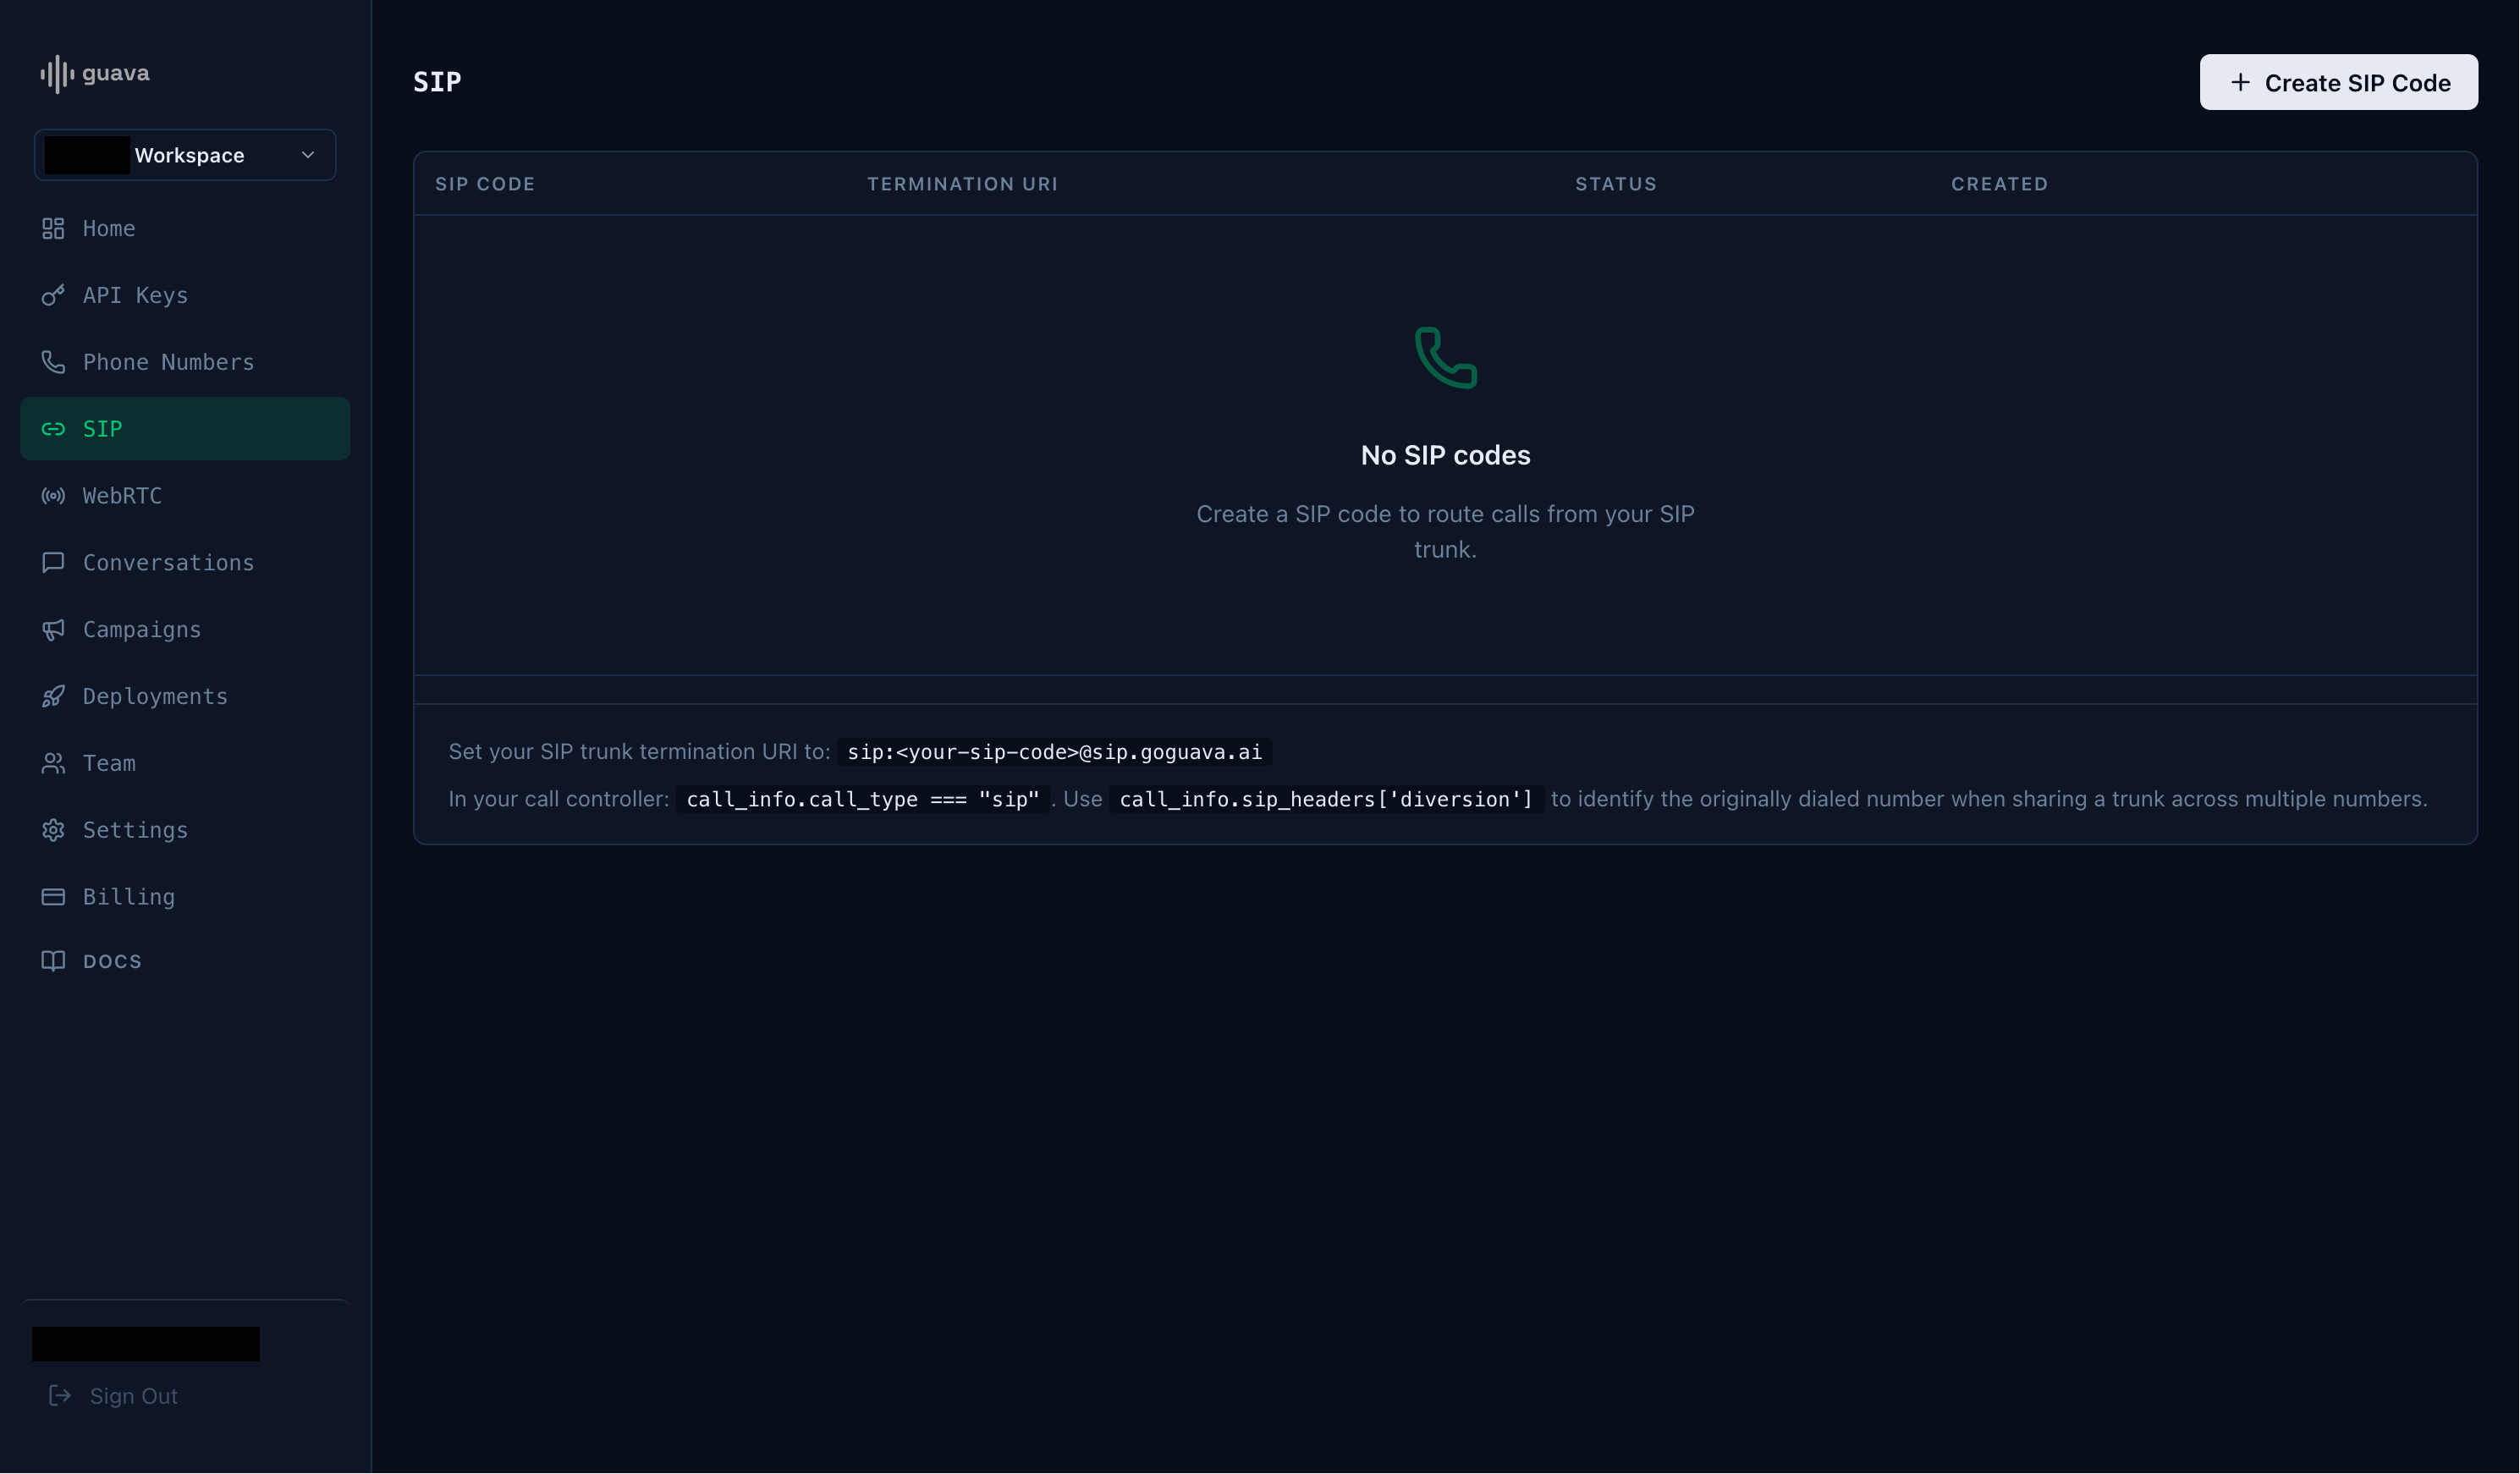
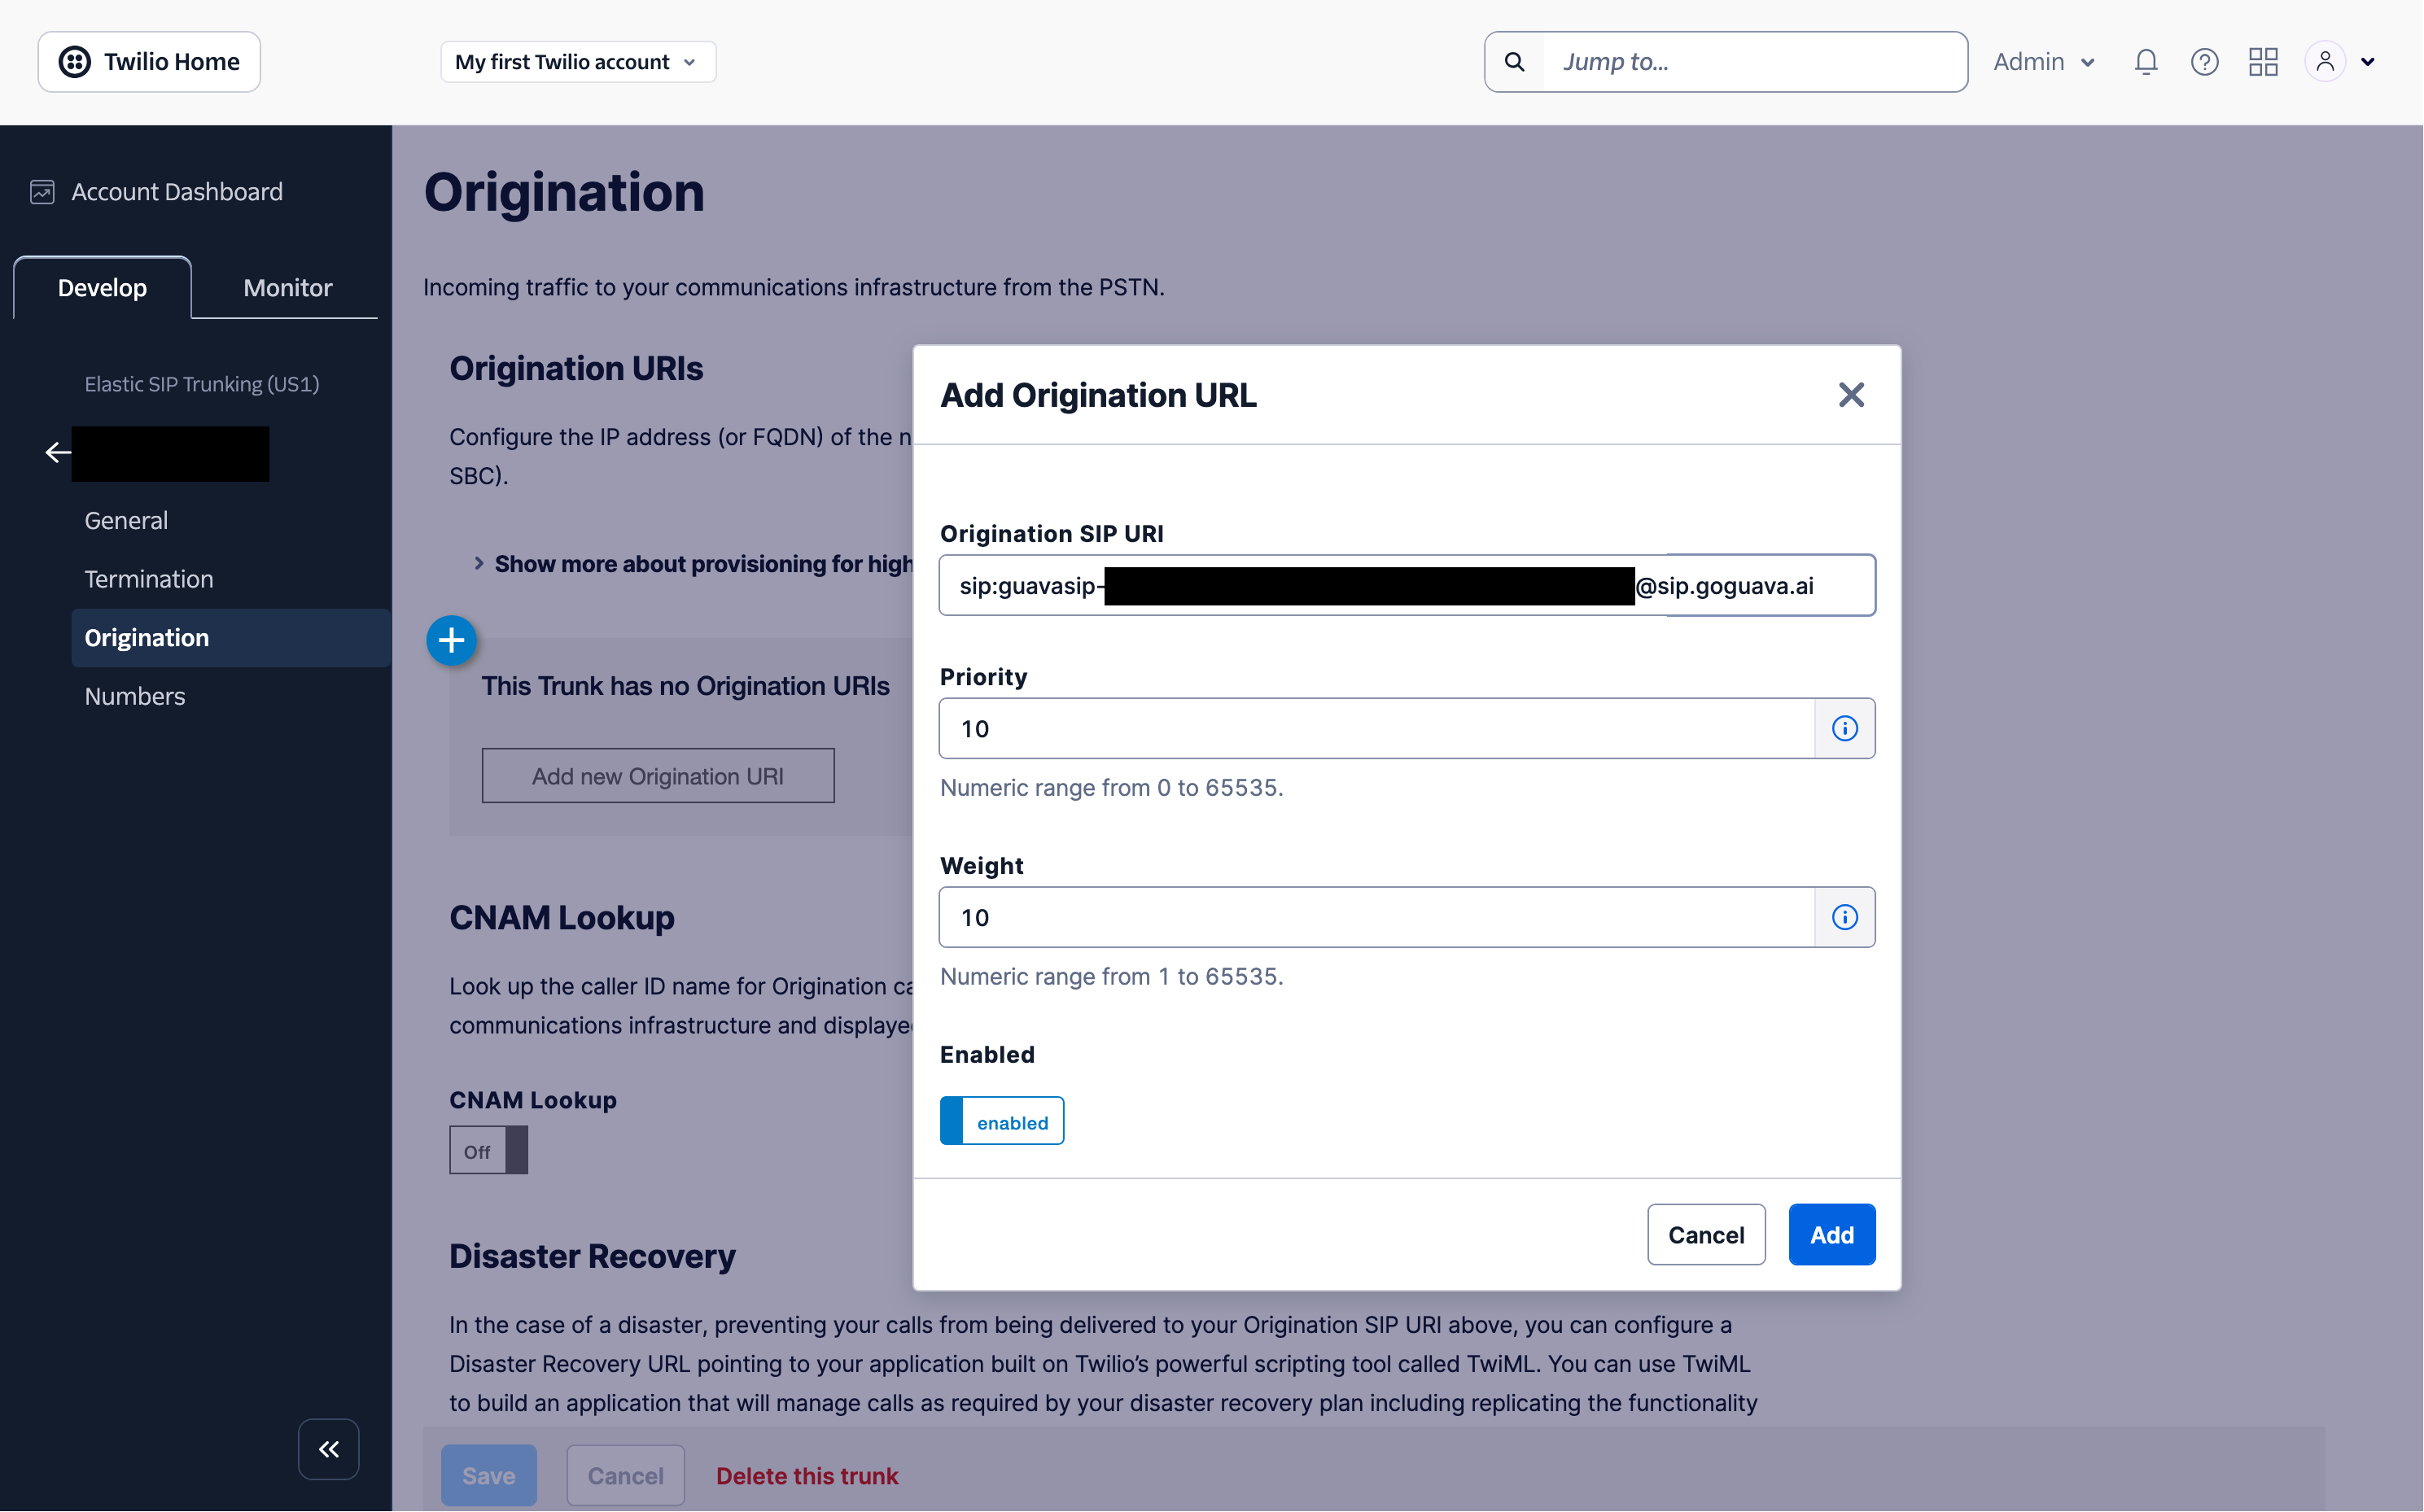
Greets caller · Answers questions · Collects details"]
    KB([knowledge base]) -.->|on_question| C
    C --> D{Outcome}
    D -->|Resolved on call| E[Wrap up call]
    D -->|Needs follow-up| F[Create Connect task]
    D -->|Needs live agent| G[Transfer back to Connect queue]
`} />

### Prerequisites

- Python 3.10 or later
- A **Guava account** with an API key and a phone number — sign up at [app.goguava.ai](https://app.goguava.ai)
- An **AWS account** with an Amazon Connect instance

### Step 1: Install Guava

Choose whichever package manager you prefer:

```bash
pip install guava-sdk    # Install using pip
uv add guava-sdk         # Install using uv
poetry add guava-sdk     # Install using poetry
```

Also install `boto3` for the Amazon Connect task API:

```bash
pip install boto3
```

### Step 2: Set Up Amazon Connect

#### 2a. Create or locate your Connect instance

1. Open the [Amazon Connect console](https://console.aws.amazon.com/connect/).
2. Create an instance if you don't have one, or select an existing one.
3. Note the **Instance ID** — it's the UUID at the end of the instance ARN:
   ```
   arn:aws:connect:us-east-1:123456789012:instance/xxxxxxxx-xxxx-xxxx-xxxx-xxxxxxxxxxxx
                                                   └─────────────── Instance ID ──────┘
   ```

#### 2b. Create a task contact flow

Riley creates Amazon Connect tasks for cases requiring follow-up. Tasks need a dedicated contact flow — the default queue flow doesn't support them.

1. In your Connect instance, go to **Routing → Contact flows → Create contact flow**.
2. Name it `Guava Task Flow` (or similar).
3. Add a **Set working queue** block and point it to your support queue.
4. Connect it to a **Transfer to queue** block, then a **Disconnect** block.
5. **Save and publish** the flow.
6. Open the flow, click **Show additional flow information**, and copy the **Contact flow ID** (UUID at the end of the ARN).

#### 2c. Note your support queue phone number

This is the number Riley will transfer escalations to — your live agent queue's direct dial number in Amazon Connect.

1. Go to **Routing → Phone numbers** in your Connect instance.
2. Use any number claimed to your instance that routes to your support queue, or claim a new one.
3. Copy the number in E.164 format (e.g., `+15551234567`).

#### 2d. Create the contact flow that routes to Riley

This is the contact flow your customers actually call into. It transfers them to Riley's Guava number.

1. Go to **Routing → Contact flows → Create contact flow** (type: Inbound contact flow).
2. Name it `AI Customer Service`.
3. Build the flow:

   ```
   Entry ──▶ Play prompt ──▶ Transfer to phone number ──▶ Disconnect
              "Thanks for              (GUAVA_AGENT_NUMBER)
              calling Pinnacle Gear.
              Please hold."
   ```

   - Add a **Play prompt** block: set the text to a brief hold message (or skip it).
   - Add a **Transfer to phone number** block:
     - Set **Phone number** to your Guava agent number (the value of `GUAVA_AGENT_NUMBER`).
     - Set **Transfer type** to `Softphone transfer` or `PSTN`.
   - Add a **Disconnect** block on the error branch.

4. **Save and publish** the flow.
5. Assign this flow to an inbound phone number: go to **Channels → Phone numbers**, select a number, and set its contact flow to `AI Customer Service`.

<Callout>
**Adding routing logic**: If you want Connect to handle an IVR before routing to Riley, add a **Get customer input** block before the transfer. You can route product questions to Guava and billing escalations to a human queue based on the customer's menu selection.
</Callout>

### Step 3: Configure AWS Credentials

```bash
export AWS_ACCESS_KEY_ID="your-access-key-id"
export AWS_SECRET_ACCESS_KEY="your-secret-access-key"
export AWS_DEFAULT_REGION="us-east-1"   # Match your Connect instance region
```

The IAM user or role needs:

```json
{
  "Version": "2012-10-17",
  "Statement": [
    {
      "Effect": "Allow",
      "Action": ["connect:StartTaskContact"],
      "Resource": "arn:aws:connect:*:*:instance/YOUR_INSTANCE_ID/*"
    }
  ]
}
```

### Step 4: Set Environment Variables

```bash
# Guava
export GUAVA_API_KEY="your-guava-api-key"
export GUAVA_AGENT_NUMBER="+15551000000"      # Your Guava phone number (Riley's number)

# Amazon Connect
export CONNECT_INSTANCE_ID="xxxxxxxx-xxxx-xxxx-xxxx-xxxxxxxxxxxx"
export CONNECT_CONTACT_FLOW_ID="xxxxxxxx-xxxx-xxxx-xxxx-xxxxxxxxxxxx"   # Task flow from Step 2b
export CONNECT_SUPPORT_QUEUE_NUMBER="+15551234567"   # Live agent queue from Step 2c
```

### Step 5: Run Riley

```bash
python -m examples.integrations.ccaas.amazon_connect.ai_customer_service
```

You should see:

```
INFO:ai_customer_service:Riley is ready — listening for inbound calls on +15551000000
```

Riley is now live. Call your Amazon Connect number (the one you assigned the `AI Customer Service` flow to in Step 2d) — Connect will transfer the call to Riley automatically.

---

### How the Code Works

#### Defining the agent

```python
agent = Agent(
    name="Riley",
    organization="Pinnacle Gear Co.",
    purpose="to help Pinnacle Gear customers with product questions, orders, returns, and warranty support",
)
```

The `Agent` is a top-level handle for your AI persona. You attach behavior to it with decorators (`@agent.on_call_start`, `@agent.on_question`, `@agent.on_task_complete(...)`) — each decorator registers a handler that runs when the corresponding event fires on a live call.

#### Accepting inbound calls

```python
agent.inbound_phone(os.environ["GUAVA_AGENT_NUMBER"]).run()
```

`inbound_phone` opens a persistent WebSocket to the Guava server and waits for calls. Each time a call arrives on Riley's number — whether from a customer dialing directly or transferred from Amazon Connect — the agent's registered handlers run on a fresh `Call` object that represents that conversation.

#### Kicking off the conversation

```python
@agent.on_call_start
def on_call_start(call: guava.Call) -> None:
    call.set_task(
        "intake",
        objective="...",
        checklist=[
            guava.Say("Thanks for calling Pinnacle Gear. I'm Riley, and I'm here to help. ..."),
            guava.Field(key="customer_name", ...),
            guava.Field(key="inquiry", ...),
        ],
    )
```

`on_call_start` runs as soon as the call connects. We use it to set the first task — a named intake step the agent works through, greeting the caller and collecting the fields we need before deciding what to do next.

#### Answering questions with a knowledge base

```python
@agent.on_question
def on_question(call: guava.Call, question: str) -> str:
    return document_qa.ask(question)
```

Whenever a caller asks something Riley can't answer from context alone — "What's your return policy?", "Is this jacket machine washable?" — Guava invokes `on_question` with the question in natural language. `DocumentQA` retrieves the most relevant chunks from `SUPPORT_DOCS` and generates an accurate answer. Riley speaks the answer back and continues the conversation without any perceivable delay.

`DocumentQA()` with no `store` argument runs in **server mode** — your documents are uploaded to the Guava server and searched there. The `namespace` parameter scopes the uploaded documents to this agent so they don't collide with documents from other `DocumentQA` instances in the same account.

#### Routing after the conversation

```python
intent_recognizer = IntentRecognizer(
    {
        "live_agent": "Caller wants to speak with a human, agent, manager, or supervisor, or has a complaint, legal threat, or sensitive escalation",
        "follow_up_task": "Caller needs a return, refund, exchange, warranty claim, or has a damaged or wrong item that requires team follow-up",
        "resolved": "Caller's question was answered and no further action is needed",
    }
)

@agent.on_task_complete("intake")
def handle_inquiry(call: guava.Call) -> None:
    inquiry = call.get_field("inquiry", "")
    intent = intent_recognizer.classify(inquiry)

    if intent == "live_agent":
        escalate_to_human(call)
    elif intent == "follow_up_task":
        collect_followup_details(call)
    else:
        call.hangup(...)
```

After the `intake` task finishes collecting details, the registered `@agent.on_task_complete("intake")` handler classifies the outcome using `IntentRecognizer` and routes accordingly. Using an LLM-based classifier handles natural phrasing correctly — "the zipper broke on the first use" maps to `follow_up_task` even without explicitly matching "broken". The recognizer is instantiated once at module level and reused across calls.

| Outcome | Example signals | Action |
|---|---|---|
| Resolved | Question answered, no action needed | Wrap up and end call |
| Follow-up | Return request, warranty claim | Collect email, create Connect task |
| Live agent | "I want to speak to someone", complaint | Transfer back to Connect |

#### Transferring back to Amazon Connect

```python
def escalate_to_human(call: guava.Call) -> None:
    call.transfer(
        os.environ["CONNECT_SUPPORT_QUEUE_NUMBER"],
        "Let the customer know you're connecting them with a specialist. "
        "Then transfer the call.",
    )
```

The second argument to `call.transfer` gives Riley natural language guidance on what to say before transferring — she'll let the customer know what's happening and transfer when it feels right in the conversation. The customer lands in the Connect support queue as a normal inbound call, which agents handle in the Contact Control Panel (CCP).

#### Creating a Connect task for follow-up

```python
connect_client.start_task_contact(
    InstanceId=os.environ["CONNECT_INSTANCE_ID"],
    ContactFlowId=os.environ["CONNECT_CONTACT_FLOW_ID"],
    Name=f"Follow-up Required — {call.get_field('customer_name')}"[:512],
    Description=f"Customer: ...\nEmail: ...\nOrder: ...\nIssue: ..."[:4096],
    Attributes={...},
)
```

When a caller needs follow-up but doesn't need a live agent right now, Riley collects their email and order number in a second task (`follow_up`). The `@agent.on_task_complete("follow_up")` handler then creates a task in Amazon Connect via `StartTaskContact`. Agents see it in the CCP like any other contact — with the customer's name, issue summary, and email for follow-up.

---

### Customization Ideas

**Use your own knowledge base**
Replace `SUPPORT_DOCS` with your actual product documentation, policy pages, or FAQs. `DocumentQA` handles chunking and retrieval automatically — paste in as much text as you need.

**Add IVR routing in Connect before transferring**
Instead of routing all calls to Riley, add a **Get customer input** block in your Connect flow. Route product questions to Riley's number and billing escalations to a human queue. Riley only handles the calls she's best suited for.

**Pass context from Connect to Riley via SIP**
For more advanced setups, Amazon Connect can transfer calls over a SIP trunk to a Guava SIP endpoint. This lets Connect pass the original Contact ID and other attributes as SIP headers, which the agent can read from the call info. You can then link Riley's Connect task back to the original call using `PreviousContactId` for full call chain reporting.

**Route different inquiry types to different agents**
Run multiple Guava agents on different agent numbers — one for product support, one for returns, one for technical help. Have Connect's IVR route to the right one based on the customer's menu selection.

**Use call info to customize behavior per call**
The `@agent.on_call_received` decorator lets you inspect the inbound `CallInfo` (caller number, SIP headers, etc.) before the call is accepted. Use this to accept or decline calls, or to set per-call variables in `on_call_start` that change Riley's behavior — for example, routing region-specific callers to region-specific transfer numbers.

### Complete Example

```python
import guava
import os
import logging
import json
import boto3
from datetime import datetime

from guava import Agent, logging_utils
from guava.helpers.openai import IntentRecognizer
from guava.helpers.rag import DocumentQA

logger = logging.getLogger("ai_customer_service")

# ---------------------------------------------------------------------------
# Knowledge base
# Guava answers caller questions from these documents in real time.
# Replace with your own product docs, policies, or FAQs.
# ---------------------------------------------------------------------------

SUPPORT_DOCS = """
Pinnacle Gear Co. — Customer Support Reference

RETURNS & REFUNDS
- We accept returns within 30 days of purchase for unused items in original packaging.
- Items showing signs of use may be exchanged for store credit at our discretion.
- Refunds are processed within 5–7 business days of receiving the returned item.
- Sale items are final sale and cannot be returned or exchanged.
- Start a return at pinnaclegear.com/returns or by calling our support line.

SHIPPING
- Standard shipping (5–7 business days): free on orders over $75, otherwise $7.99.
- Expedited shipping (2–3 business days): $14.99 flat rate.
- Overnight shipping: $29.99. Orders placed before 2 PM ET ship the same day.
- We ship to all 50 US states and Canada. International shipping is not available.

WARRANTY
- All products carry a 1-year limited warranty against manufacturing defects.
- Summit Series backpacks and Trail Pro footwear carry a lifetime warranty.
- Warranty claims require proof of purchase. Email support@pinnaclegear.com.
- Damage from misuse, normal wear, or accidents is not covered.

SIZING
- Apparel follows standard US sizing. See pinnaclegear.com/size-guide.
- Footwear runs true to size; for wide feet, size up by half a size.
- When between sizes, size up for layering or down for an athletic fit.

ORDERS & ACCOUNT
- Track orders at pinnaclegear.com/track using your order number and email.
- To modify or cancel an order, contact us within 1 hour of placing it.
- We accept Visa, Mastercard, Amex, Discover, PayPal, and Pinnacle gift cards.
- Pinnacle Rewards: 1 point per dollar spent; 100 points = $5 reward credit.

PRODUCT CARE
- Machine wash apparel on cold, gentle cycle. Tumble dry on low heat.
- Do not use fabric softener on moisture-wicking or DWR-coated gear.
- Re-apply DWR treatment after 10–15 wash cycles.
- Store sleeping bags loosely in a large cotton sack, never compressed long-term.
"""

document_qa = DocumentQA(documents=SUPPORT_DOCS, namespace="pinnacle-gear-customer-service")

connect_client = boto3.client("connect")

intent_recognizer = IntentRecognizer(
    {
        "live_agent": "Caller wants to speak with a human, agent, manager, or supervisor, or has a complaint, legal threat, or sensitive escalation",
        "follow_up_task": "Caller needs a return, refund, exchange, warranty claim, or has a damaged or wrong item that requires team follow-up",
        "resolved": "Caller's question was answered and no further action is needed",
    }
)

agent = Agent(
    name="Riley",
    organization="Pinnacle Gear Co.",
    purpose=(
        "to help Pinnacle Gear customers with product questions, orders, "
        "returns, and warranty support"
    ),
)


@agent.on_call_start
def on_call_start(call: guava.Call) -> None:
    call.set_task(
        "intake",
        objective=(
            "Help the customer with their inquiry. Answer questions accurately using "
            "the knowledge base. If their issue needs a human specialist or involves "
            "a complaint or legal matter, let them know you'll connect them with someone."
        ),
        checklist=[
            guava.Say(
                "Thanks for calling Pinnacle Gear. I'm Riley, and I'm here to help."
            ),
            guava.Field(
                key="customer_name",
                description="Ask for the customer's name.",
                field_type="text",
                required=True,
            ),
            guava.Field(
                key="inquiry",
                description=(
                    "Understand what the customer needs. Answer their question if you can "
                    "using the knowledge base. If you cannot resolve it — they want a "
                    "return, refund, complaint resolution, or to speak with a person — "
                    "capture what they need in detail."
                ),
                field_type="text",
                required=True,
            ),
        ],
    )


@agent.on_question
def on_question(call: guava.Call, question: str) -> str:
    """Answer caller questions from the knowledge base in real time."""
    return document_qa.ask(question)


@agent.on_task_complete("intake")
def handle_inquiry(call: guava.Call) -> None:
    inquiry = call.get_field("inquiry", "")
    intent = intent_recognizer.classify(inquiry)

    if intent == "live_agent":
        escalate_to_human(call)
    elif intent == "follow_up_task":
        collect_followup_details(call)
    else:
        call.hangup(
            "Thank the customer for calling Pinnacle Gear. Ask if there's "
            "anything else you can help with, then wish them a great day."
        )


def escalate_to_human(call: guava.Call) -> None:
    """Transfer the caller to the Amazon Connect support queue."""
    call.transfer(
        os.environ["CONNECT_SUPPORT_QUEUE_NUMBER"],
        "Let the customer know you're connecting them with a Pinnacle Gear "
        "specialist who can take care of them. Then transfer the call.",
    )


def collect_followup_details(call: guava.Call) -> None:
    """Collect contact info so a specialist can follow up via a Connect task."""
    call.set_task(
        "follow_up",
        objective=(
            "Collect the customer's contact details so our team can follow up "
            "and resolve their issue."
        ),
        checklist=[
            guava.Say(
                "I'll have our support team reach out to you directly to sort this out."
            ),
            guava.Field(
                key="email",
                description="Ask for their email address for our team to reach them.",
                field_type="text",
                required=True,
            ),
            guava.Field(
                key="order_number",
                description=(
                    "Ask for their order number if they have one. It's fine if they don't."
                ),
                field_type="text",
                required=False,
            ),
        ],
    )


@agent.on_task_complete("follow_up")
def create_followup_task(call: guava.Call) -> None:
    results = {
        "timestamp": datetime.utcnow().isoformat() + "Z",
        "agent": "Riley",
        "organization": "Pinnacle Gear Co.",
        "use_case": "connect_inbound_ai_customer_service",
        "fields": {
            "customer_name": call.get_field("customer_name"),
            "inquiry": call.get_field("inquiry"),
            "email": call.get_field("email"),
            "order_number": call.get_field("order_number"),
        },
    }
    print(json.dumps(results, indent=2))
    logger.info("Follow-up details captured.")

    try:
        connect_client.start_task_contact(
            InstanceId=os.environ["CONNECT_INSTANCE_ID"],
            ContactFlowId=os.environ["CONNECT_CONTACT_FLOW_ID"],
            Name=f"Follow-up Required — {call.get_field('customer_name', 'Customer')}"[:512],
            Description=(
                f"Customer: {call.get_field('customer_name')}\n"
                f"Email: {call.get_field('email')}\n"
                f"Order: {call.get_field('order_number', 'N/A')}\n"
                f"Issue: {call.get_field('inquiry')}"
            )[:4096],
            References={
                "source": {"Value": "guava_ai_customer_service", "Type": "STRING"},
            },
            Attributes={
                "customer_name": call.get_field("customer_name", ""),
                "email": call.get_field("email", ""),
                "order_number": call.get_field("order_number", ""),
            },
        )
        logger.info("Amazon Connect follow-up task created successfully.")
    except Exception as e:
        logger.error("Failed to create Amazon Connect task: %s", e)

    call.hangup(
        "Let the customer know our support team will reach out by email within "
        "one business day. Thank them for their patience and wish them a great day."
    )


if __name__ == "__main__":
    logging_utils.configure_logging()
    logger.info(
        "Riley is ready — listening for inbound calls on %s",
        os.environ.get("GUAVA_AGENT_NUMBER", "(GUAVA_AGENT_NUMBER not set)"),
    )
    agent.inbound_phone(os.environ["GUAVA_AGENT_NUMBER"]).run()
```


---

<!-- section: amazon-connect-appointment-reminder -->

import { Callout } from '../views/docs/prose';
import MermaidDiagram from '../components/MermaidDiagram';

## Appointment Reminder

This example shows how to use Guava to call patients and remind them of upcoming appointments. If a patient needs to reschedule, the agent checks your Amazon Connect queue in real time — and either transfers them directly to a live scheduling agent (if one is free) or captures their callback preference and creates a Connect task (if the queue is busy).

### What Happens on the Call

<MermaidDiagram chart={`flowchart TD
    A([Guava calls patient]) --> B{Reach the right person?}
    B -->|No| C[Leave voicemail, end call]
    B -->|Yes| D{Can they make the appointment?}
    D -->|Yes| E[Send SMS confirmation]
    D -->|No| F{Check Connect queue}
    F -->|Agent free| G[Transfer live call]
    F -->|Queue busy| H[Collect callback preference]
    H --> I[Create Connect task for scheduler callback]
`} />

### Prerequisites

- Python 3.10 or later
- A **Guava account** with an API key and a phone number — sign up at [app.goguava.ai](https://app.goguava.ai)
- An **AWS account** with an Amazon Connect instance

### Step 1: Install Guava

Choose whichever package manager you prefer:

```bash
pip install guava-sdk    # Install using pip
uv add guava-sdk         # Install using uv
poetry add guava-sdk     # Install using poetry
```

You also need `boto3` for the Amazon Connect API:

```bash
pip install boto3
```

### Step 2: Set Up Amazon Connect

If you already have a Connect instance configured, skip to the parts you haven't done yet.

#### 2a. Create a Connect Instance

1. Open the [Amazon Connect console](https://console.aws.amazon.com/connect/).
2. Click **Create instance** and follow the setup wizard.
3. Once the instance is created, open it and copy the **Instance ID** from the ARN shown in the overview — it's the UUID at the end:
   ```
   arn:aws:connect:us-east-1:123456789012:instance/xxxxxxxx-xxxx-xxxx-xxxx-xxxxxxxxxxxx
                                                    ^^^^^^^^^^^^^^^^^^^^^^^^^^^^^^^^^^^^^^^^
                                                    This is your CONNECT_INSTANCE_ID
   ```

#### 2b. Create a Contact Flow for Task Routing

Amazon Connect tasks need a dedicated contact flow — the default queue flow does not support tasks.

1. In your Connect instance, go to **Routing → Contact flows → Create contact flow**.
2. Name it something like `Guava Task Routing Flow`.
3. Add a **Set working queue** block and connect it to your scheduling queue.
4. Add a **Transfer to queue** block after that.
5. Add a **Disconnect / hang up** block at the end of the error branch.
6. Save and publish the flow.
7. Open the flow, click **Show additional flow information**, and copy the **Contact flow ID** (the UUID at the end of the ARN).

<Callout>
**Tip:** For a minimal test flow, you can also use any existing inbound contact flow — tasks will be routed to whatever queue the flow sets.
</Callout>

#### 2c. Set Up a Scheduling Queue

1. Go to **Routing → Queues → Add new queue**.
2. Name it (e.g., `Scheduling`) and assign it to the hours of operation and outbound caller ID of your choice.
3. Copy the **Queue ID** from the queue's ARN (the UUID at the end).

#### 2d. Get a Transfer Number

This is the phone number Guava will transfer rescheduling patients to — typically your scheduling desk or the Amazon Connect direct dial number for your scheduling queue.

- In Connect, go to **Channels → Phone numbers** to see claimed numbers.
- Or use any external scheduling desk number in E.164 format (e.g., `+15551234567`).

### Step 3: Configure AWS Credentials

The example uses `boto3`, which reads credentials from the standard AWS credential chain. The easiest way for local development:

```bash
export AWS_ACCESS_KEY_ID="your-access-key-id"
export AWS_SECRET_ACCESS_KEY="your-secret-access-key"
export AWS_DEFAULT_REGION="us-east-1"   # Match your Connect instance region
```

The IAM user or role you use needs the following permissions:
- `connect:GetCurrentMetricData` — to check queue availability
- `connect:StartTaskContact` — to create callback tasks

A minimal IAM policy:
```json
{
  "Version": "2012-10-17",
  "Statement": [
    {
      "Effect": "Allow",
      "Action": [
        "connect:GetCurrentMetricData",
        "connect:StartTaskContact"
      ],
      "Resource": "arn:aws:connect:*:*:instance/YOUR_INSTANCE_ID/*"
    }
  ]
}
```

### Step 4: Set Environment Variables

```bash
# Guava
export GUAVA_API_KEY="your-guava-api-key"
export GUAVA_AGENT_NUMBER="+15551000000"    # Your Guava phone number

# Amazon Connect
export CONNECT_INSTANCE_ID="xxxxxxxx-xxxx-xxxx-xxxx-xxxxxxxxxxxx"
export CONNECT_CONTACT_FLOW_ID="xxxxxxxx-xxxx-xxxx-xxxx-xxxxxxxxxxxx"
export CONNECT_QUEUE_ID="xxxxxxxx-xxxx-xxxx-xxxx-xxxxxxxxxxxx"
export CONNECT_TRANSFER_NUMBER="+15551234567"   # Scheduling desk number
```

### Step 5: Run the Example

```bash
python -m examples.integrations.ccaas.amazon_connect.appointment_reminder \
  +15559876543 \
  --name "Jane Doe" \
  --appointment "Thursday, April 17 at 10:30 AM"
```

Replace `+15559876543` with the phone number to call and adjust `--name` and `--appointment` as needed.

**What to expect:**
- Guava calls the patient and verifies they're the right person
- If they confirm: you'll see a confirmation logged and an SMS is sent
- If they need to reschedule: the example checks your Connect queue in real time
  - If agents are free: Guava transfers the patient to `CONNECT_TRANSFER_NUMBER`
  - If the queue is busy: Guava collects a callback preference and creates a task in your Connect instance — visible to agents in the Contact Control Panel (CCP)
- If no one picks up: Guava leaves a voicemail

---

### How It Works

#### 1. Defining the Agent and Kicking Off the Call

```python
agent = Agent(
    name="Alex",
    organization="Bright Valley Medical Center",
    purpose="to remind patients of their upcoming appointments and assist with rescheduling when needed",
)

agent.outbound_phone(
    from_number=os.environ["GUAVA_AGENT_NUMBER"],
    to_number=args.phone,
    variables={"patient_name": args.name, "appointment": args.appointment},
).run()
```

`Agent` is the top-level handle for the AI persona. `outbound_phone` places the call and binds the agent to that single conversation. The `variables` dict is passed into the call and made available throughout — handlers can read each value with `call.get_variable(key)`.

#### 2. Reaching the Right Person (`reach_person`)

```python
@agent.on_call_start
def on_call_start(call: guava.Call) -> None:
    call.reach_person(contact_full_name=call.get_variable("patient_name"))
```

`reach_person` handles the gatekeeper problem — it has the agent confirm they're speaking with the intended patient before proceeding. If a family member answers, the agent politely asks for the patient by name. The reach result is delivered to the handler registered with `@agent.on_reach_person`.

```python
@agent.on_reach_person
def on_reach_person(call: guava.Call, outcome: str) -> None:
    if outcome == "unavailable":
        call.hangup("Leave a brief voicemail ...")
        return
    # otherwise, set up the reminder task
```

#### 3. Collecting the Appointment Response

```python
call.set_task(
    "remind",
    objective=...,
    checklist=[
        guava.Say(f"Hi {patient_name}, this is Alex calling from ..."),
        guava.Field(
            key="response",
            description="Ask if they can make the appointment or need to reschedule.",
            field_type="text",
            required=True,
        ),
    ],
)
```

`set_task` gives the agent a named objective and a checklist of items to work through. `guava.Field` tells the agent what information to collect — the patient might say "Yes, I'll be there" or "Actually, I have a conflict that day" — and the agent normalizes that into a structured value you can inspect via `call.get_field(...)`.

#### 4. Classifying the Patient's Response

```python
from guava.helpers.openai import IntentRecognizer

intent_recognizer = IntentRecognizer(["confirmed", "needs to reschedule"])

@agent.on_task_complete("remind")
def handle_response(call: guava.Call) -> None:
    response = call.get_field("response", "")
    if intent_recognizer.classify(response) == "needs to reschedule":
        handle_reschedule(call)
    else:
        ...
```

When the `remind` task completes, the registered `@agent.on_task_complete("remind")` handler runs. Rather than matching against a list of keywords, `IntentRecognizer` uses an LLM to classify what the patient actually meant — natural phrasing like "I actually have a conflict that day" or "Can we move it?" still maps to `needs to reschedule` without enumerating every variant. The recognizer is instantiated once at module level and reused across calls.

#### 5. Checking the Connect Queue in Real Time

```python
def check_queue_availability() -> dict:
    response = connect_client.get_current_metric_data(
        InstanceId=os.environ["CONNECT_INSTANCE_ID"],
        Filters={"Queues": [os.environ["CONNECT_QUEUE_ID"]], "Channels": ["VOICE"]},
        CurrentMetrics=[
            {"Name": "AGENTS_AVAILABLE", "Unit": "COUNT"},
            {"Name": "CONTACTS_IN_QUEUE", "Unit": "COUNT"},
        ],
    )
    ...
```

`GetCurrentMetricData` returns a real-time snapshot of the queue — how many agents are available and how many contacts are already waiting. This snapshot updates every ~15 seconds.

#### 6. Routing Decision: Transfer vs. Task

```python
queue = check_queue_availability()
if queue["agents_available"] > 0:
    call.transfer(os.environ["CONNECT_TRANSFER_NUMBER"], "...")
else:
    # collect callback preference, then create a task
    call.set_task("callback", ...)
```

If a scheduler is free, Guava transfers the call live. If not, the agent collects the patient's preferred callback time in a follow-up `callback` task; its completion handler creates a Connect task via `StartTaskContact` — complete with the patient's name, original appointment, and preferred callback window. The task appears in your agents' Contact Control Panel (CCP) just like any other contact.

#### 7. SMS Confirmation

```python
call_state = {"appointment_confirmed": False}

# ... inside the "remind" handler, when the patient confirms:
call_state["appointment_confirmed"] = True

# ... after agent.run() returns:
if call_state["appointment_confirmed"]:
    guava.Client().send_sms(...)
```

After `agent.run()` returns, if the patient confirmed, we send an SMS reminder via the Guava client. This runs after the call ends, so it never blocks the voice interaction.

---

### Customization Ideas

**Pull patient data from a database or CRM**
Replace the hardcoded `--name` and `--appointment` CLI args with a database query or CRM API call, and call patients in a loop:
```python
for patient in get_todays_appointments():
    agent.outbound_phone(
        from_number=os.environ["GUAVA_AGENT_NUMBER"],
        to_number=patient["phone"],
        variables={"patient_name": patient["name"], "appointment": patient["appointment"]},
    ).run()
```

**Set a queue depth threshold**
Instead of transferring whenever any agent is free, add a threshold — e.g., only transfer if fewer than 3 contacts are already waiting:
```python
if queue["agents_available"] > 0 and queue["contacts_in_queue"] < 3:
    call.transfer(...)
```

**Route by appointment type**
Different appointment types may need different queues or transfer numbers. Pass the appointment type into the call as a variable and route accordingly:
```python
transfer_number = SPECIALIST_LINE if call.get_variable("type") == "specialist" else GENERAL_LINE
call.transfer(transfer_number, "...")
```

**Add multi-language support**
Guava supports English, Spanish, French, German, and Italian. The agent's voice can be set per call using the persona configuration on the underlying `Call` object.

### Complete Example

```python
import guava
import os
import logging
import json
import argparse
import boto3
from datetime import datetime

from guava import Agent, logging_utils
from guava.helpers.openai import IntentRecognizer

logger = logging.getLogger("appointment_reminder")

connect_client = boto3.client("connect")

intent_recognizer = IntentRecognizer(["confirmed", "needs to reschedule"])

# State the SMS step needs after the call ends.
call_state: dict = {"appointment_confirmed": False}


agent = Agent(
    name="Alex",
    organization="Bright Valley Medical Center",
    purpose=(
        "to remind patients of their upcoming appointments and assist "
        "with rescheduling when needed"
    ),
)


def check_queue_availability() -> dict:
    """Query Amazon Connect for real-time agent availability in the scheduling queue."""
    try:
        response = connect_client.get_current_metric_data(
            InstanceId=os.environ["CONNECT_INSTANCE_ID"],
            Filters={
                "Queues": [os.environ["CONNECT_QUEUE_ID"]],
                "Channels": ["VOICE"],
            },
            CurrentMetrics=[
                {"Name": "AGENTS_AVAILABLE", "Unit": "COUNT"},
                {"Name": "CONTACTS_IN_QUEUE", "Unit": "COUNT"},
            ],
        )
        agents_available = 0
        contacts_in_queue = 0
        for result in response.get("MetricResults", []):
            for collection in result.get("Collections", []):
                name = collection["Metric"]["Name"]
                value = collection.get("Value") or 0
                if name == "AGENTS_AVAILABLE":
                    agents_available = int(value)
                elif name == "CONTACTS_IN_QUEUE":
                    contacts_in_queue = int(value)
        logger.info(
            "Queue check — agents available: %d, contacts in queue: %d",
            agents_available,
            contacts_in_queue,
        )
        return {"agents_available": agents_available, "contacts_in_queue": contacts_in_queue}
    except Exception as e:
        logger.error("Failed to fetch queue metrics: %s", e)
        return {"agents_available": 0, "contacts_in_queue": 0}


@agent.on_call_start
def on_call_start(call: guava.Call) -> None:
    call.reach_person(contact_full_name=call.get_variable("patient_name"))


@agent.on_reach_person
def on_reach_person(call: guava.Call, outcome: str) -> None:
    if outcome == "unavailable":
        appointment = call.get_variable("appointment")
        call.hangup(
            "We were unable to reach the patient. Leave a brief, friendly voicemail from "
            "Bright Valley Medical Center reminding them of their appointment on "
            f"{appointment} and asking them to call back to confirm or reschedule."
        )
        return

    patient_name = call.get_variable("patient_name")
    appointment = call.get_variable("appointment")
    call.set_task(
        "remind",
        objective=(
            f"Remind {patient_name} of their appointment at Bright Valley Medical "
            f"Center on {appointment}. Ask if they can attend or need to reschedule."
        ),
        checklist=[
            guava.Say(
                f"Hi {patient_name}, this is Alex calling from Bright Valley "
                f"Medical Center with a reminder about your appointment on {appointment}."
            ),
            guava.Field(
                key="response",
                description=(
                    "Ask if they can make the appointment or need to reschedule. "
                    "Capture their answer as 'confirmed' or 'reschedule'."
                ),
                field_type="text",
                required=True,
            ),
        ],
    )


@agent.on_task_complete("remind")
def handle_response(call: guava.Call) -> None:
    response = call.get_field("response", "")
    if intent_recognizer.classify(response) == "needs to reschedule":
        handle_reschedule(call)
    else:
        call_state["appointment_confirmed"] = True
        call.hangup(
            "Thank the patient for confirming. Remind them to arrive 15 minutes "
            "early and bring their insurance card and a photo ID. Wish them well."
        )


def handle_reschedule(call: guava.Call) -> None:
    queue = check_queue_availability()
    if queue["agents_available"] > 0:
        # Scheduling agents are free — transfer directly.
        call.transfer(
            os.environ["CONNECT_TRANSFER_NUMBER"],
            "Let the patient know you're connecting them with a scheduling specialist "
            "who will help find a new appointment time. Then transfer the call.",
        )
    else:
        # Queue is busy — collect callback preference and create a task.
        call.set_task(
            "callback",
            objective=(
                "Our scheduling team is currently busy. Collect the patient's preferred "
                "callback window so a scheduler can call them back."
            ),
            checklist=[
                guava.Say(
                    "Our scheduling team is with other patients right now. "
                    "I'll arrange for a scheduler to call you back."
                ),
                guava.Field(
                    key="preferred_callback",
                    description=(
                        "Ask when would be a good time for our scheduling team to call "
                        "them back. Capture their preferred day and time of day."
                    ),
                    field_type="text",
                    required=True,
                ),
            ],
        )


@agent.on_task_complete("callback")
def create_reschedule_task(call: guava.Call) -> None:
    patient_name = call.get_variable("patient_name")
    appointment = call.get_variable("appointment")
    preferred_callback = call.get_field("preferred_callback")

    results = {
        "timestamp": datetime.utcnow().isoformat() + "Z",
        "agent": "Alex",
        "organization": "Bright Valley Medical Center",
        "use_case": "appointment_reminder_reschedule",
        "fields": {
            "patient_name": patient_name,
            "original_appointment": appointment,
            "preferred_callback": preferred_callback,
        },
    }
    print(json.dumps(results, indent=2))
    logger.info("Reschedule details captured.")

    try:
        connect_client.start_task_contact(
            InstanceId=os.environ["CONNECT_INSTANCE_ID"],
            ContactFlowId=os.environ["CONNECT_CONTACT_FLOW_ID"],
            Name=f"Reschedule Needed — {patient_name}"[:512],
            Description=(
                f"Patient: {patient_name}\n"
                f"Original appointment: {appointment}\n"
                f"Preferred callback: {preferred_callback}\n"
                "Action: Call patient back to reschedule their appointment."
            )[:4096],
            References={
                "source": {"Value": "guava_appointment_reminder", "Type": "STRING"},
            },
            Attributes={
                "patient_name": patient_name,
                "original_appointment": appointment,
                "preferred_callback": preferred_callback or "",
            },
        )
        logger.info("Amazon Connect reschedule task created successfully.")
    except Exception as e:
        logger.error("Failed to create Amazon Connect task: %s", e)

    call.hangup(
        "Let the patient know a scheduling specialist will call them back at their "
        "preferred time. Thank them for their patience and wish them a great day."
    )


if __name__ == "__main__":
    logging_utils.configure_logging()

    parser = argparse.ArgumentParser(
        description=(
            "Outbound appointment reminder with smart escalation for Bright Valley Medical Center. "
            "Confirms the appointment, transfers to a live scheduler if one is available, or "
            "creates an Amazon Connect callback task if the queue is busy."
        )
    )
    parser.add_argument("phone", help="Patient phone number in E.164 format (e.g. +15551234567)")
    parser.add_argument("--name", required=True, help="Full name of the patient")
    parser.add_argument(
        "--appointment",
        default="tomorrow at 9:00 AM",
        help="Appointment date and time string (default: 'tomorrow at 9:00 AM')",
    )
    args = parser.parse_args()

    logger.info(
        "Calling %s (%s) — appointment: %s",
        args.name,
        args.phone,
        args.appointment,
    )

    agent.outbound_phone(
        from_number=os.environ["GUAVA_AGENT_NUMBER"],
        to_number=args.phone,
        variables={"patient_name": args.name, "appointment": args.appointment},
    ).run()

    # Send an SMS confirmation if the patient confirmed their appointment.
    if call_state["appointment_confirmed"]:
        try:
            guava.Client().send_sms(
                from_number=os.environ["GUAVA_AGENT_NUMBER"],
                to_number=args.phone,
                message=(
                    f"Hi {args.name}, this is Bright Valley Medical Center confirming "
                    f"your appointment on {args.appointment}. Please arrive 15 minutes early "
                    "and bring your insurance card and photo ID. Reply STOP to opt out."
                ),
            )
            logger.info("SMS confirmation sent to %s.", args.phone)
        except Exception as e:
            logger.error("Failed to send SMS confirmation: %s", e)
```


---

<!-- section: amazon-connect-csat-survey -->

import { Callout } from '../views/docs/prose';
import MermaidDiagram from '../components/MermaidDiagram';

## CSAT Survey

This example shows how to use Guava to call customers after a support interaction and collect a brief satisfaction survey — NPS score, resolution status, and open feedback. The results are written to your logs and posted back into Amazon Connect as a task linked to the original support contact, so the survey responses live alongside the conversation they're about.

The Guava agent (**Jamie**) can:
- Reach the right customer using `reach_person` (handles voicemail and the gatekeeper problem)
- Politely decline if the customer doesn't want to participate, without forcing them through the survey
- Collect an NPS score, resolution status, and open-ended feedback in a single conversational task
- Create an Amazon Connect task linked to the original `ContactId` via `RelatedContactId`, so the survey is reportable in Connect's contact search and historical metrics

### How It Works

<MermaidDiagram chart={`flowchart TD
    A([Guava calls customer]) --> B{Reach the right person?}
    B -->|No| C[End call politely]
    B -->|Yes| D{Willing to participate?}
    D -->|No| E[Thank them, hang up]
    D -->|Yes| F[Collect NPS, resolution, feedback]
    F --> G[Derive NPS category]
    G --> H[Create linked Connect task]
    H --> I[Thank customer, end call]
`} />

### Prerequisites

- Python 3.10 or later
- A **Guava account** with an API key and a phone number — sign up at [app.goguava.ai](https://app.goguava.ai)
- An **AWS account** with an Amazon Connect instance
- The **ContactId** of the original support call you want to survey about (Amazon Connect surfaces this in the Contact Control Panel and contact search)

### Step 1: Install Guava

Choose whichever package manager you prefer:

```bash
pip install guava-sdk    # Install using pip
uv add guava-sdk         # Install using uv
poetry add guava-sdk     # Install using poetry
```

You also need `boto3` for the Amazon Connect API:

```bash
pip install boto3
```

### Step 2: Set Up Amazon Connect

If you already have a Connect instance configured, skip to the parts you haven't done yet.

#### 2a. Create or locate your Connect instance

1. Open the [Amazon Connect console](https://console.aws.amazon.com/connect/).
2. Create an instance if you don't have one, or select an existing one.
3. Note the **Instance ID** — it's the UUID at the end of the instance ARN:
   ```
   arn:aws:connect:us-east-1:123456789012:instance/xxxxxxxx-xxxx-xxxx-xxxx-xxxxxxxxxxxx
                                                   └─────────────── Instance ID ──────┘
   ```

#### 2b. Create a contact flow for survey tasks

Amazon Connect tasks need a dedicated contact flow — the default queue flow does not support tasks.

1. In your Connect instance, go to **Routing → Contact flows → Create contact flow**.
2. Name it something like `Guava CSAT Task Flow`.
3. Add a **Set working queue** block and point it at the queue you'd like surveys to be reviewed in (a CX or QA queue is a natural fit).
4. Add a **Transfer to queue** block, then a **Disconnect** block.
5. **Save and publish** the flow.
6. Open the flow, click **Show additional flow information**, and copy the **Contact flow ID** (the UUID at the end of the ARN).

<Callout>
**Tip:** If you only want surveys to land somewhere queryable rather than being worked by a live agent, point the flow at a low-priority "review" queue — the task will still appear in Connect's historical reports and contact search.
</Callout>

### Step 3: Configure AWS Credentials

The example uses `boto3`, which reads credentials from the standard AWS credential chain. The easiest way for local development:

```bash
export AWS_ACCESS_KEY_ID="your-access-key-id"
export AWS_SECRET_ACCESS_KEY="your-secret-access-key"
export AWS_DEFAULT_REGION="us-east-1"   # Match your Connect instance region
```

A minimal IAM policy:

```json
{
  "Version": "2012-10-17",
  "Statement": [
    {
      "Effect": "Allow",
      "Action": ["connect:StartTaskContact"],
      "Resource": "arn:aws:connect:*:*:instance/YOUR_INSTANCE_ID/*"
    }
  ]
}
```

### Step 4: Set Environment Variables

```bash
# Guava
export GUAVA_API_KEY="your-guava-api-key"
export GUAVA_AGENT_NUMBER="+15551000000"      # Your Guava phone number (Jamie's number)

# Amazon Connect
export CONNECT_INSTANCE_ID="xxxxxxxx-xxxx-xxxx-xxxx-xxxxxxxxxxxx"
export CONNECT_CONTACT_FLOW_ID="xxxxxxxx-xxxx-xxxx-xxxx-xxxxxxxxxxxx"   # Survey task flow from Step 2b
```

### Step 5: Run the Example

```bash
python -m examples.integrations.ccaas.amazon_connect.csat_survey \
  +15559876543 \
  --name "Jane Doe" \
  --contact-id "11111111-2222-3333-4444-555555555555"
```

Replace `+15559876543` with the customer's phone number, set `--name` to their full name, and set `--contact-id` to the Amazon Connect `ContactId` of the original support call you're following up on.

**What to expect:**
- Guava calls the customer and verifies they're the right person
- Jamie asks if they have a minute for a quick survey
  - If they decline, Jamie thanks them and ends the call gracefully — no pressure
  - If they agree, Jamie collects an NPS score, asks whether the issue was resolved, and invites open-ended feedback
- The full survey result is printed as JSON to stdout and a Connect task is created **linked to the original support contact** via `RelatedContactId` — so the response shows up in contact search and historical reports tied to the conversation it's about
- If no one picks up, Guava ends the call politely

---

### How the Code Works

#### Defining the agent and starting the call

```python
agent = Agent(
    name="Jamie",
    organization="Pinnacle Gear Co.",
    purpose=(
        "to conduct a brief customer satisfaction survey about a recent "
        "support experience"
    ),
)

agent.outbound_phone(
    from_number=os.environ["GUAVA_AGENT_NUMBER"],
    to_number=args.phone,
    variables={
        "customer_name": args.name,
        "original_contact_id": args.contact_id,
    },
).run()
```

`Agent` is the top-level handle for the AI persona. `outbound_phone` places the call and binds the agent to that single conversation. The `variables` dict is passed into the call and made available to all handlers via `call.get_variable(key)` — here we pass the customer's name (so Jamie can address them) and the original Connect `ContactId` (so the resulting survey task can be linked back to the support call it's about).

#### Reaching the right person

```python
@agent.on_call_start
def on_call_start(call: guava.Call) -> None:
    call.reach_person(contact_full_name=call.get_variable("customer_name"))


@agent.on_reach_person
def on_reach_person(call: guava.Call, outcome: str) -> None:
    if outcome == "unavailable":
        call.hangup("We were unable to reach the customer. End the call politely.")
        return
    # otherwise, set up the survey task
```

`reach_person` handles the gatekeeper problem — Jamie confirms she's speaking with the intended customer before starting the survey. If a family member or colleague answers, she politely asks for the right person. If the customer truly can't be reached, `outcome == "unavailable"` and we end the call without leaving a long voicemail (post-hoc surveys are easy to skip; we don't push them).

#### Asking permission, then collecting the survey

```python
call.set_task(
    "survey",
    objective=(
        "Conduct a short, friendly customer satisfaction survey about the customer's "
        "recent support call with Pinnacle Gear. Keep it conversational and brief."
    ),
    checklist=[
        guava.Say(f"Hi {customer_name}, this is Jamie from Pinnacle Gear. ..."),
        guava.Field(key="willing_to_participate", ..., required=True),
        guava.Field(key="nps_score", ..., field_type="integer", required=False),
        guava.Field(key="issue_resolved", ..., required=False),
        guava.Field(key="feedback", ..., required=False),
    ],
)
```

`set_task` gives Jamie a named objective and an ordered checklist. The first `Field` — `willing_to_participate` — is the gate. The remaining fields are marked `required=False` and the descriptions explicitly say *"Only ask this if they agreed to participate"* — so if the customer declines, Jamie doesn't push them through the rest of the survey. The agent reads the prompts as guidance and adapts its phrasing rather than reciting them verbatim, so the conversation stays natural even though the schema is structured.

#### Honoring the customer's choice

```python
participation_recognizer = IntentRecognizer(["willing to participate", "not willing to participate"])

@agent.on_task_complete("survey")
def save_survey(call: guava.Call) -> None:
    willing = call.get_field("willing_to_participate", "")
    if participation_recognizer.classify(willing) == "not willing to participate":
        call.hangup(
            "Respect their time and thank them for taking the call. "
            "Wish them a great day."
        )
        return
    # otherwise, save the survey
```

When the `survey` task completes, the `@agent.on_task_complete("survey")` handler runs. Customers respond with all kinds of phrasing — *"sure"*, *"now's not a great time"*, *"I'm driving"*, *"yeah I guess so"* — so we use `IntentRecognizer` to map the free-text answer to a clean `willing` / `not willing` decision. If they declined, we end the call with a thank-you. The recognizer is instantiated once at module level and reused across calls.

#### Deriving the NPS category

```python
try:
    nps_int = int(nps_raw) if nps_raw else 0
except (ValueError, TypeError):
    nps_int = 0
if nps_int >= 9:
    nps_category = "promoter"
elif nps_int >= 7:
    nps_category = "passive"
else:
    nps_category = "detractor"
```

NPS uses three buckets — promoters (9–10), passives (7–8), and detractors (0–6). We compute the category server-side rather than asking the agent to do it, so the categorization is consistent across every call and shows up in the Connect task title and attributes in a form you can filter on.

#### Linking the survey back to the original contact

```python
connect_client.start_task_contact(
    InstanceId=os.environ["CONNECT_INSTANCE_ID"],
    ContactFlowId=os.environ["CONNECT_CONTACT_FLOW_ID"],
    Name=f"CSAT Survey — {customer_name} ({nps_category})"[:512],
    Description=f"Customer: ...\nNPS Score: ...\nIssue Resolved: ...\nFeedback: ..."[:4096],
    RelatedContactId=original_contact_id,
    Attributes={
        "customer_name": customer_name,
        "nps_score": str(nps_raw or ""),
        "nps_category": nps_category,
        "issue_resolved": issue_resolved,
    },
)
```

The key field here is `RelatedContactId` — passing the original support call's `ContactId` tells Amazon Connect to link the new survey task to that conversation. In Connect's contact search, you can pivot from the support call to its survey task (and back) without joining tables yourself, and historical metrics that group by `RelatedContactId` will see them as a single customer interaction with a follow-up survey attached.

The `Attributes` dict is searchable in Connect's contact search — putting `nps_score`, `nps_category`, and `issue_resolved` here means CX leaders can filter and report on surveys directly inside the Connect console.

---

### Customization Ideas

**Trigger surveys automatically after every support call**
Instead of running this script manually, hook it into your support flow: after a Connect contact ends, fire a Lambda (via EventBridge on `Amazon Connect Contact Events`) that pulls the customer's name and phone from your CRM and invokes this example with the original `ContactId`. Surveys go out within minutes of the call ending, while the experience is fresh.

**Sample only a fraction of calls**
Calling every customer is overkill — most teams sample 10–20% of contacts. Add a random gate before invoking this script:
```python
import random
if random.random() < 0.15:
    run_csat_survey(...)
```

**Skip detractors of detractors**
If the customer was already escalated or marked dissatisfied during the original call (visible in Connect attributes on the original contact), skip the survey or route them to a manager call instead — surveying angry customers can make things worse.

**Push results to a data warehouse**
Replace the `print(json.dumps(results, indent=2))` line with a write to your warehouse of choice (BigQuery, Snowflake, Redshift) or push to S3 in JSON Lines for downstream analytics — the Connect task gives you the operational view, the warehouse gives you the analytical view.

**Customize the survey per product line**
Pass a `product_line` variable into the call and conditionally include extra fields in the checklist — e.g., apparel customers get asked about fit and sizing, footwear customers get asked about comfort and durability. The same agent persona can run very different surveys depending on what the customer just bought.

---

### Complete Example

```python
import guava
import os
import logging
import json
import argparse
import boto3
from datetime import datetime

from guava import Agent, logging_utils
from guava.helpers.openai import IntentRecognizer

logger = logging.getLogger("csat_survey")

connect_client = boto3.client("connect")

participation_recognizer = IntentRecognizer(["willing to participate", "not willing to participate"])

agent = Agent(
    name="Jamie",
    organization="Pinnacle Gear Co.",
    purpose=(
        "to conduct a brief customer satisfaction survey about a recent "
        "support experience"
    ),
)


@agent.on_call_start
def on_call_start(call: guava.Call) -> None:
    call.reach_person(contact_full_name=call.get_variable("customer_name"))


@agent.on_reach_person
def on_reach_person(call: guava.Call, outcome: str) -> None:
    if outcome == "unavailable":
        call.hangup("We were unable to reach the customer. End the call politely.")
        return

    customer_name = call.get_variable("customer_name")
    call.set_task(
        "survey",
        objective=(
            "Conduct a short, friendly customer satisfaction survey about the customer's "
            "recent support call with Pinnacle Gear. Keep it conversational and brief."
        ),
        checklist=[
            guava.Say(
                f"Hi {customer_name}, this is Jamie from Pinnacle Gear. "
                "We noticed you recently contacted our support team, and I was hoping "
                "to grab one minute of your time for a quick feedback survey. "
                "Your input really helps us improve."
            ),
            guava.Field(
                key="willing_to_participate",
                description=(
                    "Ask if they have about a minute to share some feedback. "
                    "Capture 'yes' or 'no'."
                ),
                field_type="text",
                required=True,
            ),
            guava.Field(
                key="nps_score",
                description=(
                    "On a scale of 1 to 10, how likely are they to recommend Pinnacle Gear "
                    "support to a friend or colleague? Only ask this if they agreed to participate."
                ),
                field_type="integer",
                required=False,
            ),
            guava.Field(
                key="issue_resolved",
                description=(
                    "Ask if their issue was fully resolved during the support call. "
                    "Capture 'yes', 'no', or 'partially'. Only ask if they agreed to participate."
                ),
                field_type="text",
                required=False,
            ),
            guava.Field(
                key="feedback",
                description=(
                    "Ask if there's anything we could have done better, or any other "
                    "comments they'd like to share. Only ask if they agreed to participate."
                ),
                field_type="text",
                required=False,
            ),
        ],
    )


@agent.on_task_complete("survey")
def save_survey(call: guava.Call) -> None:
    customer_name = call.get_variable("customer_name")
    original_contact_id = call.get_variable("original_contact_id")

    willing = call.get_field("willing_to_participate", "")
    if participation_recognizer.classify(willing) == "not willing to participate":
        call.hangup(
            "Respect their time and thank them for taking the call. "
            "Wish them a great day."
        )
        return

    nps_raw = call.get_field("nps_score")
    issue_resolved = call.get_field("issue_resolved", "unknown")
    feedback = call.get_field("feedback", "No additional feedback provided.")

    # Derive NPS category from score.
    try:
        nps_int = int(nps_raw) if nps_raw else 0
    except (ValueError, TypeError):
        nps_int = 0
    if nps_int >= 9:
        nps_category = "promoter"
    elif nps_int >= 7:
        nps_category = "passive"
    else:
        nps_category = "detractor"

    results = {
        "timestamp": datetime.utcnow().isoformat() + "Z",
        "agent": "Jamie",
        "organization": "Pinnacle Gear Co.",
        "use_case": "post_call_csat_survey",
        "original_contact_id": original_contact_id,
        "fields": {
            "customer_name": customer_name,
            "nps_score": nps_raw,
            "nps_category": nps_category,
            "issue_resolved": issue_resolved,
            "feedback": feedback,
        },
    }
    print(json.dumps(results, indent=2))
    logger.info("CSAT survey results captured — NPS: %s (%s).", nps_raw, nps_category)

    # Create a Connect task linked to the original support call via RelatedContactId.
    # This ties the survey results to the interaction for reporting without altering
    # the original contact's attributes.
    try:
        connect_client.start_task_contact(
            InstanceId=os.environ["CONNECT_INSTANCE_ID"],
            ContactFlowId=os.environ["CONNECT_CONTACT_FLOW_ID"],
            Name=f"CSAT Survey — {customer_name} ({nps_category})"[:512],
            Description=(
                f"Customer: {customer_name}\n"
                f"NPS Score: {nps_raw}/10 ({nps_category})\n"
                f"Issue Resolved: {issue_resolved}\n"
                f"Feedback: {feedback}"
            )[:4096],
            RelatedContactId=original_contact_id,
            References={
                "source": {"Value": "guava_csat_survey", "Type": "STRING"},
            },
            Attributes={
                "customer_name": customer_name,
                "nps_score": str(nps_raw or ""),
                "nps_category": nps_category,
                "issue_resolved": issue_resolved,
            },
        )
        logger.info("Amazon Connect CSAT task created and linked to contact %s.", original_contact_id)
    except Exception as e:
        logger.error("Failed to create Amazon Connect CSAT task: %s", e)

    call.hangup(
        "Thank the customer sincerely for their feedback and time. "
        "Let them know their input helps the team improve. Wish them a great day."
    )


if __name__ == "__main__":
    logging_utils.configure_logging()

    parser = argparse.ArgumentParser(
        description=(
            "Outbound post-call CSAT survey for Pinnacle Gear Co. "
            "Collects NPS score and feedback after a support interaction, then creates "
            "a linked Amazon Connect task tied to the original call for reporting."
        )
    )
    parser.add_argument("phone", help="Customer phone number in E.164 format (e.g. +15551234567)")
    parser.add_argument("--name", required=True, help="Full name of the customer")
    parser.add_argument(
        "--contact-id",
        required=True,
        help="Amazon Connect ContactId of the original support call to link the survey to",
    )
    args = parser.parse_args()

    logger.info(
        "Calling %s (%s) for CSAT survey — original contact: %s",
        args.name,
        args.phone,
        args.contact_id,
    )

    agent.outbound_phone(
        from_number=os.environ["GUAVA_AGENT_NUMBER"],
        to_number=args.phone,
        variables={
            "customer_name": args.name,
            "original_contact_id": args.contact_id,
        },
    ).run()
```


---

<!-- section: amazon-connect-product-support -->

import { Callout } from '../views/docs/prose';
import MermaidDiagram from '../components/MermaidDiagram';

## Product Support

This example shows how to route inbound product support calls from Amazon Connect to a Guava AI agent that can answer most questions on its own — pulling from a product FAQ — and create an Amazon Connect task when a real human needs to follow up. Unlike the AI Customer Service example, this one keeps the routing simple (no live transfer back to a queue) and focuses on two outcomes: **resolve the question on the call**, or **collect details and hand off to a specialist asynchronously**.

The Guava agent (**Jordan**) can:
- Greet the caller, take their name, and understand what they need
- Answer product, return, shipping, and warranty questions in real time using a product FAQ knowledge base
- Recognize when an issue requires human follow-up (returns, refunds, complaints, damaged items, manager requests) and collect the customer's email and order number for a specialist to reach out

### How It Works

<MermaidDiagram chart={`flowchart TD
    A([Customer calls Amazon Connect]) --> B["Amazon Connect contact flow\n(greeting, optional IVR)"]
    B -->|Transfer to GUAVA_AGENT_NUMBER| C["Jordan — Guava AI<br/>Greets caller · Takes name · Understands issue"]
    KB([Product FAQ knowledge base]) -.->|on_question| C
    C --> D{Outcome}
    D -->|Question answered| E[Wrap up call]
    D -->|Needs follow-up| F[Collect email + order number]
    F --> G[Create Connect task for specialist]
    G --> H[Promise email follow-up, end call]
`} />

### Prerequisites

- Python 3.10 or later
- A **Guava account** with an API key and a phone number — sign up at [app.goguava.ai](https://app.goguava.ai)
- An **AWS account** with an Amazon Connect instance

### Step 1: Install Guava

Choose whichever package manager you prefer:

```bash
pip install guava-sdk    # Install using pip
uv add guava-sdk         # Install using uv
poetry add guava-sdk     # Install using poetry
```

You also need `boto3` for the Amazon Connect API:

```bash
pip install boto3
```

### Step 2: Set Up Amazon Connect

#### 2a. Create or locate your Connect instance

1. Open the [Amazon Connect console](https://console.aws.amazon.com/connect/).
2. Create an instance if you don't have one, or select an existing one.
3. Note the **Instance ID** — it's the UUID at the end of the instance ARN:
   ```
   arn:aws:connect:us-east-1:123456789012:instance/xxxxxxxx-xxxx-xxxx-xxxx-xxxxxxxxxxxx
                                                   └─────────────── Instance ID ──────┘
   ```

#### 2b. Create a contact flow for escalation tasks

Jordan creates Amazon Connect tasks for cases that need specialist follow-up. Tasks need a dedicated contact flow — the default queue flow doesn't support them.

1. In your Connect instance, go to **Routing → Contact flows → Create contact flow**.
2. Name it `Guava Support Task Flow` (or similar).
3. Add a **Set working queue** block and point it to your support queue.
4. Connect it to a **Transfer to queue** block, then a **Disconnect** block.
5. **Save and publish** the flow.
6. Open the flow, click **Show additional flow information**, and copy the **Contact flow ID** (the UUID at the end of the ARN).

#### 2c. Create the contact flow that routes to Jordan

This is the contact flow your customers actually call into. It transfers them to Jordan's Guava number.

1. Go to **Routing → Contact flows → Create contact flow** (type: Inbound contact flow).
2. Name it `Product Support`.
3. Build the flow:

   ```
   Entry ──▶ Play prompt ──▶ Transfer to phone number ──▶ Disconnect
              "Thanks for              (GUAVA_AGENT_NUMBER)
              calling Pinnacle Gear.
              Please hold."
   ```

   - Add a **Play prompt** block: set the text to a brief hold message (or skip it).
   - Add a **Transfer to phone number** block:
     - Set **Phone number** to your Guava agent number (the value of `GUAVA_AGENT_NUMBER`).
     - Set **Transfer type** to `Softphone transfer` or `PSTN`.
   - Add a **Disconnect** block on the error branch.

4. **Save and publish** the flow.
5. Assign this flow to an inbound phone number: go to **Channels → Phone numbers**, select a number, and set its contact flow to `Product Support`.

<Callout>
**No live transfer queue here.** Unlike the AI Customer Service example, this example doesn't transfer escalations back to a live agent — it creates an asynchronous Connect task instead. If you'd rather offer a live transfer for escalations, see the AI Customer Service walkthrough for that pattern.
</Callout>

### Step 3: Configure AWS Credentials

```bash
export AWS_ACCESS_KEY_ID="your-access-key-id"
export AWS_SECRET_ACCESS_KEY="your-secret-access-key"
export AWS_DEFAULT_REGION="us-east-1"   # Match your Connect instance region
```

The IAM user or role needs:

```json
{
  "Version": "2012-10-17",
  "Statement": [
    {
      "Effect": "Allow",
      "Action": ["connect:StartTaskContact"],
      "Resource": "arn:aws:connect:*:*:instance/YOUR_INSTANCE_ID/*"
    }
  ]
}
```

### Step 4: Set Environment Variables

```bash
# Guava
export GUAVA_API_KEY="your-guava-api-key"
export GUAVA_AGENT_NUMBER="+15551000000"      # Your Guava phone number (Jordan's number)

# Amazon Connect
export CONNECT_INSTANCE_ID="xxxxxxxx-xxxx-xxxx-xxxx-xxxxxxxxxxxx"
export CONNECT_CONTACT_FLOW_ID="xxxxxxxx-xxxx-xxxx-xxxx-xxxxxxxxxxxx"   # Task flow from Step 2b
```

### Step 5: Run Jordan

```bash
python -m examples.integrations.ccaas.amazon_connect.product_support
```

You should see:

```
INFO:product_support:Jordan is ready — listening for inbound calls on +15551000000
```

Jordan is now live. Call your Amazon Connect number (the one you assigned the `Product Support` flow to in Step 2c) — Connect will transfer the call to Jordan automatically.

**What to expect:**
- Jordan greets the caller, takes their name, and asks what they need
- For straightforward questions ("How do I wash my jacket?", "What's your return window?", "Do you ship to Canada?"), Jordan answers from the product FAQ in real time and wraps up the call
- For requests that need a human (returns, refunds, complaints, damaged items, *"can I speak to a manager"*), Jordan collects the customer's email and order number, creates a Connect task with the issue summary, and tells the customer a specialist will email them within one business day

---

### How the Code Works

#### The product FAQ knowledge base

```python
# knowledge_base.py
PRODUCT_FAQ = """
Pinnacle Gear Co. — Product FAQ

RETURNS & REFUNDS
- We accept returns within 30 days of purchase ...

SHIPPING
- Standard shipping (5–7 business days): free on orders over $75 ...

WARRANTY
- All Pinnacle Gear products carry a 1-year limited warranty ...
...
"""
```

The knowledge base lives in a sibling `knowledge_base.py` file as a single multi-line string. Keeping it in its own module makes it easy to swap in a longer corpus, edit copy without touching the agent code, or load from a file at startup. There's no chunking or indexing required — `DocumentQA` handles all of that.

#### Wiring up the agent

```python
from knowledge_base import PRODUCT_FAQ

document_qa = DocumentQA(documents=PRODUCT_FAQ, namespace="pinnacle-gear-product-support")

agent = Agent(
    name="Jordan",
    organization="Pinnacle Gear Co.",
    purpose=(
        "to help customers with product questions, returns, shipping, "
        "and warranty inquiries"
    ),
)
```

`Agent` is the top-level handle for the AI persona. `DocumentQA` with no `store` argument runs in **server mode** — your documents are uploaded to the Guava server and searched there, so you don't need to set up GCP credentials or a vector store yourself. The `namespace` parameter scopes the upload to this agent so it doesn't collide with documents from other `DocumentQA` instances in the same account.

`DocumentQA` is content-addressed: if `PRODUCT_FAQ` hasn't changed since the last run, nothing is re-uploaded — startup is instant after the first launch.

#### Accepting inbound calls

```python
agent.inbound_phone(os.environ["GUAVA_AGENT_NUMBER"]).run()
```

`inbound_phone` opens a persistent WebSocket to the Guava server and waits for calls. Each time a call arrives on Jordan's number — whether dialed directly or transferred from the Amazon Connect contact flow — the agent's registered handlers run on a fresh `Call` object that represents that conversation.

#### Kicking off the conversation

```python
@agent.on_call_start
def on_call_start(call: guava.Call) -> None:
    call.set_task(
        "intake",
        objective="Help the customer with their Pinnacle Gear question. ...",
        checklist=[
            guava.Say("Thank you for calling Pinnacle Gear. My name is Jordan. ..."),
            guava.Field(key="customer_name", ...),
            guava.Field(key="issue_summary", ...),
        ],
    )
```

`on_call_start` runs as soon as the call connects. We use it to set the first task — a named intake step Jordan works through, greeting the caller, taking their name, and capturing what they need in their own words. The `issue_summary` field's description tells Jordan to *try to resolve the question first* using the knowledge base, and only escalate if she can't — so simple FAQ questions get answered without ever entering an escalation flow.

#### Answering questions with a knowledge base

```python
@agent.on_question
def on_question(call: guava.Call, question: str) -> str:
    """Answer product questions from the knowledge base in real time."""
    return document_qa.ask(question)
```

Whenever a caller asks something Jordan can't answer from context alone — *"What's your return policy?"*, *"Is this jacket machine washable?"*, *"Do you ship overnight?"* — Guava invokes `on_question` with the question in natural language. `DocumentQA.ask` retrieves the most relevant chunks from the FAQ and generates an accurate answer. Jordan speaks the answer back and continues the conversation without any perceivable delay.

This decorator is what gives Jordan her FAQ superpowers: she'll never make up a return policy. If the FAQ doesn't cover the question, the answer will reflect that, and the customer naturally drops into the escalation path.

#### Routing after the conversation

```python
intent_recognizer = IntentRecognizer(
    {
        "escalation_needed": "Customer needs a return, refund, exchange, or complaint resolved, wants to speak with a manager or specialist, or has a damaged or broken item",
        "resolved": "Customer's question was answered and no further action is needed",
    }
)

@agent.on_task_complete("intake")
def handle_outcome(call: guava.Call) -> None:
    issue = call.get_field("issue_summary", "")
    if intent_recognizer.classify(issue) == "escalation_needed":
        collect_escalation_details(call)
    else:
        call.hangup("Thank the customer for calling Pinnacle Gear. ...")
```

After the `intake` task finishes, the registered `@agent.on_task_complete("intake")` handler classifies the outcome using `IntentRecognizer` and routes accordingly. Using an LLM-based classifier handles natural phrasing correctly — *"the seam ripped after one trip"* maps to `escalation_needed` even without explicitly matching "broken" or "return". The recognizer is instantiated once at module level and reused across calls.

| Outcome | Example signals | Action |
|---|---|---|
| Resolved | FAQ question answered, no action needed | Wrap up and end call |
| Escalation needed | Return, refund, complaint, damaged item, manager request | Collect email + order number, create Connect task |

#### Collecting follow-up details

```python
def collect_escalation_details(call: guava.Call) -> None:
    call.set_task(
        "escalation",
        objective="Collect the customer's contact details so a specialist can follow up.",
        checklist=[
            guava.Say("I'll have a specialist follow up with you directly to take care of that."),
            guava.Field(key="email", ..., required=True),
            guava.Field(key="order_number", ..., required=False),
        ],
    )
```

If the issue requires escalation, Jordan starts a second task to collect the email and order number. The order number is `required=False` because not every issue is order-bound (warranty inquiries on long-owned products, general complaints), and the field description explicitly tells Jordan that *"if they don't have one, that's fine"* — so she doesn't get stuck pestering the customer for something that doesn't exist.

#### Creating a Connect task for follow-up

```python
@agent.on_task_complete("escalation")
def create_support_task(call: guava.Call) -> None:
    ...
    connect_client.start_task_contact(
        InstanceId=os.environ["CONNECT_INSTANCE_ID"],
        ContactFlowId=os.environ["CONNECT_CONTACT_FLOW_ID"],
        Name=f"Support Escalation — {call.get_field('customer_name', 'Customer')}"[:512],
        Description=f"Customer: ...\nEmail: ...\nOrder: ...\nIssue: ..."[:4096],
        Attributes={
            "customer_name": call.get_field("customer_name", ""),
            "email": call.get_field("email", ""),
            "order_number": call.get_field("order_number", ""),
        },
    )
    call.hangup("Let the customer know a specialist will reach out by email ...")
```

Once the escalation task completes, the `@agent.on_task_complete("escalation")` handler creates a task in Amazon Connect via `StartTaskContact`. The task's `Description` carries the full issue summary, and its `Attributes` make the customer's name, email, and order number searchable in Connect's contact search — so support agents can pick up the work in the Contact Control Panel just like any other contact, with full context.

The handler also prints the captured fields as JSON for local debugging and ends the call with a promise of email follow-up within one business day.

---

### Customization Ideas

**Use your own product documentation**
Replace `PRODUCT_FAQ` with your real product manuals, policy pages, or help center articles. `DocumentQA` handles chunking and retrieval automatically — paste in as much text as you need, or load from files at startup:
```python
faq_text = pathlib.Path("docs/product_faq.md").read_text()
document_qa = DocumentQA(documents=faq_text, namespace="my-product-faq")
```

**Combine with a live-transfer escalation path**
This example only creates async tasks. If some escalations need a live agent immediately (high-value customers, urgent complaints), add a third intent class — e.g. `live_agent` — and use `call.transfer(...)` to send those calls back to a Connect queue, like the AI Customer Service example does.

**Look up customer info before answering**
If you can identify the caller from their phone number (CRM lookup), pass their order history into the call as variables and reference it from `on_call_start`. Jordan can then say *"I see your recent order shipped on Tuesday"* without the customer needing to provide an order number.

**Add real-time inventory or order lookups**
The `@agent.on_question` decorator can call any code, not just `DocumentQA`. Inspect the question, route product-availability questions to your inventory API, route order-status questions to your OMS, and fall back to the FAQ for everything else.

**Pass context from Connect to Jordan via SIP**
For more advanced setups, Amazon Connect can transfer calls over a SIP trunk to a Guava SIP endpoint. This lets Connect pass the original Contact ID and other attributes as SIP headers, which the agent can read from the call info — and you can link the resulting escalation task back to the original call using `RelatedContactId` for full call chain reporting (see the CSAT Survey example for the same `RelatedContactId` pattern).

---

### Complete Example

#### `__main__.py`

```python
import guava
import os
import sys
import logging
import json
import pathlib
import boto3
from datetime import datetime

from guava import Agent, logging_utils
from guava.helpers.openai import IntentRecognizer
from guava.helpers.rag import DocumentQA

logger = logging.getLogger("product_support")

# Load the product FAQ from the sibling knowledge_base module.
sys.path.insert(0, str(pathlib.Path(__file__).parent))
from knowledge_base import PRODUCT_FAQ

# Initialize DocumentQA in server mode — no GCP credentials needed.
# Documents are content-addressed: unchanged FAQ text is never re-uploaded.
document_qa = DocumentQA(documents=PRODUCT_FAQ, namespace="pinnacle-gear-product-support")

connect_client = boto3.client("connect")

intent_recognizer = IntentRecognizer(
    {
        "escalation_needed": "Customer needs a return, refund, exchange, or complaint resolved, wants to speak with a manager or specialist, or has a damaged or broken item",
        "resolved": "Customer's question was answered and no further action is needed",
    }
)

agent = Agent(
    name="Jordan",
    organization="Pinnacle Gear Co.",
    purpose=(
        "to help customers with product questions, returns, shipping, "
        "and warranty inquiries"
    ),
)


@agent.on_call_start
def on_call_start(call: guava.Call) -> None:
    call.set_task(
        "intake",
        objective=(
            "Help the customer with their Pinnacle Gear question. Use the knowledge base "
            "to answer product questions accurately. If the customer needs a return, refund, "
            "or to speak with a specialist, collect their details for follow-up."
        ),
        checklist=[
            guava.Say(
                "Thank you for calling Pinnacle Gear. My name is Jordan. "
                "I can help with product questions, returns, shipping, and warranty. "
                "How can I help you today?"
            ),
            guava.Field(
                key="customer_name",
                description="Ask for the customer's name.",
                field_type="text",
                required=True,
            ),
            guava.Field(
                key="issue_summary",
                description=(
                    "Understand what the customer needs. Answer their question if you can "
                    "using the knowledge base. If you can't resolve it — return request, "
                    "refund, complaint, or request to speak with a specialist — note what "
                    "they need in detail."
                ),
                field_type="text",
                required=True,
            ),
        ],
    )


@agent.on_question
def on_question(call: guava.Call, question: str) -> str:
    """Answer product questions from the knowledge base in real time."""
    return document_qa.ask(question)


@agent.on_task_complete("intake")
def handle_outcome(call: guava.Call) -> None:
    issue = call.get_field("issue_summary", "")
    if intent_recognizer.classify(issue) == "escalation_needed":
        collect_escalation_details(call)
    else:
        call.hangup(
            "Thank the customer for calling Pinnacle Gear. Ask if there's anything "
            "else you can help with. If not, wish them a great day."
        )


def collect_escalation_details(call: guava.Call) -> None:
    call.set_task(
        "escalation",
        objective="Collect the customer's contact details so a specialist can follow up.",
        checklist=[
            guava.Say(
                "I'll have a specialist follow up with you directly to take care of that."
            ),
            guava.Field(
                key="email",
                description="Ask for the customer's email address.",
                field_type="text",
                required=True,
            ),
            guava.Field(
                key="order_number",
                description=(
                    "Ask for their order number if relevant to the issue. "
                    "If they don't have one, that's fine."
                ),
                field_type="text",
                required=False,
            ),
        ],
    )


@agent.on_task_complete("escalation")
def create_support_task(call: guava.Call) -> None:
    results = {
        "timestamp": datetime.utcnow().isoformat() + "Z",
        "agent": "Jordan",
        "organization": "Pinnacle Gear Co.",
        "use_case": "inbound_product_support",
        "fields": {
            "customer_name": call.get_field("customer_name"),
            "issue_summary": call.get_field("issue_summary"),
            "email": call.get_field("email"),
            "order_number": call.get_field("order_number"),
        },
    }
    print(json.dumps(results, indent=2))
    logger.info("Escalation details captured.")

    try:
        connect_client.start_task_contact(
            InstanceId=os.environ["CONNECT_INSTANCE_ID"],
            ContactFlowId=os.environ["CONNECT_CONTACT_FLOW_ID"],
            Name=f"Support Escalation — {call.get_field('customer_name', 'Customer')}"[:512],
            Description=(
                f"Customer: {call.get_field('customer_name')}\n"
                f"Email: {call.get_field('email')}\n"
                f"Order: {call.get_field('order_number', 'N/A')}\n"
                f"Issue: {call.get_field('issue_summary')}"
            )[:4096],
            References={
                "source": {"Value": "guava_product_support", "Type": "STRING"},
            },
            Attributes={
                "customer_name": call.get_field("customer_name", ""),
                "email": call.get_field("email", ""),
                "order_number": call.get_field("order_number", ""),
            },
        )
        logger.info("Amazon Connect support task created successfully.")
    except Exception as e:
        logger.error("Failed to create Amazon Connect task: %s", e)

    call.hangup(
        "Let the customer know a specialist will reach out by email within one business "
        "day. Thank them for their patience and wish them a great day."
    )


if __name__ == "__main__":
    logging_utils.configure_logging()
    agent.inbound_phone(os.environ["GUAVA_AGENT_NUMBER"]).run()
```

#### `knowledge_base.py`

This file contains the product FAQ document imported by the main script.

```python
PRODUCT_FAQ = """
Pinnacle Gear Co. — Product FAQ

RETURNS & REFUNDS
- We accept returns within 30 days of purchase for unused items in original packaging.
- Items showing signs of use may be returned for store credit only, at our discretion.
- To start a return, visit pinnaclegear.com/returns or call our support line.
- Refunds are processed within 5–7 business days after we receive the returned item.
- Sale items are final sale and cannot be returned or exchanged.
- Gift recipients can exchange items for equal or lesser value without a receipt.

SHIPPING
- Standard shipping (5–7 business days): free on orders over $75, otherwise $7.99.
- Expedited shipping (2–3 business days): $14.99 flat rate.
- Overnight shipping (next business day): $29.99. Orders placed before 2 PM ET ship same day.
- We ship to all 50 US states and Canada. International shipping is not yet available.
- Orders placed before 2 PM ET on business days ship the same day.

WARRANTY
- All Pinnacle Gear products carry a 1-year limited warranty against manufacturing defects.
- Our Summit Series backpacks and Trail Pro footwear carry a lifetime warranty.
- Warranty claims require proof of purchase. Contact support@pinnaclegear.com to file a claim.
- Normal wear and tear, damage from misuse, or accidental damage are not covered under warranty.

SIZING
- Apparel follows standard US sizing. See our full size guide at pinnaclegear.com/size-guide.
- Footwear runs true to size. For wide feet, we recommend sizing up by half a size.
- Backpack sizing is based on torso length, not height. Measure from your C7 vertebra to your iliac crest.
- When between sizes in apparel, size up for layering and size down for a fitted athletic look.

PRODUCT CARE
- Most Pinnacle apparel is machine washable on cold, gentle cycle. Tumble dry on low heat.
- Do not use fabric softener on moisture-wicking or DWR-coated items — it reduces performance.
- Down insulation should be washed on a delicate cycle and dried on low heat with clean tennis balls.
- Re-apply DWR water repellent treatment (such as Nikwax TX.Direct) after 10–15 wash cycles.
- Store sleeping bags loosely in a large cotton storage sack — never compressed for long periods.
- Clean tents with mild soap and cool water. Never machine wash or put a tent in the dryer.

ORDERS & ACCOUNT
- Track your order at pinnaclegear.com/track using your order number and the email on the order.
- To modify or cancel an order, contact us within 1 hour of placing it. After that, it may have shipped.
- We accept Visa, Mastercard, American Express, Discover, PayPal, and Pinnacle gift cards.
- Pinnacle Rewards members earn 1 point per dollar spent. 100 points = $5 reward credit.
- To create an account or reset your password, visit pinnaclegear.com/account.
"""
```


---

<!-- section: release-notes -->

## Release Notes

<p style={{ fontSize: '1.35rem', fontStyle: 'italic' }}>What's new in Guava.</p>

---


## May 5, 2026

## Headline / Summary

The Guava Agent API gains direct voice configuration, DTMF event support, and call ID access. Campaigns now support custom caller IDs for pre-approved accounts.

## New Features

**Guava Agent API**
- Added `voice` parameter to the Agent class — voice can now be set directly on the agent.
- Exposed `call.id` for use in agent code.
- Added support for DTMF events.

**Campaigns**
- Pre-approved accounts can set their own number as the caller ID for outbound calls.

**CLI**
- `guava deploy` can now use `.env` files to mount secrets.
- One login can now access multiple orgs.

## Improvements

- Increased robustness of ASR background noise rejection and short utterance handling.
- Various ease-of-use updates to Guava CLI.

---

## April 29, 2026

The **public SIP gateway** is live. Guava agents can receive and place calls over SIP.

**Voicemail detection** for Guava agents is configurable and testable. *Outbound agents, of course!*

**WebRTC** is supported in the **Guava CLI**

**Agent / Call API** receives **expanded and refined capabilities**, including:
- **escalation support**: the supervisor can escalate calls
- simpler **language mode** setting for agents

**Campaigns API** has streamlined **outbound campaign creation and modification**

**one-time passwords (OTPs)** replace magic links for login/authentication.

---
